Building a Basic Demo Project Application Using Oracle Application Express 5.0 (v2.0.5)
1. Overview
Purpose
This tutorial for Oracle® Application Express release 5.0 (Application Express) demonstrates how to build a working application for managing projects and tasks using some of the latest features of Application Express 5.0. This exercise assumes no prior knowledge of Application Express.
This lab can also be utilized for migrating your application development from one environment to another, such as from on-premise to the cloud.
Workshop Scenario
Your team tracks projects you are currently working on. Rather than using a spreadsheet or some commercial project tracking tool you have been tasked with building a Web application so that the team has a custom application that meets everyone's requirements. The DBA has created a script which creates various tables and populates them with the current data.
Optionally, part way through the development of this application you decide to move your development to the Oracle Database Cloud Service. In this way you can continue developing the application from anywhere, rather than only when you are in the office.
In this first workshop you quickly build a simple application that allows everyone to maintian the data. In the second workshop you will greatly improve the application and utilize a number of advanced techniques to make a very polished application.
The second workshop can be downloaded here.
Time to Complete
Approximately 3 - 4 hours
Introduction
Application Express is a rapid web application development tool for the Oracle Database. Using only a web browser and limited programming experience, you can develop and deploy professional applications that are both fast and secure. Application Express is a fully supported, no cost option of the Oracle Database.
In this tutorial, you use Application Express to build a fully functioning database application to maintain team members and their tasks. Tasks may be assigned to milestones and are associated with a specific project.
Prerequisites
To run this tutorial, you need:
- Access to an Oracle Application Express 5.0.1 (or later) environment, such as an account on apex.oracle.com, or the Oracle Database Cloud Service, or a local installation of Oracle Database 11g or 12c with Application Express installed.
- An Application Express workspace and a development user.
- The apex-basic-demo-projects-2848024.zip file extracted into your working directory.
2. Loading the Tables and Data
In this topic, you create the required database objects, and populate the tables with sample data. It is essential to have at least the tables defined in order for the Create Application wizard to generate pages in your application.
-
Sign in to your Application Express development environment.
-
Application Express includes the SQL Workshop for application developers to maintain database objects, from the browser. This feature is particularly important when developing in hosted environments, or where the application developer does not have access to the underlying database, and can not use tools such as SQL Developer or SQL*Plus to manage the database objects.
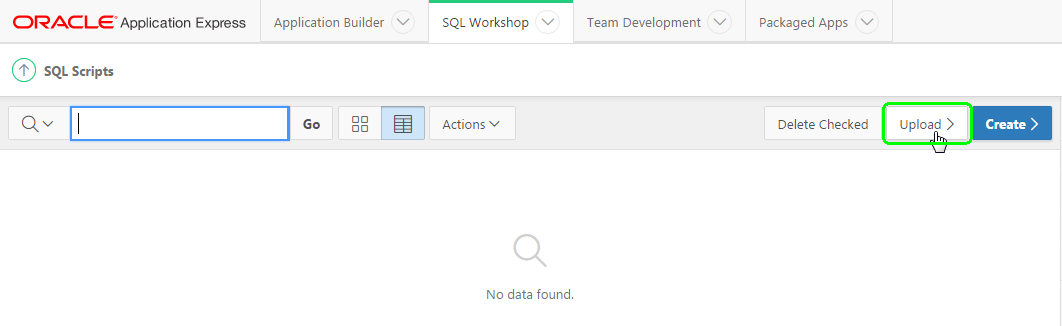
Use SQL Workshop to upload a script that creates the tables for the Demo Projects application.
Click SQL Workshop and select SQL Scripts.

Click Upload.
Click Choose File, open the working directory where you extracted
apex-basic-demo-projects-2848024.zip, open thefilesfolder.
Locate the Demo_Project_Basic_Tables.sql file, and double-click the file or click the file and then click Open.
Click Upload.
-
Review the uploaded script to see what tables will be created.
In the SQL Scripts list, click the Edit icon (pencil), to the left of the script you just uploaded.

The script file creates the following database objects:
- DEMO_TEAM_MEMBERS - Stores the details for the users of the application including a photo.
Includes:- Primary Key - ID
- Unique Key - USERNAME
- Before Insert or Update Trigger - Populates ID with Globally Unique Identifier (GUID); Populates audit columns; Sets USERNAME to uppercase
- DEMO_PROJECTS - Stores the details for the projects, including the lead, status and completed date.
Includes:- Primary Key - ID
- Unique Key - NAME
- Foreign Key - PROJECT_LEAD must match an ID in DEMO_TEAM_MEMBERS
- Index - PROJECT_LEAD to improve query performance on the foreign key column
- Before Insert or Update Trigger - Populates ID with GUID; Populates audit columns
- DEMO_MILESTONES - A child table under projects for milestones, including the due date.
Includes:- Primary Key - ID
- Foreign Key - PROJECT_ID must match an ID in DEMO_PROJECTS
- Index - PROJECT_ID to improve query performance on the foreign key column
- Before Insert or Update Trigger - Populates ID with GUID; Populates audit columns
- DEMO_TASKS - A child table under projects for tasks, optionally for a given milestone, and including an assignee and dates.
Includes:- Primary Key - ID
- Foreign Key - ASSIGNEE must match an ID in DEMO_TEAM_MEMBERS
- Foreign Key - PROJECT_ID must match an ID in DEMO_PROJECTS
- Foreign Key - MILESTONE_ID must match an ID in DEMO_MILESTONES
- Indexes - ASSIGNEE, PROJECT_ID, MILESTONE_ID to improve query performance on the foreign key columns
- Before Insert or Update Trigger - Populates ID with GUID; Populates audit columns

- DEMO_TEAM_MEMBERS - Stores the details for the users of the application including a photo.
-
Click the Run icon to the right of the script you uploaded.

Click Run In Background.
-
Click the View Results icon for the script you just ran.

At the bottom of the results page you should see "22" Statements Processed, "22" Successful, and "0" With Errors.
-
Currently the tables you created do not have any data. A script has been provided that creates an Oracle database package which can be run at any time to insert or reset the data in the tables.
Use SQL Workshop to upload a script that can be used to populate table data.
Click SQL Scripts.
Click Upload.
Click Choose File, where you extracted
apex-basic-demo-projects-2848024.zip, open thefilesfolder.
Locate the Demo_Project_Basic_Data.sql file, and double-click the file or click the file and then click Open.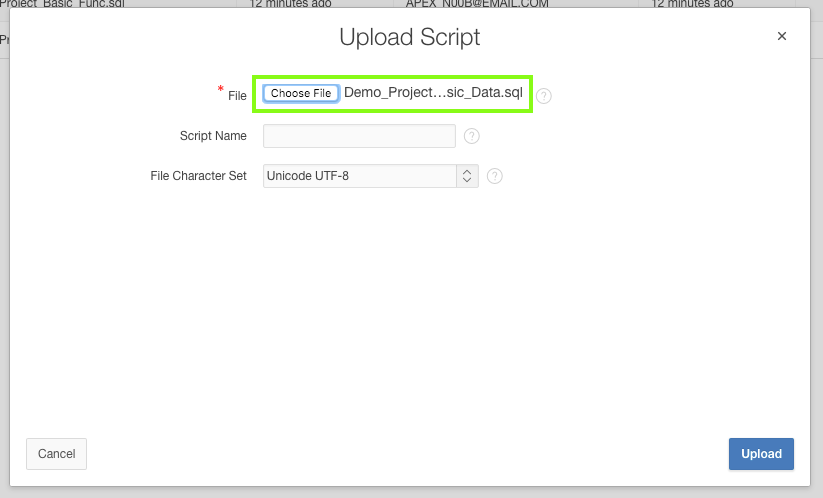
Click Upload.
-
Click the Run icon to the right of the script you uploaded (top row).
Click Run In Background.
-
Click the View Results icon for the script you just ran (top row).
At the bottom of the results page you should see "2" Statements Processed, "2" Successful, and "0" With Errors.
-
In the previous steps you uploaded a package called DEMO_PROJECTS_DATA_PKG. However, this package hasn't yet been run so the tables you created still don't have any data. The SQL Commands facility, within SQL Workshop, allows a developer to run any valid SQL commands. You will run a SQL command to execute the data package and populate the tables.
Use SQL Commands to execute n Oracle Database package.
Click the Up arrow ( ↑ ) , before SQL Scripts.

Click SQL Commands.

Enter the following code:
                    begin

                      demo_projects_data_pkg.load_sample_data;

                    end;
Click Run.
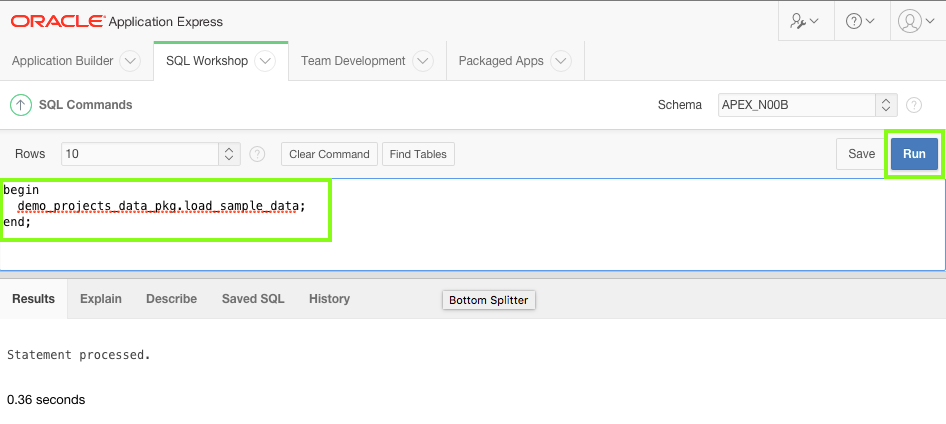
The Results will show:
Statement Processed. -
Use the Object Browser within SQL Workshop to review all of the database objects, such as the tables and packages you created, available in the underlying Oracle database schema which is associated with the Application Express workspace you logged into.
At the top of the page, select SQL Workshop and then select Object Browser.
In Object Browser, select the DEMO_TEAM_MEMBERS table, then click on the Data tab.Note: There are a number of other tables listed, outside of those you created using the script file above. The APEX$ tables are created by Application Express to store internal data specific to your workspace. Tables such as DEMO_CUSTOMERS were created when the Sample Database Appliction was installed. The Sample Database Application is installed by default when an Application Express Workspace is created.

To review the package you created, select Packages and select DEMO_PROJECTS_DATA_PKG.
Click Body to review the primary PL/SQL rather than the specification.
Note: This package includes complex PL/SQL code to insert images and replicate users entering in records. It is not important that you understand the PL/SQL code in this package, as you will not normally have to populate data in this matter. Generally, you would create the tables with no data and then use the application you build to insert the records.
3. Creating the Initial Application
In this topic, you create the initial application using the Create Application wizard to define multiple pages.
Now that you have created the underlying tables, you are ready to create a desktop application.
You will be adding reports and forms for the tables you created.
Generally, when developing an application you will not know all of the pages required at the beginning, so will only generate a select number of pages initially, and then use the
-
Click Application Builder and select Create.

Click Desktop.
Note: Desktop is selected by default.
In Name, enter
Demo Projectsand click Next.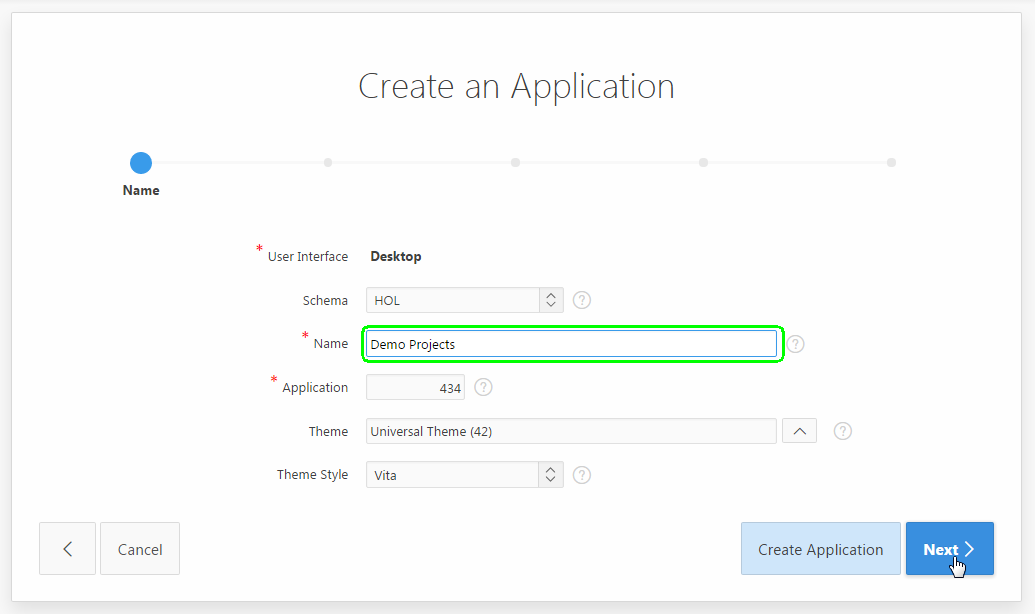
The Create Application Wizard creates a Home page automatically.
- Next add pages for the following tables:
- DEMO_TEAM_MEMBER
- DEMO_PROJECTS
- DEMO_MILESTONES
- DEMO_TASKS
Any number of pages can be added into the initial application by simply clicking Add Page, and then selecting the appropriate details. Once the page(s) have been added, certain attributes, such as names, labels, and sequence, can be updated by clicking on the edit icon for that page.
Individual pages can also be removed from the list by selecting the X to the right of each page.- Add the DEMO_TEAM_MEMBERS report and form pages.
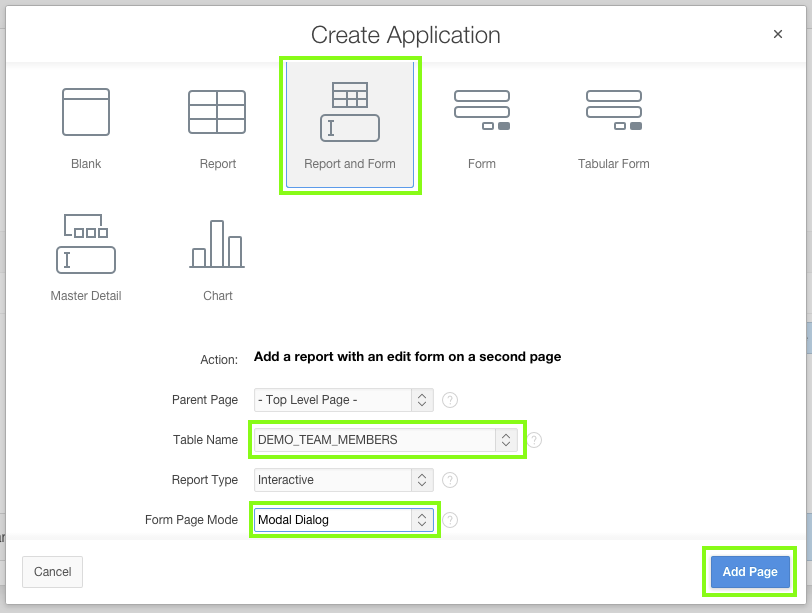
Click Add Page.Add a report and form:
- Select Page Type - select Report and Form
- Table Name - select DEMO_TEAM_MEMBERS
- Form Page Mode - select Modal Dialog
Note: If you are running Application Express on a smaller browser, you may need to scroll down within the dialog pages to see all of the items, such as Form Page Mode.
Click Add Page. - Add the DEMO_PROJECTS report and form pages.
Click Add Page.Add a report and form:
- Select Page Type - select Report and Form
- Table Name - select DEMO_PROJECTS
- Form Page Mode - select Modal Dialog
Click Add Page. - Add the DEMO_MILESTONES form page.
Click Add Page.Add a report and form:
- Select Page Type - select Report and Form
- Table Name - select DEMO_MILESTONES
- Form Page Mode - select Modal Dialog
Click Add Page. - Add the DEMO_TASKS form page.
Click Add Page.Add a report and form:
- Select Page Type - select Report and Form
- Table Name - select DEMO_TASKS Note: The form page mode for DEMO_TASKS should be generated as a normal page rather than a modal dialog.
Click Add Page.

Verify that your screen matches the next illustration. Click Create Application.
Warning: You must create these pages in the order shown to ensure that they correspond with instructions later in this tutorial.
If your screen does not look the same as the illustration below, use the X icon to the right of each page to delete problem pages and restart Step 2. Do not delete the Home page.
Click Create Application on the confirmation page.
-
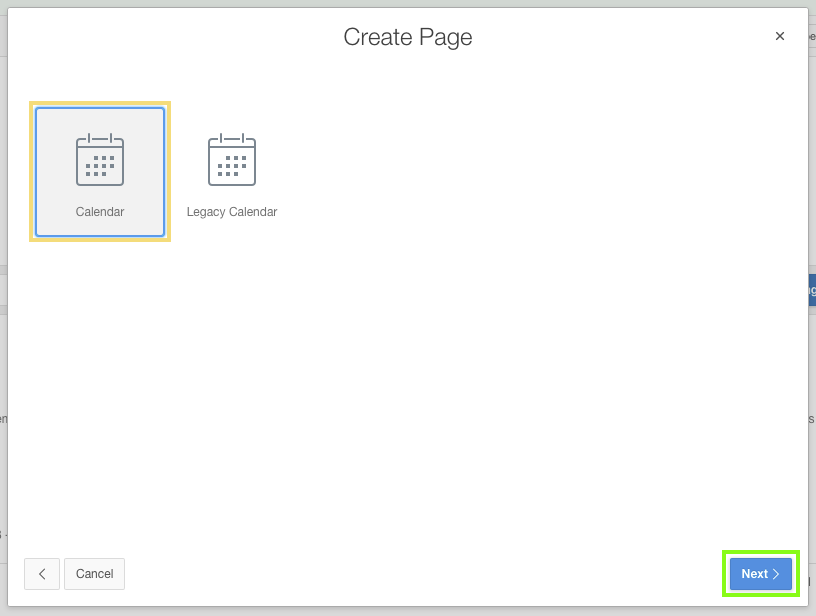
Not all page types, such as calendars, can be created using the Create Application wizard. Therefore, to add a calendar you need to utilize the Create Page wizard
Click Create Page.

For Select Page Type, select Calendar.

Verify the default selection is Calendar and click Next.
The Page and Region Attributes page appears.
For Page Name, enter
Calendar. For Breadcrumb, select Breadcrumb.
Click Next.
Note: The Region Name and Breadcrumb - Entry Name both change to the value entered into the Page Name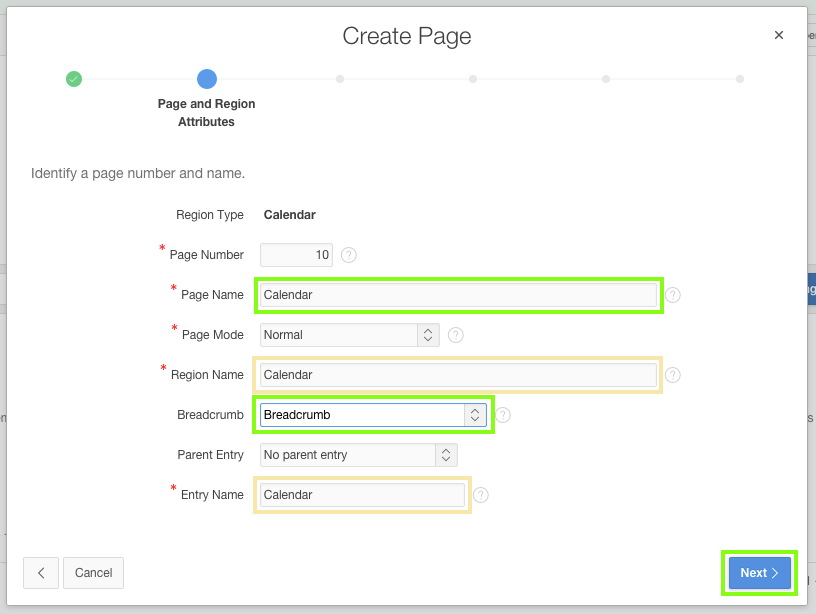
For Navigation Preference, select Create a new navigation menu entry.
Click Next.
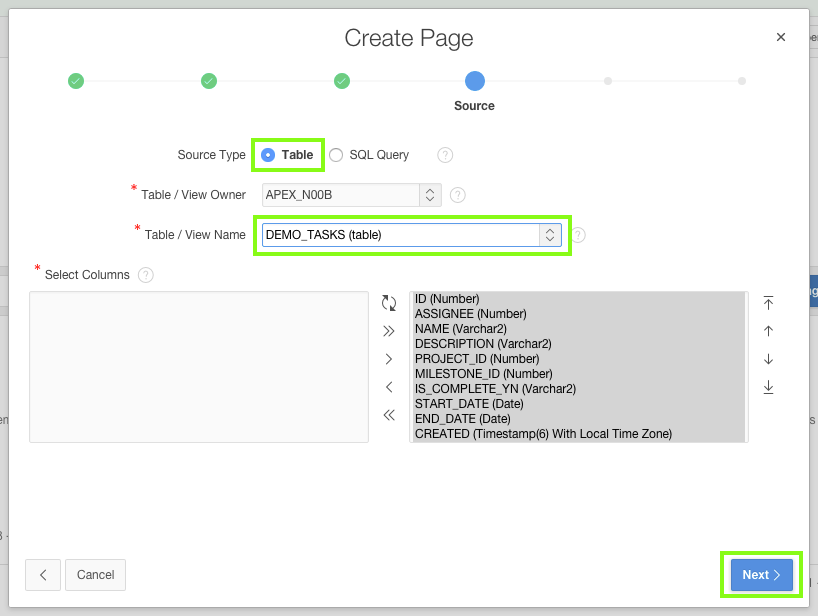
For Source Type, select Table. For Table / View Name, select DEMO_TASKS (table).
Click Next.
For Display Column, select NAME. For End Date Column, select END_DATE. For Add Create Page, select No. For Add Edit Page, select No.
Click Next.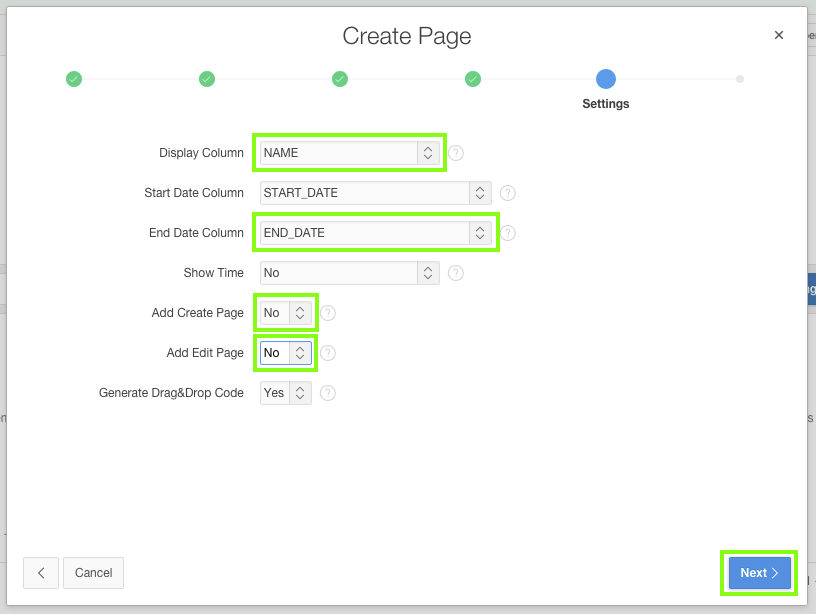
For Primary Key Type, leave the selection as Managed by Database (ROWID), and click Next.
On the confirmation page, click Create.
Once you have completed the Create Page wizard, instead of being on the application home page, you are returned to Page Designer for the page that was just created. Page Designer is a comprehensive integrated development environment (IDE) for managing all aspects of the currently selected page.
In the next topic Page Designer will be covered in detail. -
By running the application you can see what the generated pages look like.
Click Save and Run on the toolbar (next to the Save button).

The application login page is displayed, as you have not logged into the runtime environment previously.
Note: When you run the application from the Application Express Builder, the runtime environment is opened in a new tab or a new window. Whether it is opened in a tab or window is dependent on the browser and the preferences defined.Enter your username and password credentials that you use to log into the Application Builder.
Click Log In.
Click on the menu options and naviagate around the various reports and forms.
In this topic you used wizards to generate multiple pages. However, this is just the start of your application development, and the generated pages still need more work for your application to be ready for production.
4. Updating the Home Page
In this topic, you create a dashboard by adding new components to the Home page of the application.
Note: If you have not completed the previous topic, import the Basic Projects App Export - Topic 3.sql file into your workspace to continue working from this topic forward. You can find the export file in the /files subdirectory where you unzipped the original file. See Appendix A - Importing an Application.
-
In the previous topic you finished by running the application. Given that you ran the application from the Application Builder, there is a Developer Toolbar at the bottom of the screen. This toolbar allows developers to quickly navigate between runtime and various sections within the Application Builder. The Developer Toolbar also allows developers to initiate and view runtime debugging, show the HTML grid, and run the Theme Roller.
Navigate to the Home page in the runtime application.
Note: If you are not on the Home page then the Developer Toolbar will show the current page number, and clicking on Edit Page xx will navigate to that page, instead of Page 1.
In the Developer Toolbar, click Edit Page 1.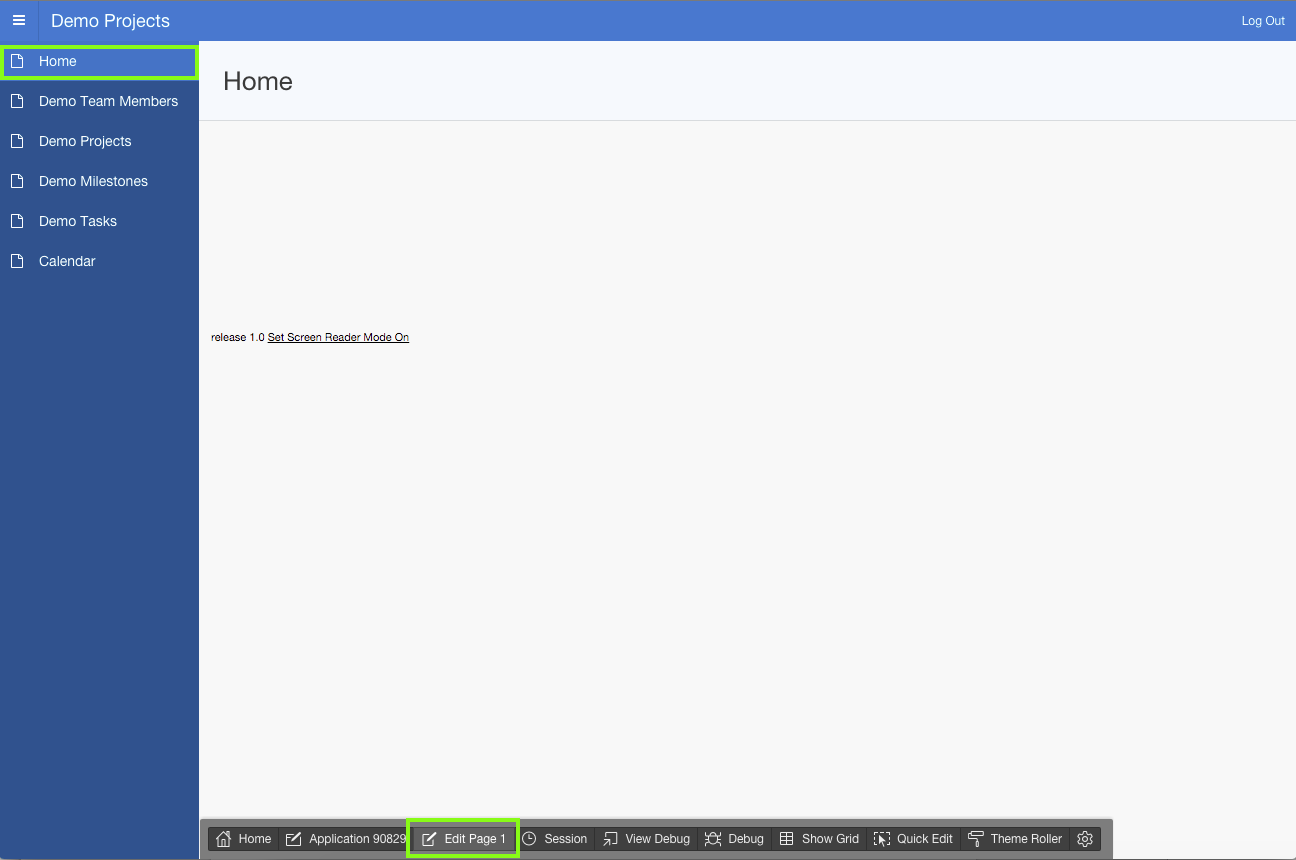
The Page Designer is displayed for Page 1.
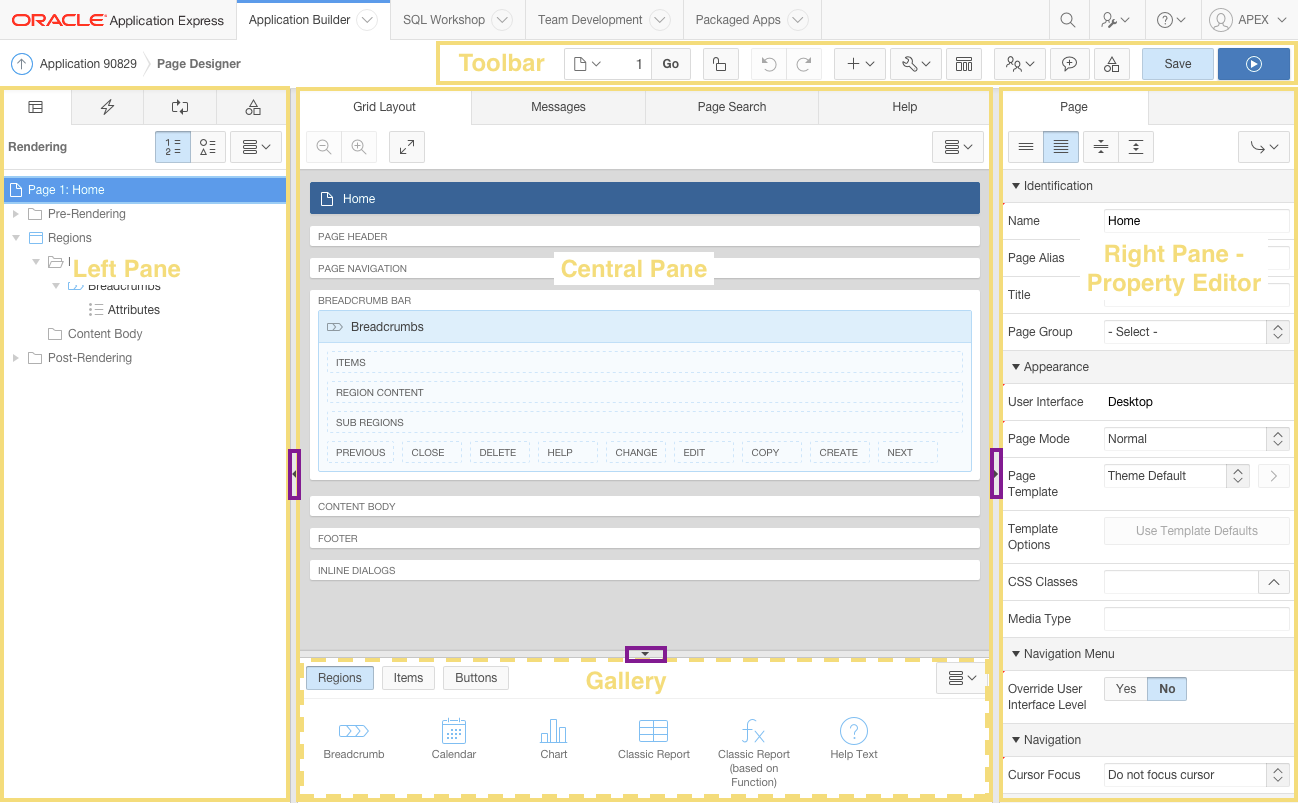
About Page Designer
The Page Designer is a powerful IDE that includes a toolbar and multiple panes, used to maintain and enhance pages withiin Oracle Application Express applications.
The toolbar across the top of the page has a number of capabilities:- Page Selector - Displays the current page. You can enter a page number directly, or click on the popup list of values to select a page.
- Page Lock - Indicates if the page is unlocked (clear), locked by you (green), or locked by another developer (red). By clicking on this icon you can lock or unlock the page, providing it is not locked by another developer.
- Undo Changes - Click to undo the previous update you made within Page Designer.
- Redo Changes - Click to reapply the last update that was undone using Undo Changes.
- Create - Create new pages, regions, shared components, developer comments and team development entries.
- Utilities - Perform a check, delete, export, or review the history for the current page. You can also access the attribute dictionary, application utilities or upgrade the application.
- Component View - Switch to the Component View for the current page.
- Team Development - Show the Features, ToDos, Bugs and Feedback entries for this page. You can also drill into filtered reports for each entry type.
- Developer Comments - Drill into the developer comments entered for the current page. You can also create new comments or delete comments from the modal window that is displayed.
- Shared Components - Navigate to the Shared Components page.
- Save - Save all changes you have made on the current page.
- Save and Run Page - Save all changes and then run the current page. Note: You will not be able to run modal and non-modal pages directly using Save and Run Page. Instead you will need to navigate to a normal page and run the page from there and then navigate within the running application to the modal or non-modal page.
Of these capabilities you will most often use Page Selector, Undo Changes, Shared Components, Save, and Save and Run Page.
There are three main panes within Page Designer:- Left Pane - Includes tabs for Rendering, Dynamic Actions, Processing, and Shared Components. Each tab displays a list of the corresponding component types and components created on the current page.
Right-click to access context sensitive menus. You can also drag components up and down within the trees to change the position or sequence of the selected component. - Central Pane - Includes tabs for Grid Layout, Messages, Page Search, and Help.
Grid Layout shows a visual representation of the page. You can add new components to a page by dragging them from the Gallery pane, at the bottom, and dropping them in Grid Layout.
Messages displays current errors and warnings. Clicking on a message changes the focus within Property Editor to the corresponding attribute associated with the error or warning.
Page Search enables you to search for any text within the current page.
Help displays attribute specific help. Click on the attribute name within Property Editor to see information and examples for that attribute. - Right Pane - Displays the Property Editor. Use the Property Editor to update attributes for the selected component(s).
When you select multiple components the Property Editor only displays common attributes. Updating a common attribute will update that attribute for all of the selected components.
You can change the size of each pane by selecting the dividers and sliding them left or right. Change the size of Grid Layout and Gallery by sliding the divider between them up and down.
You can access this information from the Application Builder.
In Page Designer, click Help, shown as a question mark on the toolbar, and then select Getting Started in Page Designer.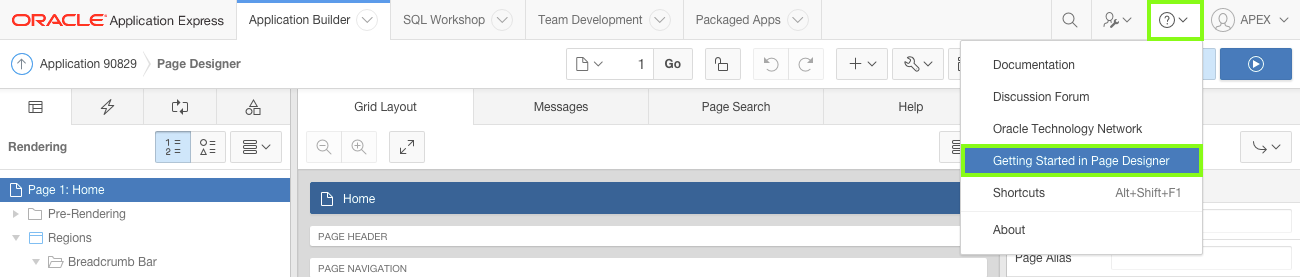
Within most panes there are also a number of useful icons, generally for manipulating the content displayed in that pane.
Of these, the icons within the Property Editor (right pane), will generally be utilized most often.
The Property Editor Icons include:
- Show Common - Only the most used attributes, and non-common attributes that have non-default values, are displayed.
- Show All - Displays all attributes.
- Collapse All - Collapses all groups.
- Expand All - Expands all groups.
- Go to Group - Navigate to, and expand if necessary, the selected group.
You should try utilizing these icons in different scenarios, to determine the most effective and productive way to update attributes.
Note: If you are having issues finding a specific attribute, click Ctrl + F to search the page for the required attribute name.
Page Designer also provides a number of keyboard shortcuts that can improve developer productivity.
Click Alt + Shift + F1, or click Help on the toolbar, and then select Shortcuts.
For example, using Go to Rendering (Alt + 1 on Windows / Option + 1 on Mac) and Go to Property Editor (Alt + 6 on Windows / Option + 6 on Mac) are useful for navigating between different page componnents, such as regions or items, and then updating attributes using only the keyboard, rather than having to move the mouse left to right and right to left continually.
-
Page Designer includes the Grid Layout in the cenral pane. The Grid Layout is a representation of how the components will be positioned on the page. Existing regions, items, and buttons can be moved relative to other components by simply clicking on the component and dragging it to a new location. For example, items can be placed next to each other by dragging the second item to the end of the first item, and dropping it in the yellow box that appears when you hover in the desired location. New components can quickly be added to an existing page by dragging the component from the Gallery up to the desired position within the Grid Layout.
Add a bar chart using drag and drop, that shows projects with the number of tasks.
In the Gallery (directly below the Grid Layout), click Regions, and locate Chart.
Click and hold Chart and drag it to the Content Body region. It should appear as a darkened tile before you drop it into place.
Note: When you drag the region up, and hover over the small yellow section, below Content Body, the yellow section will expand. A darker yellow section, with a black box around it, will indicate where the region will be placed.
-
When you first create a region, it is created with default properties, such as a Title of
New.Use the Property Editor to edit attributes for the currently selected component.
In the Property Editor, under Identification, for Title - enterProject Tasks.Note: The region name in the Rendering tree (left pane) and the Grid Layout (central pane) are updated to reflect the new title, as soon as you navigate out of the Title attribute in the Property Editor.
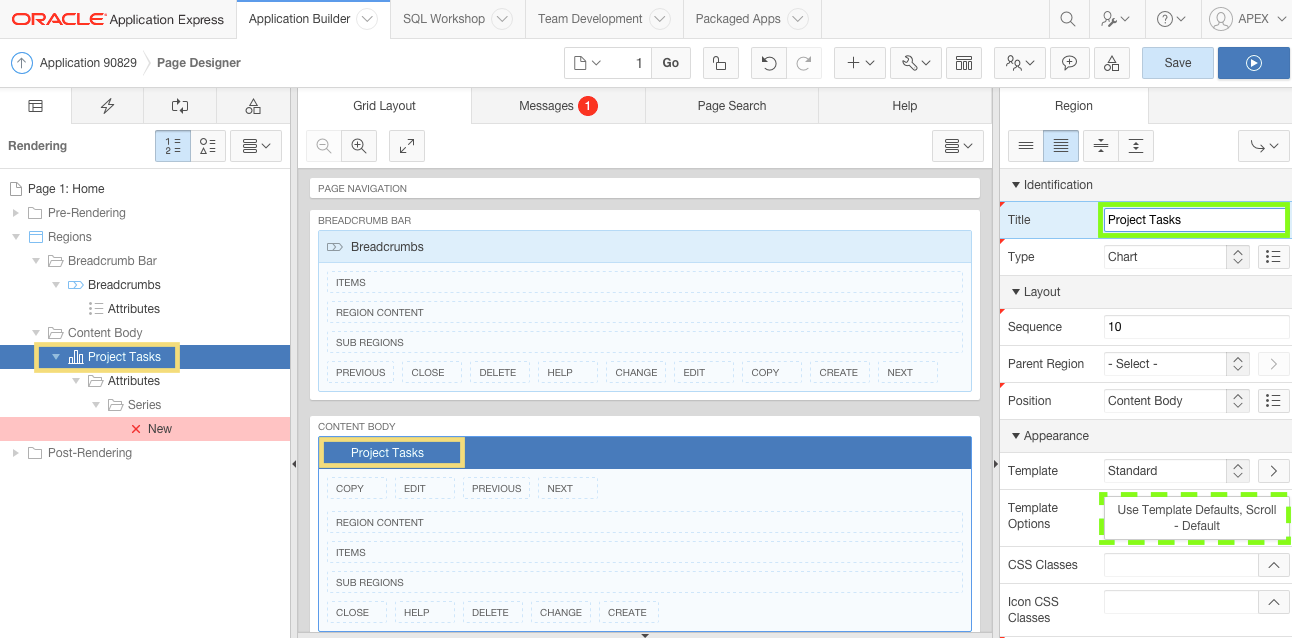
Locate Template Options and click Use Template Defaults, Scroll - Default.
For Body Height select 480px
Click OK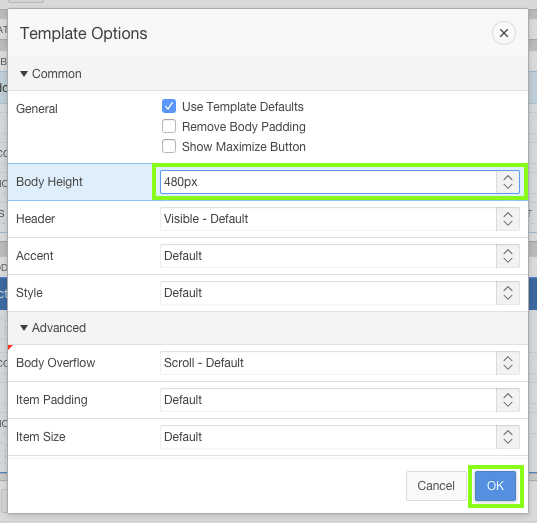
Above you modified the properties for a region, such as the Title and Template Options. For certain region types, such as Charts, there are also Attribute properties. The region properties determine how the region is displayed, whereas, the Attributes for a region (where available) are used to define the characteristics of the region, and how the contents of the region are displayed.
Locate the Rendering tree. Under the Project Tasks region, click Attributes.
In the Property Editor:- Chart: Type - select Stacked Bar Chart
- Title: Title - clear the current value
- Appearance: Show Grid - select Both
- Layout: Height - enter
480 - Y Axis: Title - enter
Tasks - Legend: Show - select Float
Note: Attributes within the Property Editor are organized into groups. The Property Editor bulleted lists specify Group: Attribute - Action to make it easier for you to locate the given attribute.


When you select an attribute, within the Property Editor, the Help tab in the central pane displays help text regarding the selected attribute. Viewing help is especially useful when entering SQL Source, as it often provides example SQL. This pane will not show any information if an attribute is not selected.
Click Help in the central pane.

The DEMO_TASKS table includes a column called IS_COMPLETE_YN. This column is populated by users to indicate that a task is complete.
Next, enter chart series details for completed and incomplete tasks within a project.
In the Rendering tree, nested under the Project Tasks region, click Series X New.
In the Property Editor:- Identification: Name - enter
Tasks - SQL Query - copy and paste the following:
                      select 'f?p=&APP_ID.:5:' || :APP_SESSION || '::::P5_ID:' || p.id as link

                      , p.name as label

                      , (select count('x') from demo_tasks t

                         where p.id = t.project_id

                         and   nvl(t.is_complete_yn,'N') = 'Y'

                        ) as "Completed Tasks"

                      , (select count('x') from demo_tasks t

                         where p.id = t.project_id

                         and   nvl(t.is_complete_yn,'N') = 'N'

                        ) as "Incomplete Tasks"

                      from demo_projects p

                      order by p.created desc
Note: The required SQL for this chart was determined by reviewing the Including Link and Two Series examples in the Help pane.
For this application, each record links to the Demo Projects form (Page 5) by setting the form itemP5_IDwith the DEMO_PROJECTS column ID.
The label is defined as the DEMO_PROJECTS column NAME.
The two series, "Completed Tasks" and "Incomplete Tasks", are defined by counting the DEMO_TASKS for each project record and using an appropriateWHEREcondition.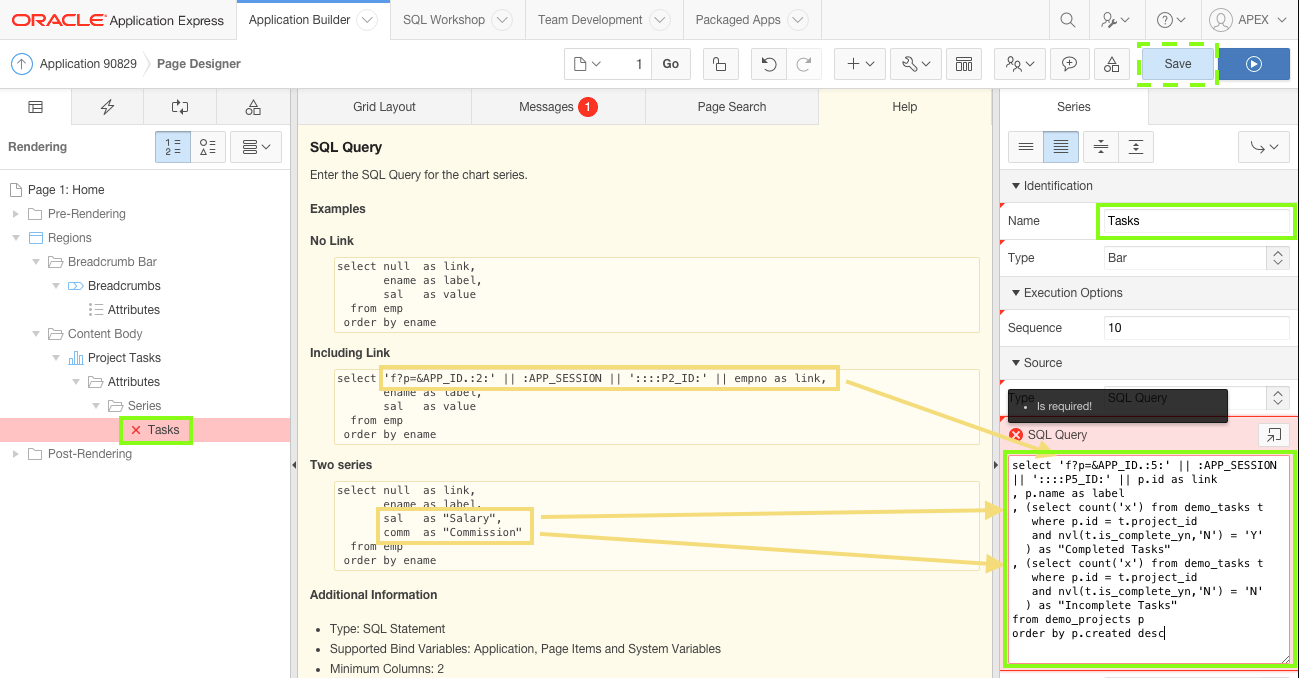
Click Save on the toolbar.
-
Create a report that allows each Team Member to see their outstanding tasks.
Click Grid Layout in the central pane.
In the Rendering tree, right-click Content Body and select Create Region.
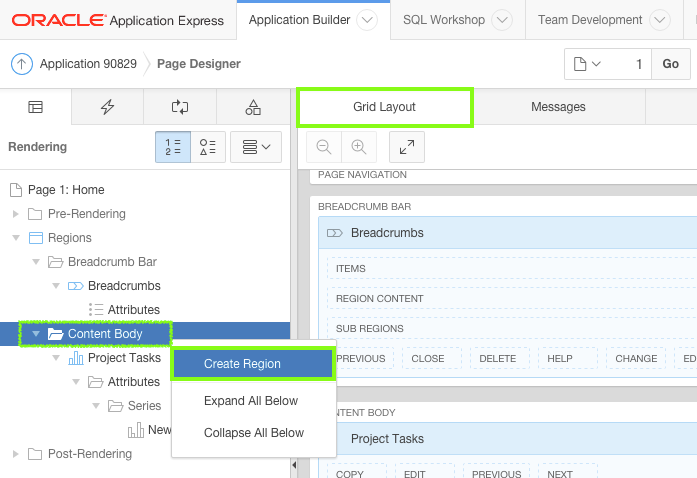
In the Property Editor:
- Identification: Title - enter
My Outstanding Tasks - Identification: Type - select Classic Report
- SQL Query - copy and paste the following:
                        select p.name project

                        , t.name task

                        , t.end_date

                        from demo_tasks t

                        , demo_projects p

                        , demo_milestones m

                        , demo_team_members tm

                        where p.id = t.project_id

                        and   m.id = t.milestone_id (+)

                        and   tm.id = t.assignee
                        and   nvl(t.is_complete_yn, 'N') = 'N'

                        and   upper(tm.username) = upper(:APP_USER)

                        order by t.end_date
Note: The where condition of
username = :APP_USERrestricts the records to those assigned to the person running the application.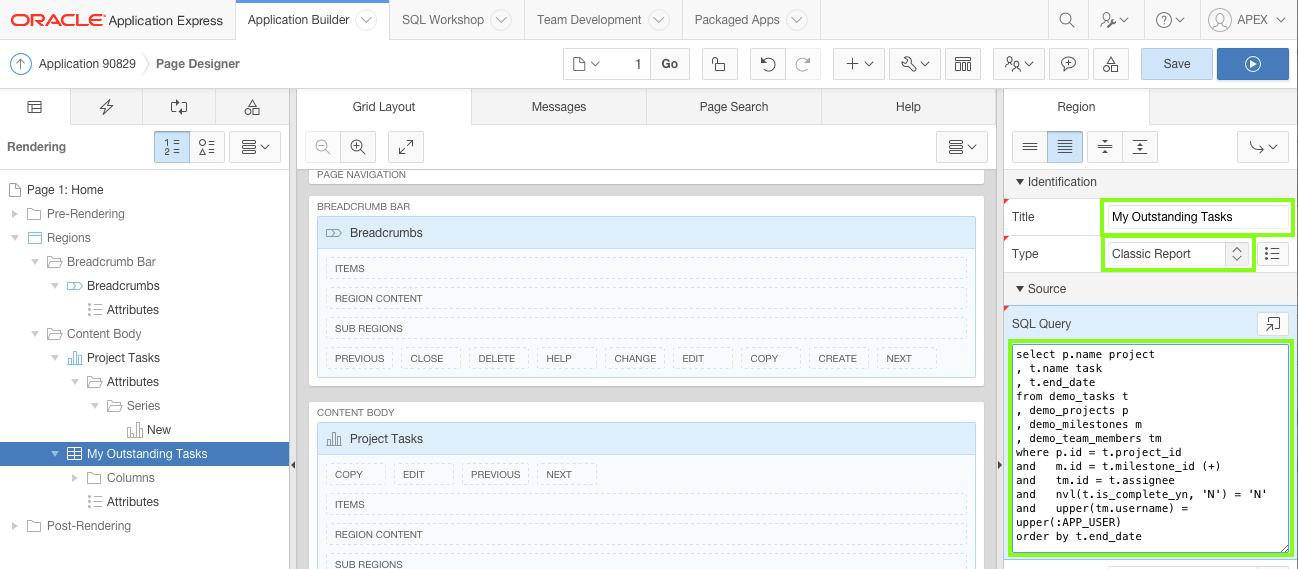
In the Property Editor, locate Appearance: Template Options and click Use Template Defaults, Scroll - Default.
For General, enable Remove Body Padding, and for Body Height select 480px.
Click OK.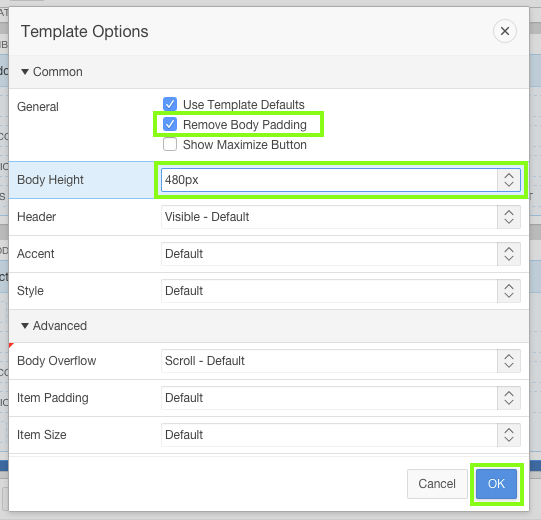
Locate the Rendering tree. Under the My Outstanding Tasks region, click Attributes.
Note: Region Template Options (such as Body Height, Header, Style and so on) alter the overall presentation of a region. However, Attribute Template Options (such as Stretch Report, Row Highlighting and so on) alter the way the records within a region display.
Under Attributes, locate Template Options and click Use Template Defaults, Enable, Enable.
In General enable Stretch Report, and for Report Border select No Outer Borders.
Click OK.

Click Save.
- Identification: Title - enter
-
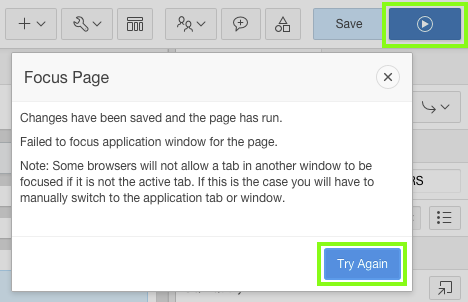
Run the application to see how the Home page looks now.
Click Save and Run Page on the toolbar.
Note: If a dialog window called Focus Page is displayed, click Try Again to navigate to the runtime environment.
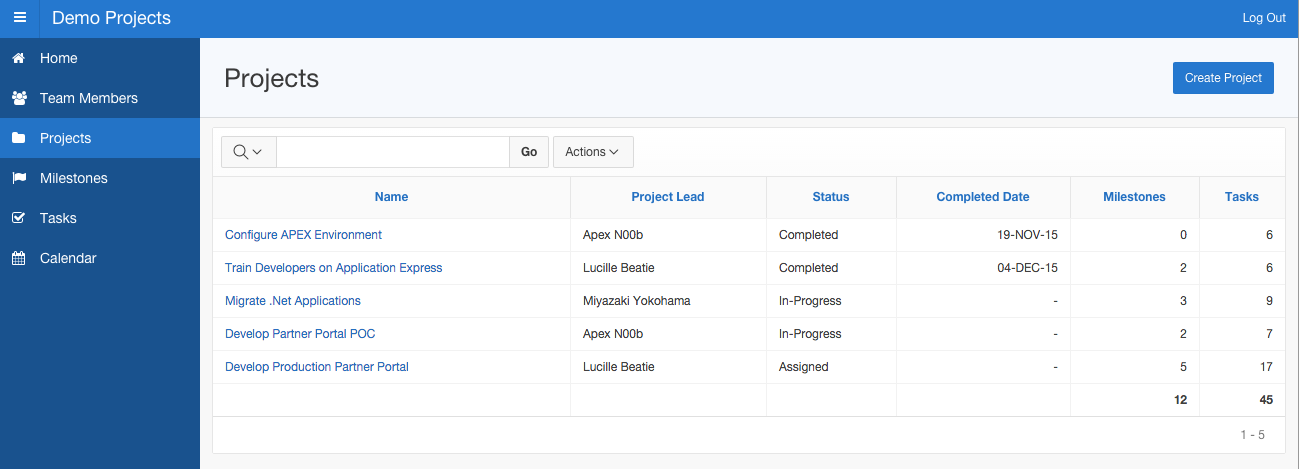
The Home Page should look like the image below.
Note: You should not need to enter your username and password credentials again, as you have already logged into the runtime application.
5. Updating the Team Member Pages
In this topic, update the Team Member pages by improving the report and improving the modal form page.
Note: If you have not completed the previous topic, you can import the Basic Projects App Export - Topic 4.sql file into your workspace, and continue working from this topic forward. You can find the export file in the /files subdirectory where you unzipped the original file. See Appendix A - Importing an Application.
-
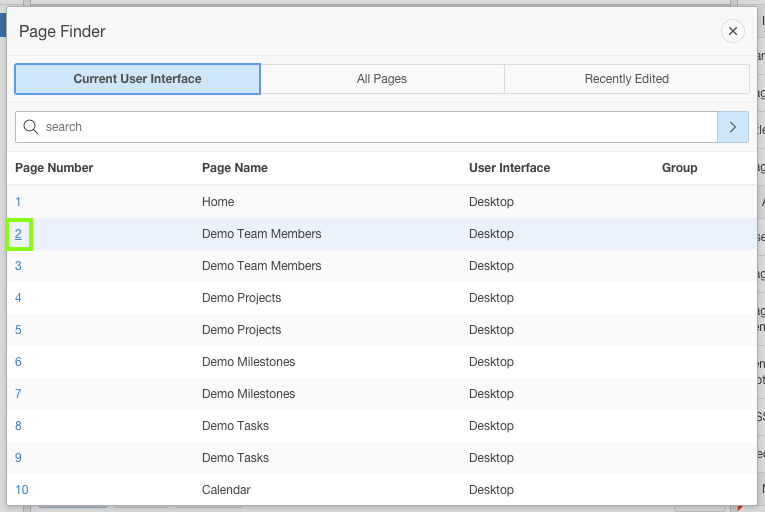
Click on the Page Finder on the toolbar and click 2 to navigate to Page 2 - Demo Team Members.

-
Update the page properties from Demo Team Members to Team Members.
In the Property Editor:- Identification: Name - enter
Team Members - Identification: Title - enter
Team Members
Note: It is important the Title you enter is meaningful. The Title displays in the browser's title bar.
You may also consider adding the application name to each title, for exampleDemo Project - Team Members.
Click Save.
- Identification: Name - enter
-
Breadcrumbs are very common within Web applications to allow users to easily traverse from the current page to a parent page. Use of the
Backbutton is discouraged within Web applications, as this operation may display old ("stale") information to the user.Update the breadcrumb entry for the page.
In the Rendering tree, click the Shared Components tab.
Expand the Breadcrumbs folder and click the Breadcrumb entry.
In the Property Editor, click the Edit Component button.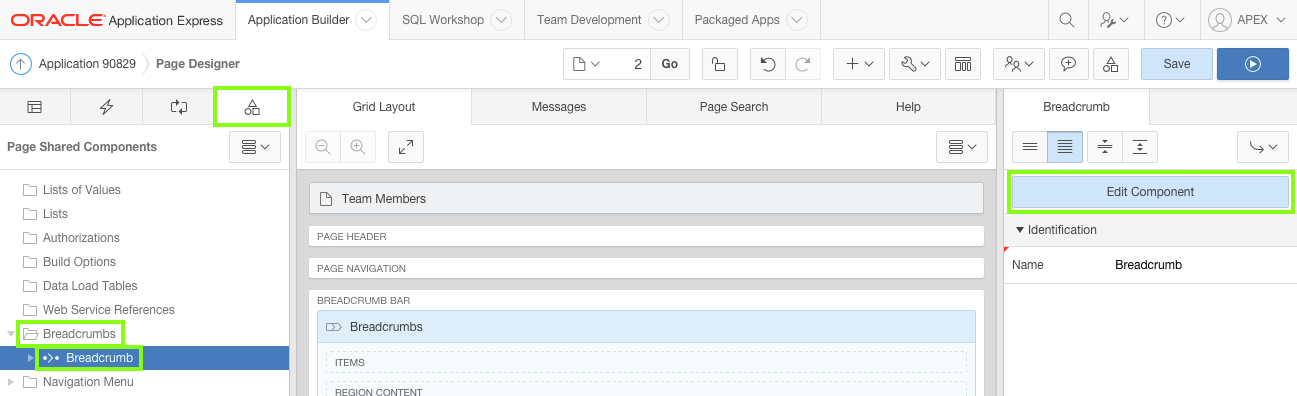
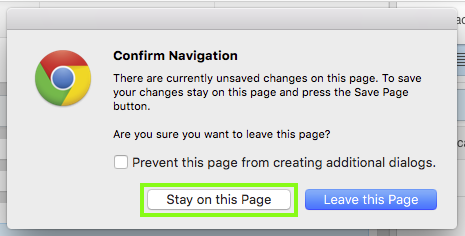
Note: If a dialog window is displayed called Confirm Navigation, or similar as the exact message varies between browsers, you have not saved the previous changes. Click Stay on this Page in the dialog window. Click Save on the toolbar, and then click the Edit Component button again.
Click the Demo Team Members breadcrumb entry.
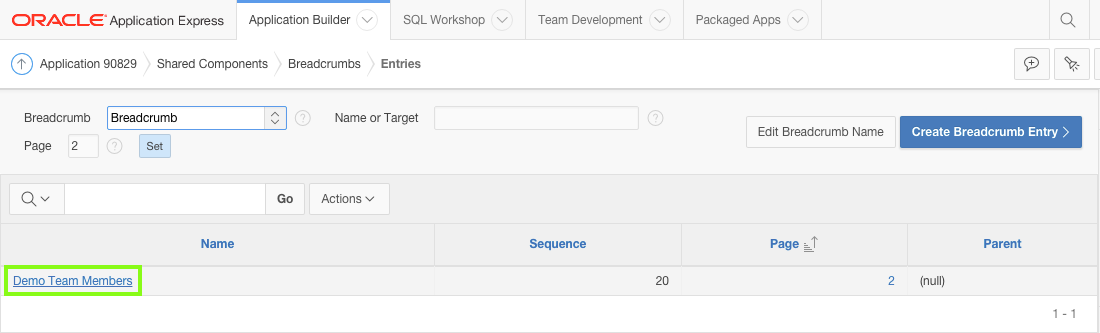
For Short Name, enter
Team Members, and click Apply Changes.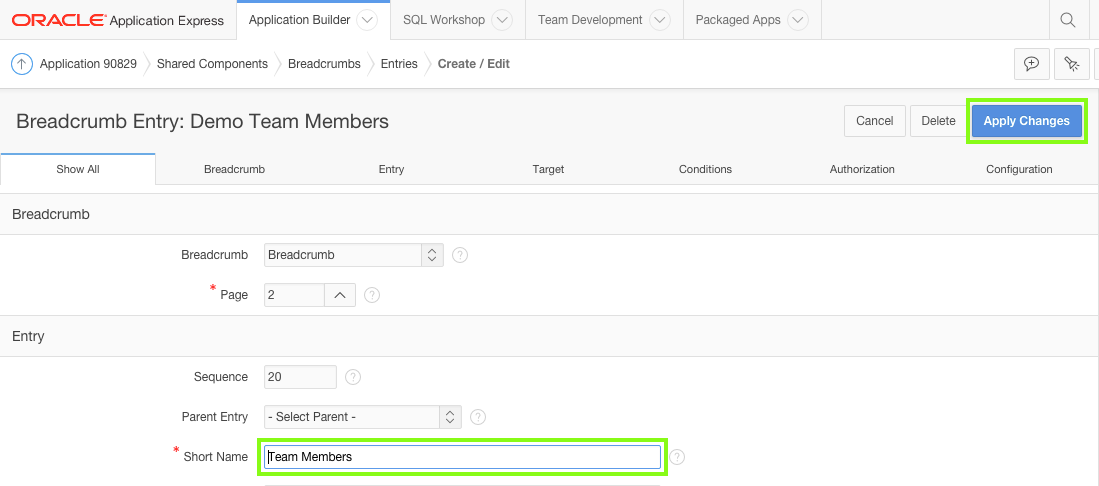
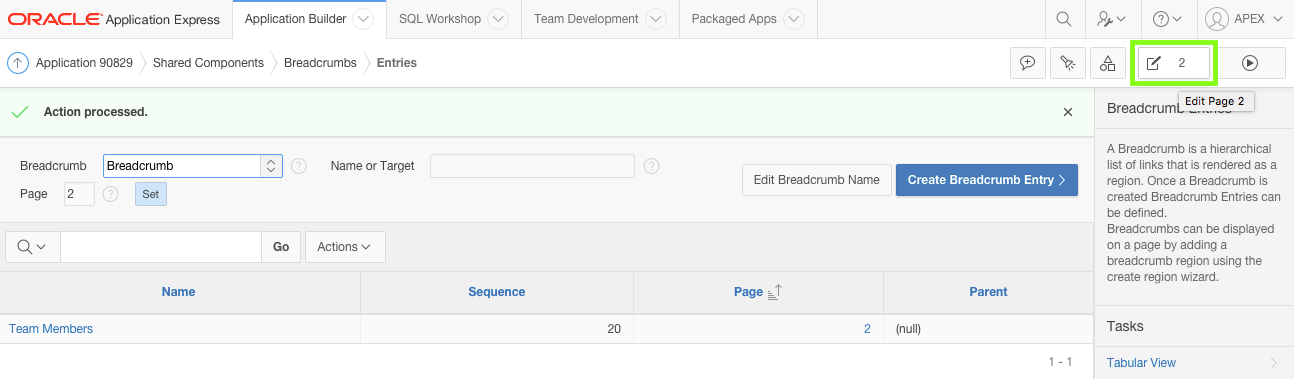
Click Edit Page 2 on the toolbar, to return to Page Designer.
-
Interactive Reports in Application Express enable end users to manipulate what data is shown and how it is displayed. The application developer simply needs to define the SQL statement to retrieve all of the data from the underlying Oracle Database tables. End users can readily manipulate that data for their own requirements, rather than needing the application developer to define numerous reports.
Interactive Reports are the default report type when generating report pages from the Create Application wizard. However, the report shows all of the columns in the table and some of those columns (such as those associated with the image), should not be included in the report.
Remove columns from the report by updating the SQL Source for the region.In the Rendering tree, locate the DEMO_TEAM_MEMBERS region. Click the DEMO_TEAM_MEMBERS region.
In the Property Editor, click Code Editor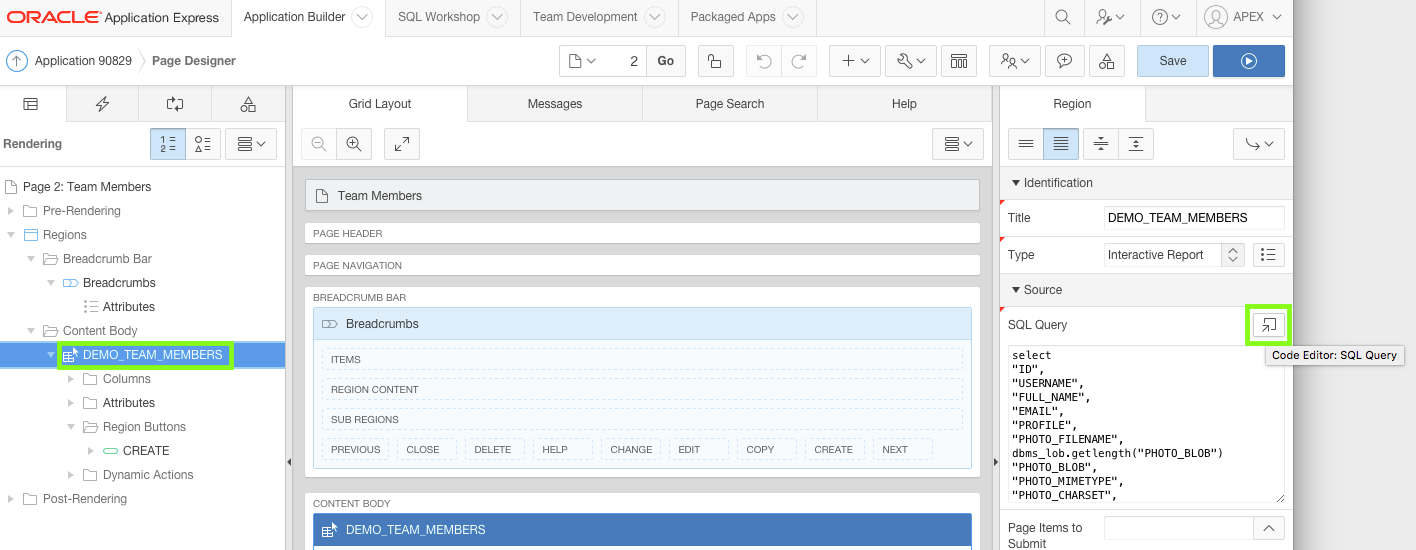
The Code Editor includes numerous features to help developers write code within Application Express. The editor provides enhanced editing for PL/SQL, SQL, HTML, CSS, and JavaScript component properties. The code highlighting is determined by the input required for the specific property. The Code Editor also includes undo, redo, find, replace, a link to Query Builder, code autocompletion, and SQL validation.
In the Code Editor, replace the existing SQL with copy and paste of the following:
                    select

                    "ID",

                    "USERNAME",

                    "FULL_NAME",

                    "EMAIL",

                    "PROFILE",

                    "CREATED",

                    "CREATED_BY",

                    "UPDATED",

                    "UPDATED_BY"

                     from   "DEMO_TEAM_MEMBERS"
Click Validate, to ensure the SQL statement is valid.
Click OK.
-
Some of the report columns, such as ID, CREATED, CREATED_BY and so forth, should be included in the report, but not visible by default. That way, if users want to review that information, they can manipulate the Interactive Report and make the columns visible.
To change what columns are displayed in the Interactive Report by default, you must alter the report in the runtime environment and then save the report.Access the runtime application by clicking Save and Run Page on the toolbar.
In the runtime environment, locate the Actions buttons in the report header.
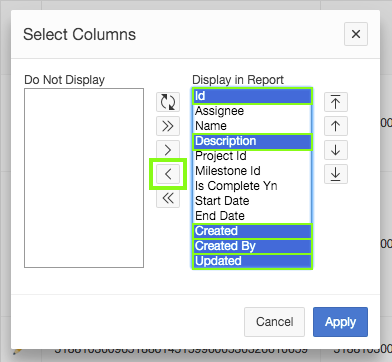
Click Actions and then select Select Columns.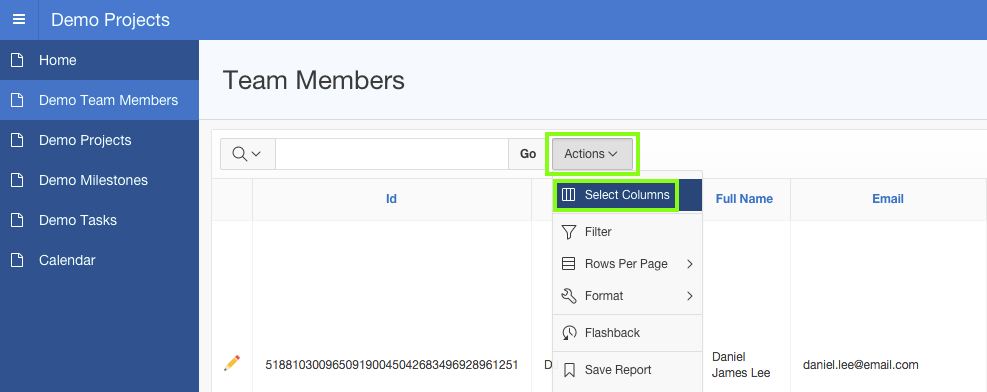
In the Display in Report column, hold the Ctrl key and click the following items to select them:
- Id
- Username
- Created
- Created By
- Updated
- Updated By
Click the Remove button (<) in the center.

Click Apply.

The report columns should be ordered by the Full Name.
Click the Full Name column Heading, and then select Sort Ascending.
To keep the changes you just made, you must save the report. If you were to log out and log back into the runtime environment, or another user runs the report, then the columns you just removed would be visble again.
Click Actions and then select Save Report.

Because you are the developer of this report, you can save your modifications and create a new default report. End users do not have this capability.
For Save, select As Default Report Settings.
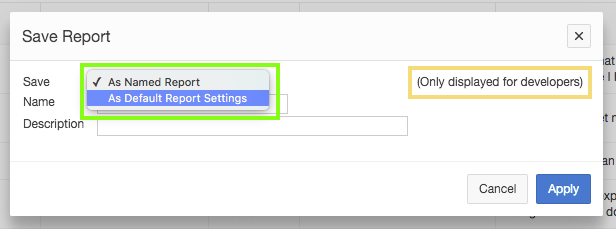
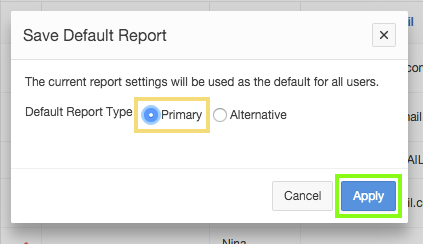
As a developer, you can choose to save the default report as either the primary or an alterative report. The primary report is how all end users will see the report when they first access the page. You can save any number of alternative reports, which end users can run by selecting from a drop-down list, that is automatically displayed once any additional report layouts are saved. In this instance you want to save the modified report as the primary report.
Verify the Default Report Type is Primary, and click Apply.
-
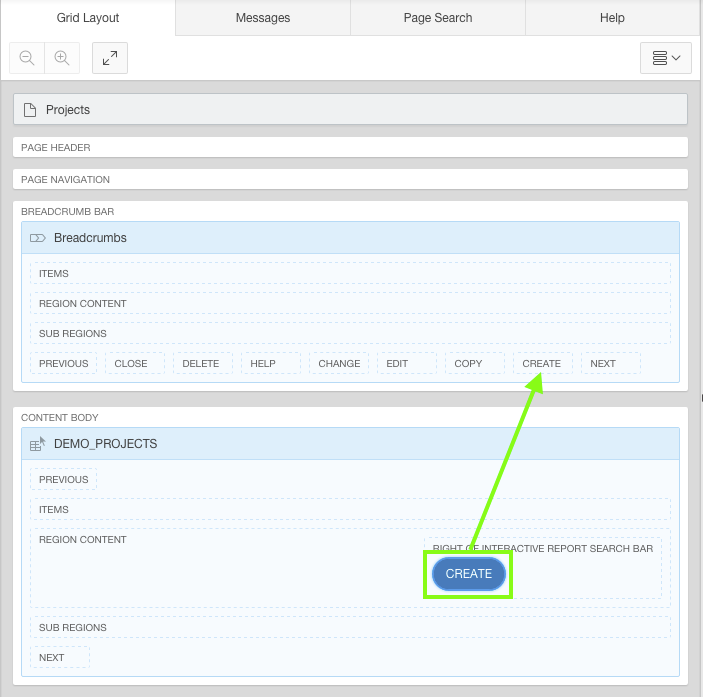
By default, buttons are positioned in the region they are associated with. Move the Create button at the top of the page to the Breadcrumbs region.
From the runtime environment, return to the Application Builder by clicking Edit Page 2 in the Developer Toolbar.
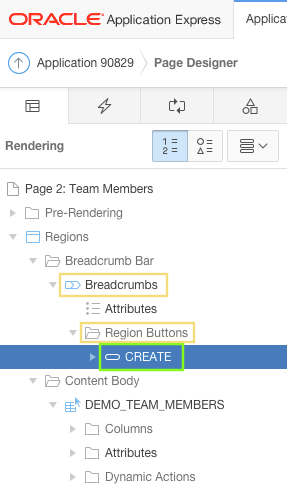
In the Rendering tree, locate the CREATE button under Content Body.
Click and hold the CREATE button and drag it up into the Breadcrumbs region. It will appear as a child within its own Region Buttons folder.
Tip: To undo a previous action, press Ctrl+Z in Windows or click the Undo button in the top-right toolbar.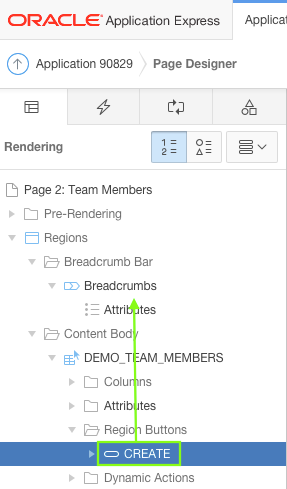

In the Property Editor:
- Identification: Label - enter
Add Team Member - Layout: Button Position - select Create
- Appearance: Hot - select Yes

Click Save and Run Page to see the updated report.

- Identification: Label - enter
-
The Team Members report is now complete. However, the navigation menu still says
Demo Team Members. The Navigation Menu is defined as a list within Shared Components.You use Shared Components to define various different types of objects in one place that can be used across an application. As a best practice, Oracle recommends defining the code once in a shared component wherever possible and then reference that component on the different pages.
Note: Some of the Shared Components, such as Authentication Schemes, Lists, Navigation Menu, and Themes, can only be defined as Shared Components, while others, such as List of Values, can also be implemented directly on individual pages.Update the Navigation Menu entries, and include icons for each entry.
From the runtime environment, click Application xxxx in the Developer Toolbar.

Click Shared Components.
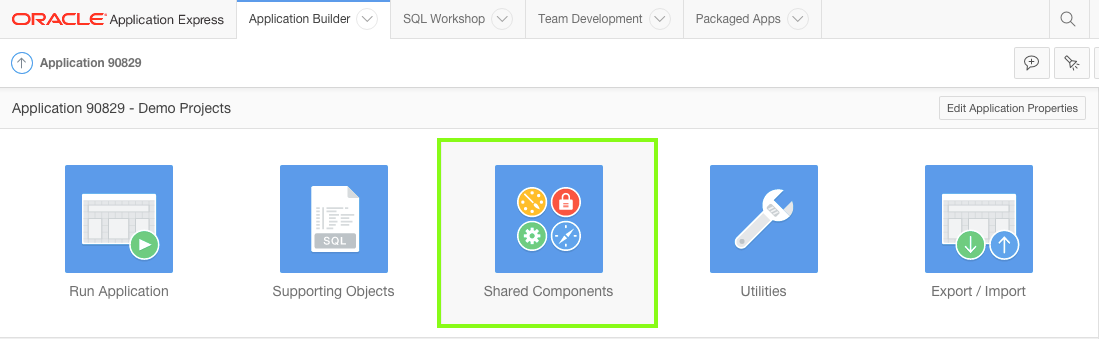
Locate the Navigation section, and click Lists.
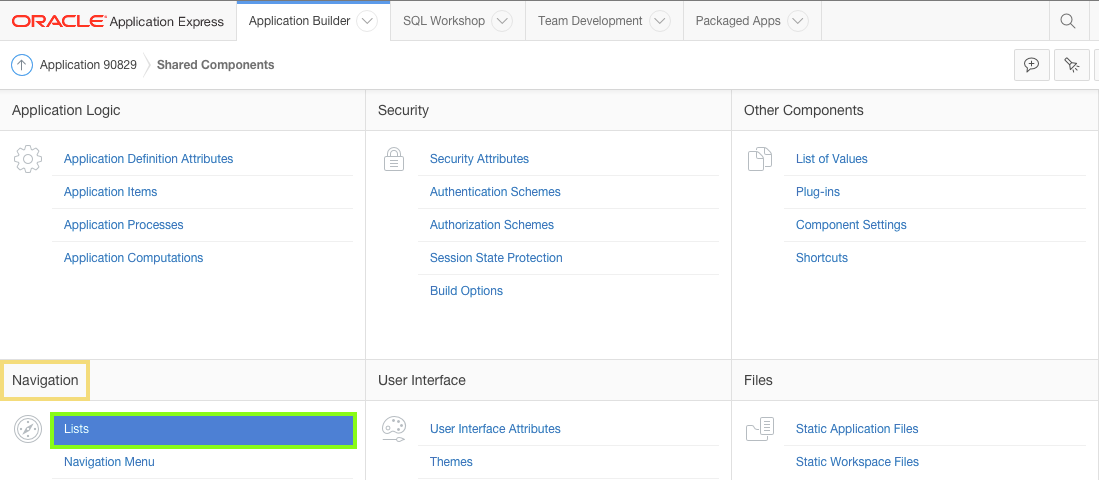
From the Lists report, select
Desktop Navigation Menu.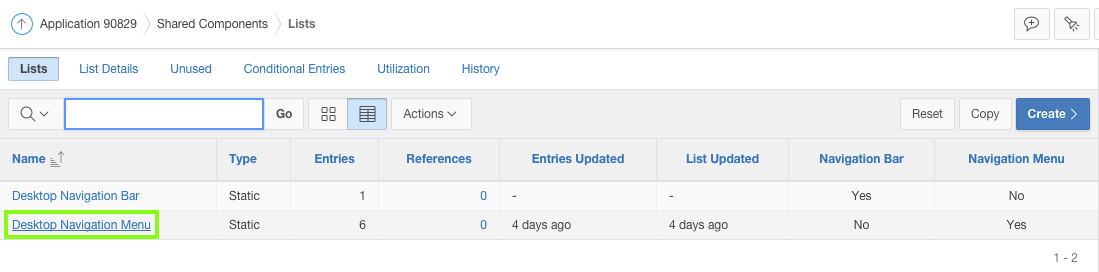
From the List Details report, select
Home.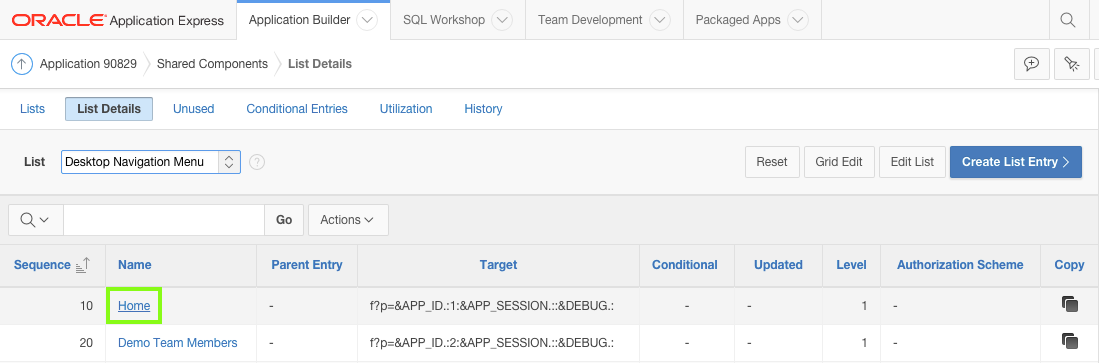
In the Home list entry, locate the Image/Class item. Click the up arrow, at the end of the field ( ^ ), to display a list of images.

Review the library of images, provided by Font Awesome (fa). These images can be utilized throughout the application to improve asthetics, and provide a visual indicator, rather than just text.
Locate and select fa-home.

Click the Next button ( > ), adjacent to the page title, to navigate to the next entry.
Note: As you navigate from one record to another, any changes to the previous record are automatically saved.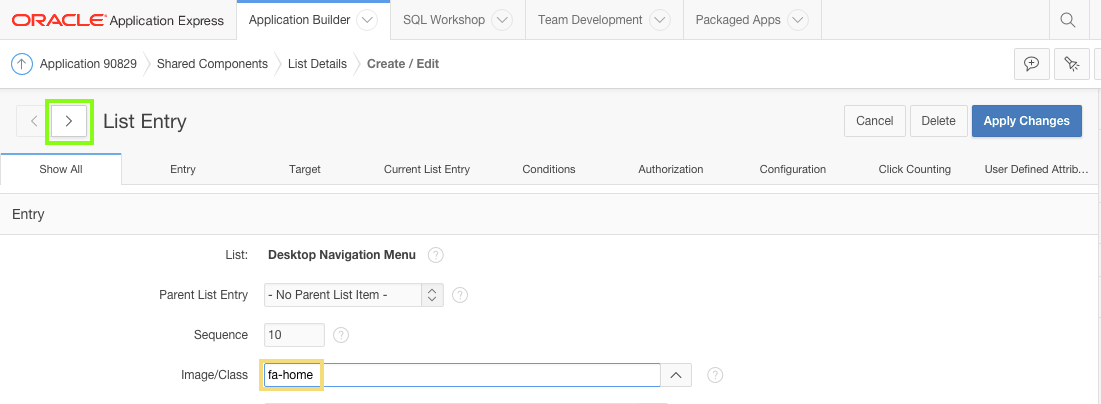
On the Demo Team Members list entry, for Image/Class enter
fa-users, and for List Entry Label enterTeam Members.
Click the Next button ( > ).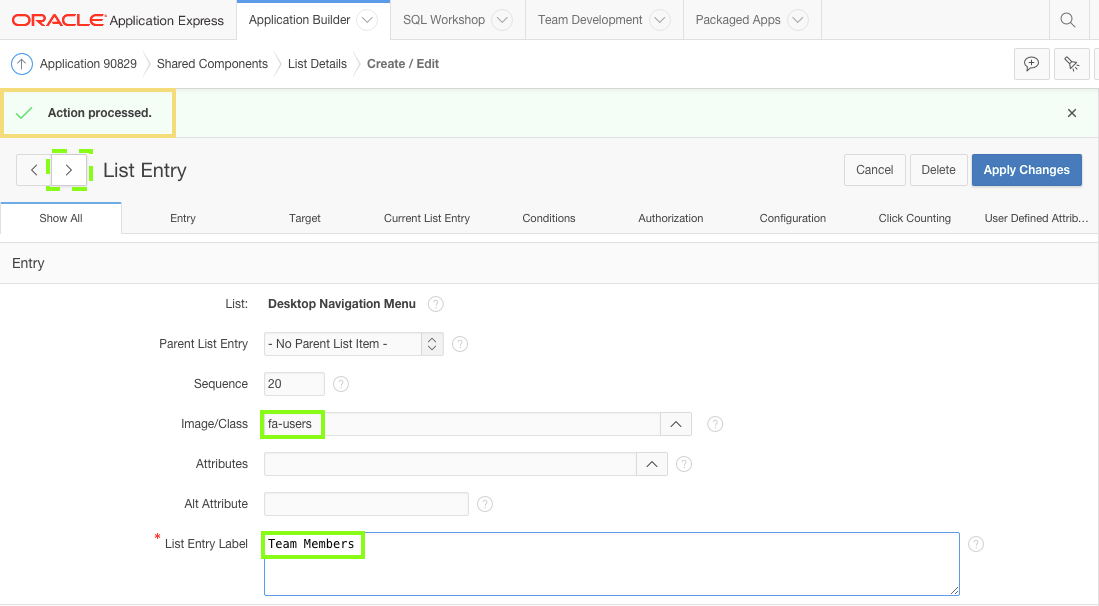
On the Demo Projects list entry, for Image/Class enter
fa-folder, and for List Entry Label enterProjects.
Click the Next button ( > ).
Note: You can simply type in the image name, such asfa-folder, directly into the Image/Classs field, rather than bringing up the library of images.On the Demo Milestones list entry, for Image/Class enter
fa-flag, and for List Entry Label enterMilestones.
Click the Next button ( > ).On the Demo Tasks list entry, for Image/Class enter
fa-check-square-o, and for List Entry Label enterTasks.
Click the Next button ( > ).On the Calendar list entry, for Image/Class enter
fa-calendar
Click Apply Changes.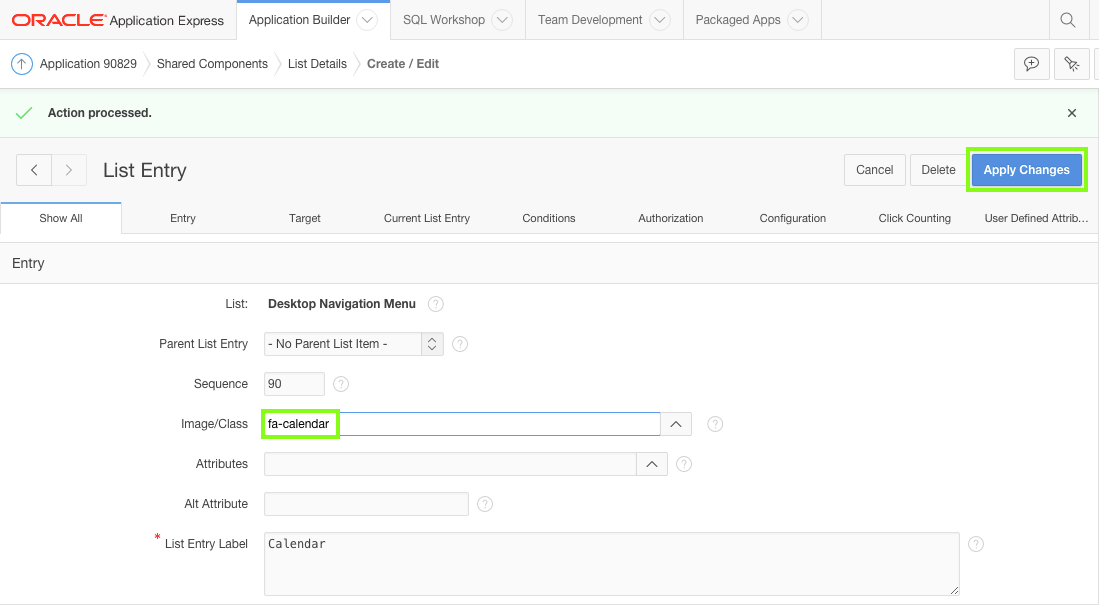
Click Run on the toolbar to see the updated navigation menu.


-
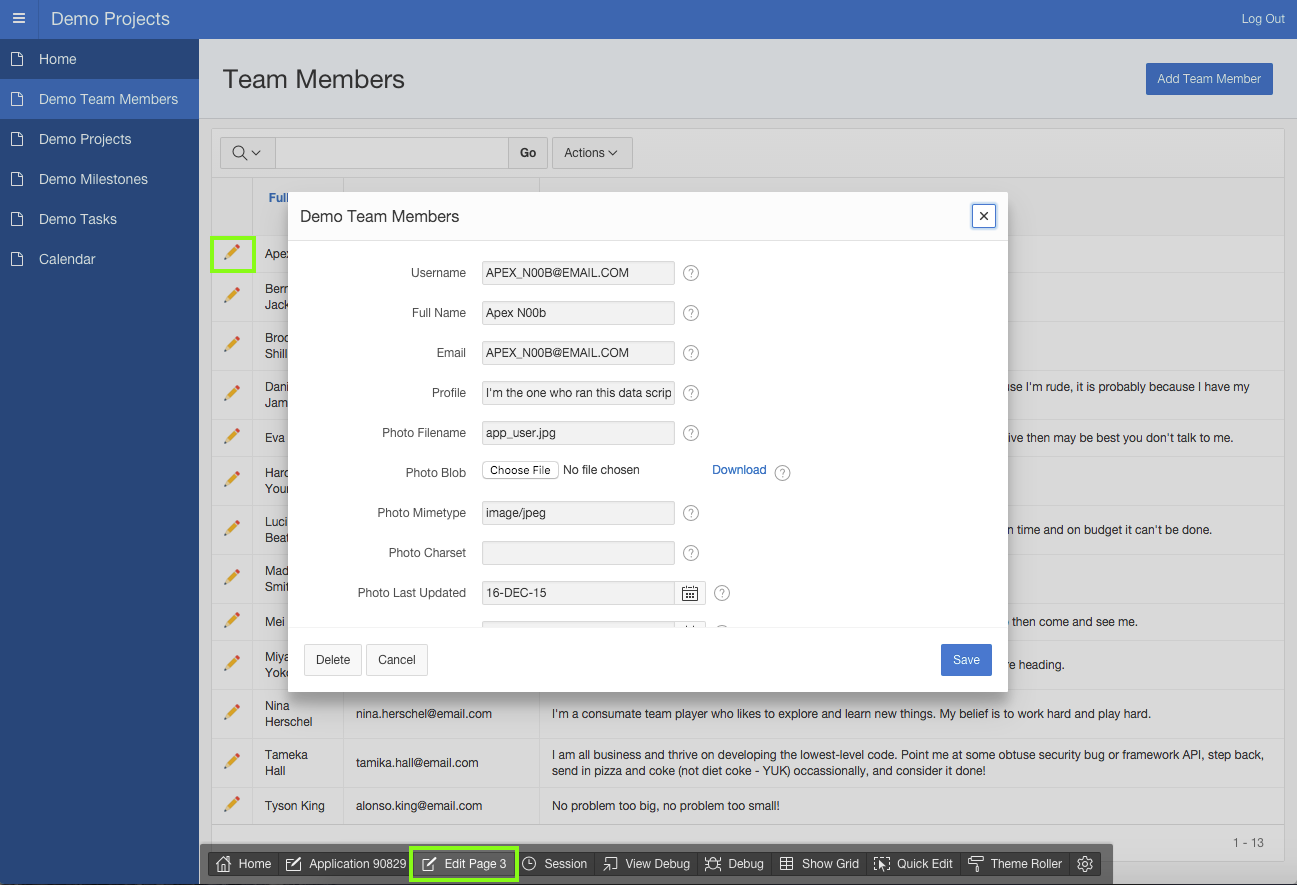
Click the Edit icon (pencil), next to a team member's name to view the modal form page, for the person you selected.
On the Developer Toolbar at the bottom of the page, click Edit Page 3 to jump to the modal page in Page Designer.
In the Property Editor:
- Identification: Name - enter
Maintain Team Member - Identification: Title - enter
Maintain Team Member

Click the Edit DEMO_TEAM_MEMBERS region. In the Property Editor, locate Template Options and click Use Template Defaults.
For Item Width select Stretch Form Fields.
Click OK.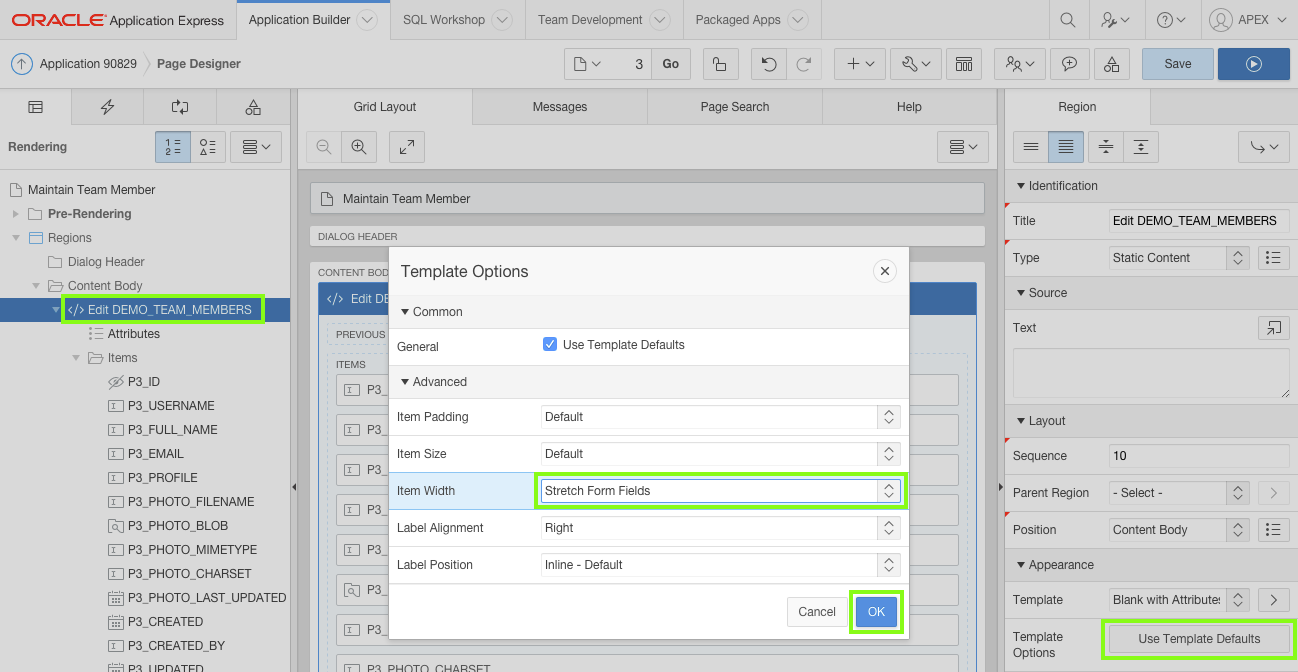
- Identification: Name - enter
-
The generated page includes a page item for every column in the DEMO_TEAM_MEMBERS tables.
You need to make the following changes:- Make the Username and Full Name fields mandatory. If either of these fields are left blank when the record is saved, then an error message should display.
- You expect users to enter multiple lines of information into the Profile field. Therefore, you need to convert the Profile item type to Textarea.
- Alter the Photo Blob field to support file upload to a table.
- Since the other photo fields are populated when a file is uploaded, these items must be hidden from users.
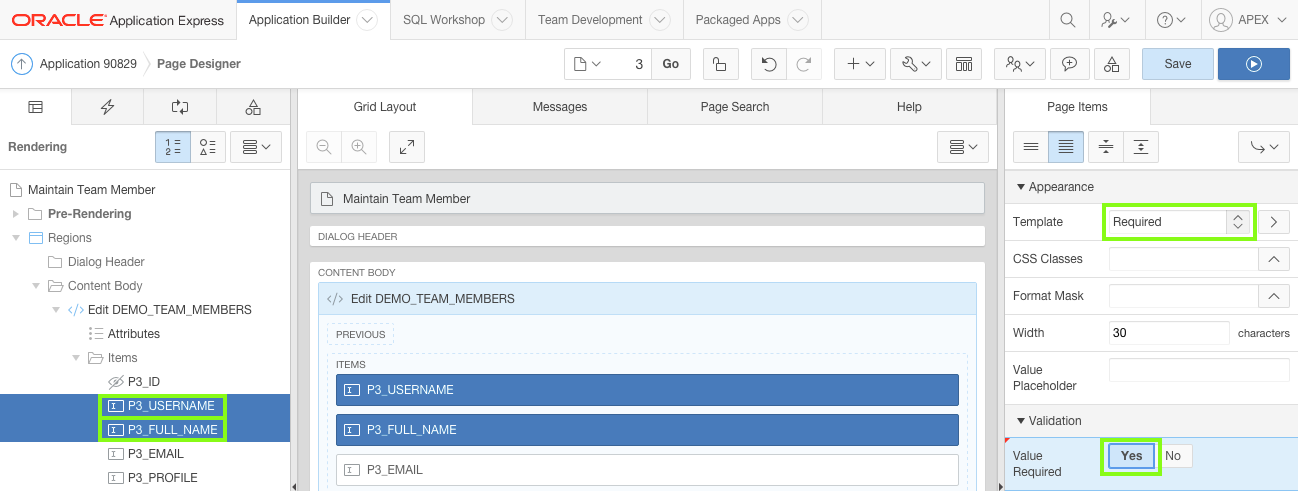
In the Rendering tree, under Content Body, expand the Items folder.
Press and hold the Ctrl key to select more than one item. Select P3_USERNAME and P3_FULL_NAME .
In the Property Editor:- Appearance: Template - select Required
- Validation: Value Required - select Yes
-
In the Rendering tree, click the P3_PROFILE item.
In the Property Editor:- Identification: Type - select Textarea
- Help: Help Text - clear the help text attribute


Note: You should either add meaningful help text for all the displayed items, or remove the current text which is
No help available for this page item.. -
In the Rendering tree, click the P3_PHOTO_BLOB item. For Label, enter
Photo.
Click the divider between Grid Layout and the Gallery to collapse the Gallery.
In the Grid Layout, hold the Ctrl key and click the following items to select more than one:
- P3_PHOTO_FILENAME
- P3_PHOTO_MIMETYPE
- P3_PHOTO_CHARSET
- P3_PHOTO_LAST_UPDATED
In the Property Editor under Identification, click the Type Quick Pick button and select Hidden.
Note: When you select multiple components, the Property Editor shows a triangle in front of the Attribute Name, and shades the Attribute Value in blue. If all of the selected components have the same Attribute Value, then the name and value will be displayed normally.

-
The tables you created earlier include audit columns for storing when and who created and last updated each record. End users should never be allowed to enter data into these columns. Furthermore, these columns should not display when the user creates a new record.
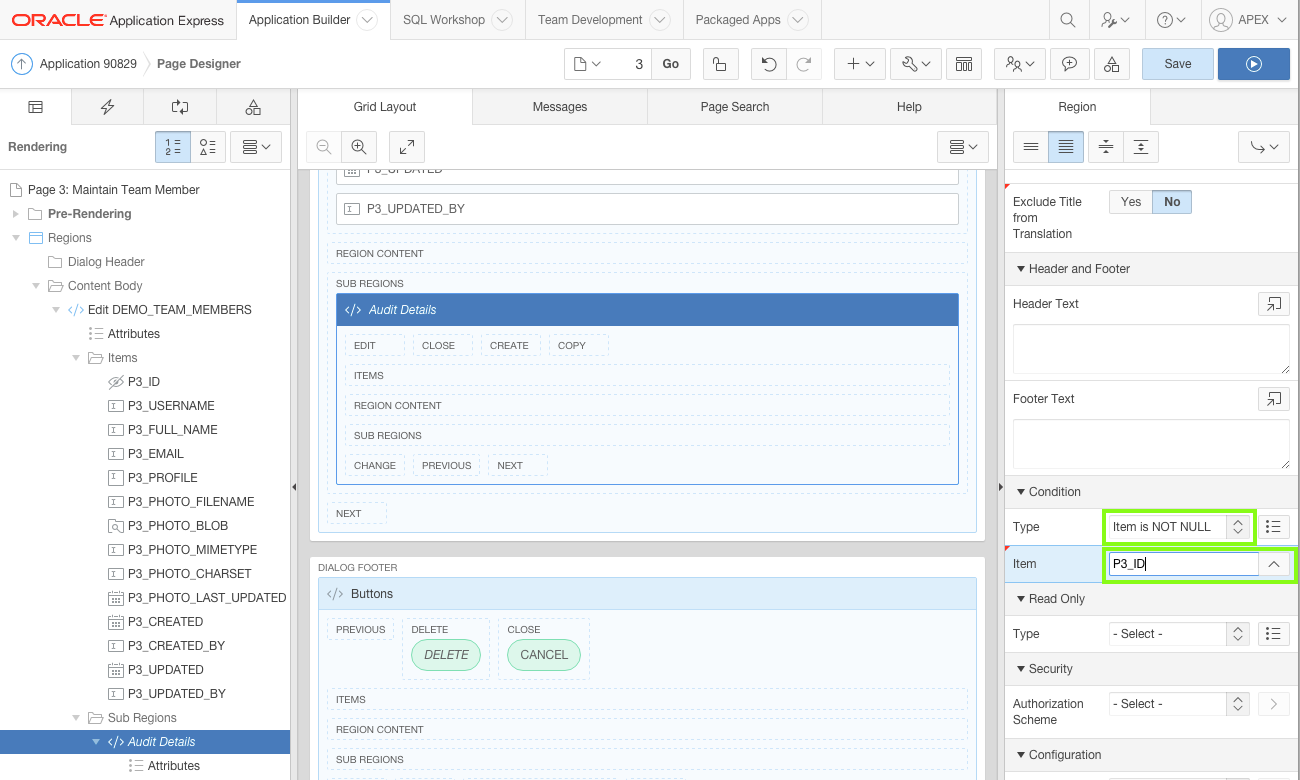
Given that audit information is only reviewed on occassion, it is preferable to add these columns into a separate, collapsible region, so they can be reviewed when necessary, but don't take up excessive screen real estate the majority of time.Reconfigure the audit columns to be Display Only and place them in a conditional sub-region.
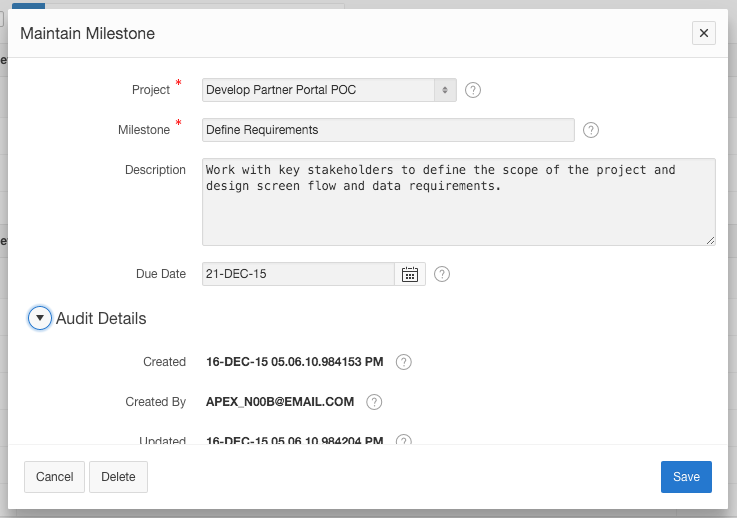
In the Rendering tree, right-click Edit DEMO_TEAM_MEMBERS and select Create Sub Region.

In the Property Editor, for the
Newregion:- Identification: Title - enter
Audit Details - Appearance: Template - select Collapsible
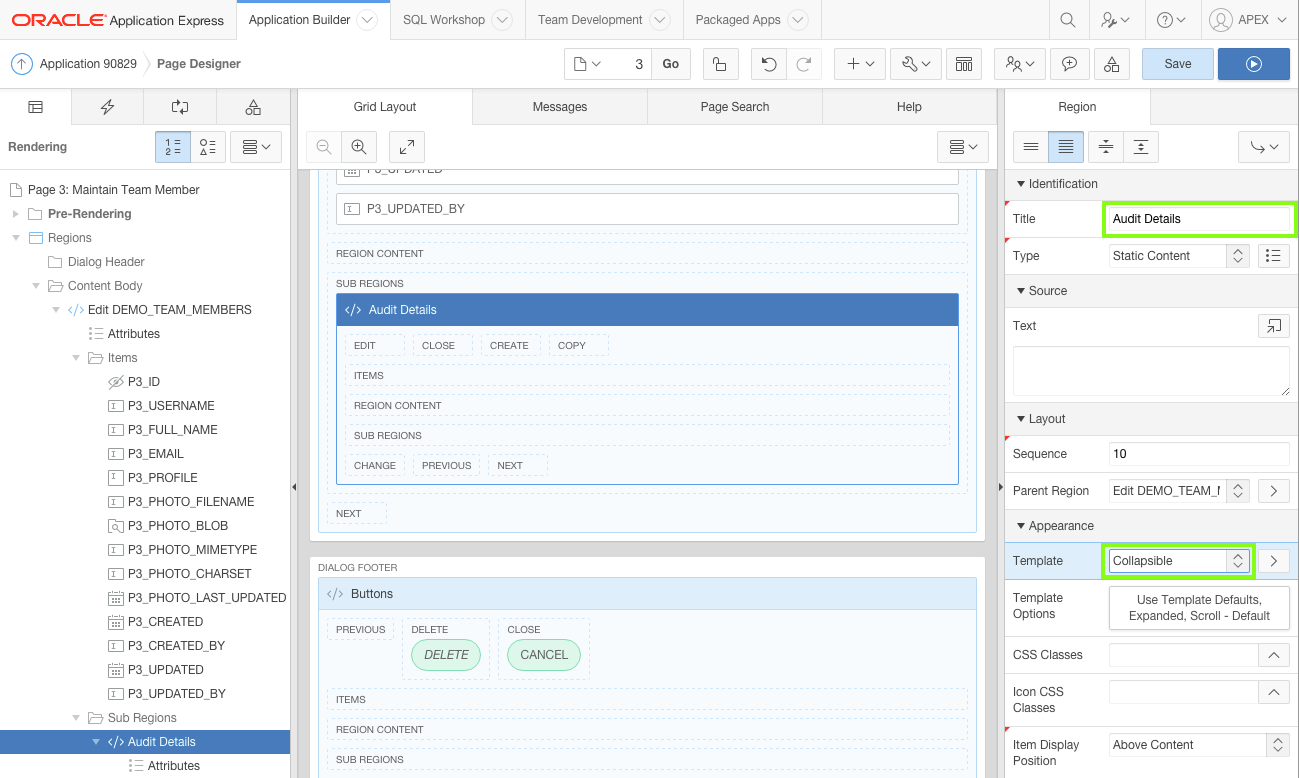
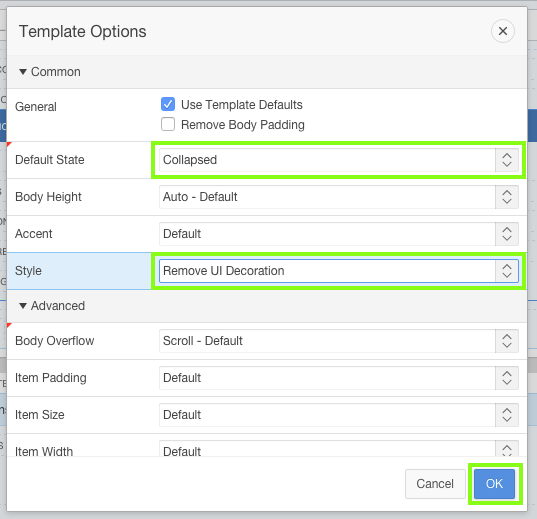
Locate Template Options and click Use Template Defaults, Expanded, Scroll - Default. Then input the following:
- Default State - select Collapsed
- Style - select Remove UI Decoration
Click OK.
In the Property Editor, click the Go To Group button in the top-right, select Condition.

In the Property Editor, select the following:
- Condition: Type - select Item is NOT NULL
- Condition: Item - select P3_ID
- Identification: Title - enter
-
Move the audit columns into the new region.
From the Rendering tree or Grid Layout, hold the Ctrl key and click the following items to select them:
- P3_CREATED
- P3_CREATED_BY
- P3_UPDATED
- P3_UPDATED_BY
In the Property Editor:
- Identification: Type - select Display Only
- Layout: Region - select ..Audit Details
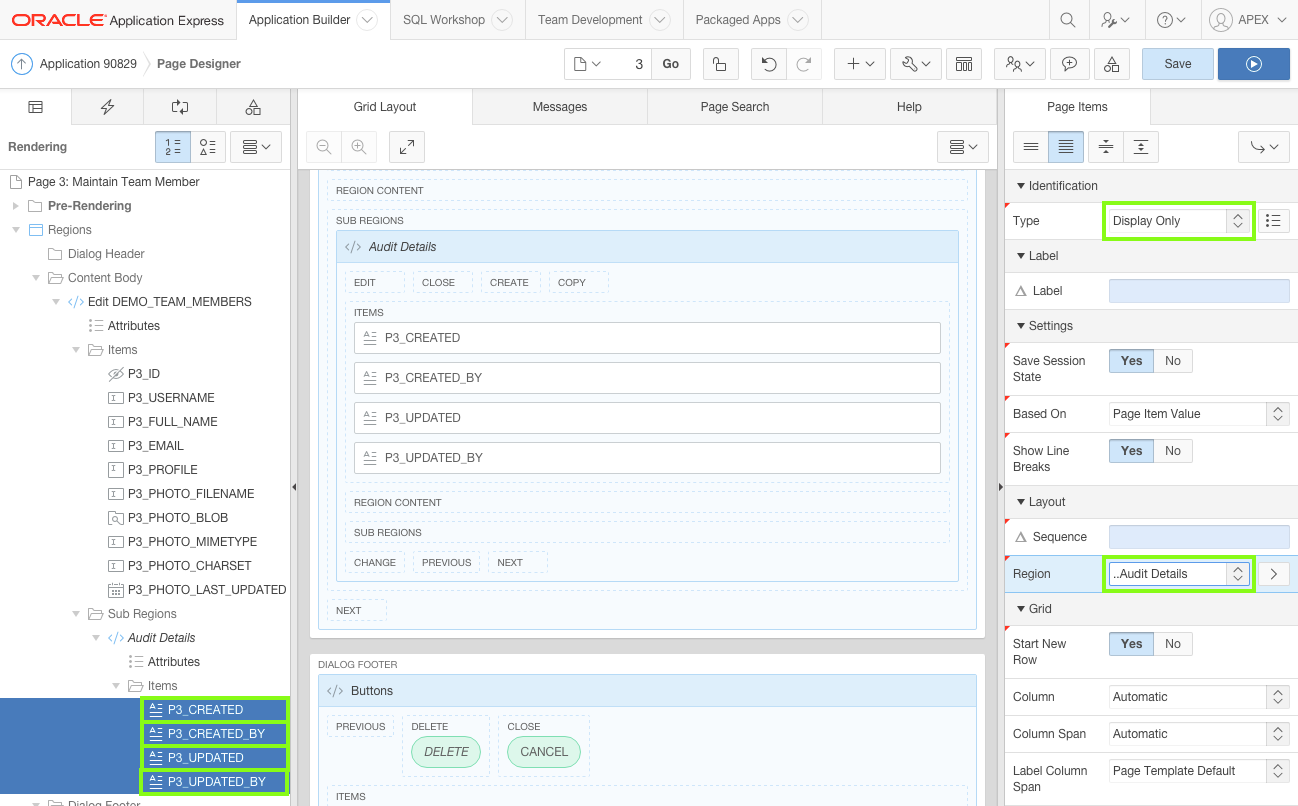
Click Save.
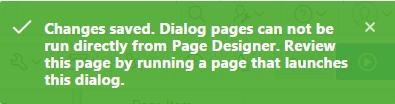
Note: If you press Save and Run Page when on a modal page, an error message displays because you can't run dialog pages directly from Page Designer. Modal pages must be invoked from a base page. The reason such pages can not be run directly is that when the modal page is closed it must have a target page to return to, being the page it was invoked from.
-
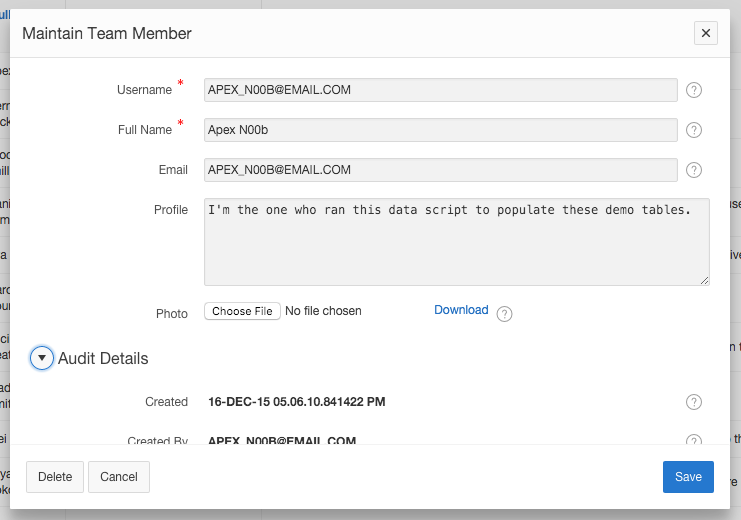
Navigate to the tab or browser with the runtime application. Return to the Team Members page, refresh the browser, and select one of the Team Member records to see the improved modal page.
6. Updating the Project Pages
In this topic, you will perform many of the same steps you performed to improve the Team Members pages, updating the report and form pages for projects. However, you will also create a List of Values, add a dynamic action, and add validations.
Note: If you have not completed the previous topic, you can import the Basic Projects App Export - Topic 5.sql file into your workspace, and continue working from this topic forward. You can find the export file in the /files subdirectory where you unzipped the original file. See Appendix A - Importing an Application.
-
Return to Application Builder by pressing Edit Page 3 in the Developer Toolbar.
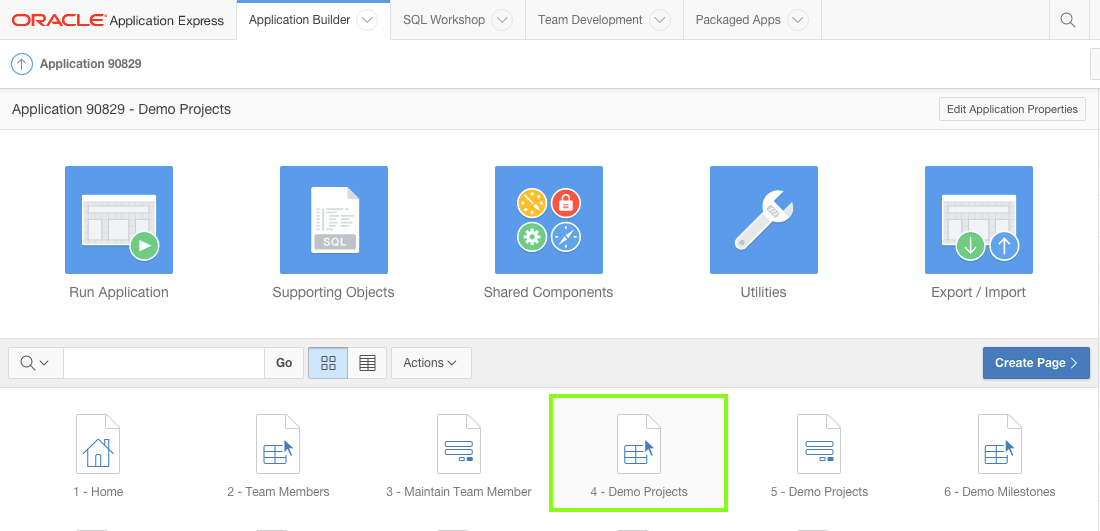
In the Application Builder breadcrumbs to the top-left, click Application #### (where #### represents your application ID, such as Application 90829).
Click 4 - Demo Projects.
Update the page properties from Demo Projects to Projects.
In the Property Editor:- Identification: Name - enter
Projects - Identification: Title - enter
Projects
Click Save.

- Identification: Name - enter
-
Update the breadcrumb entry for the page.
In the Rendering tree, click the Shared Components tab.
Expand the Breadcrumbs folder and click the Breadcrumb entry.
In the Property Editor, click the Edit Component button.
Click the Demo Projects breadcrumb entry.
For Short Name, enter
Projects, and click Apply Changes.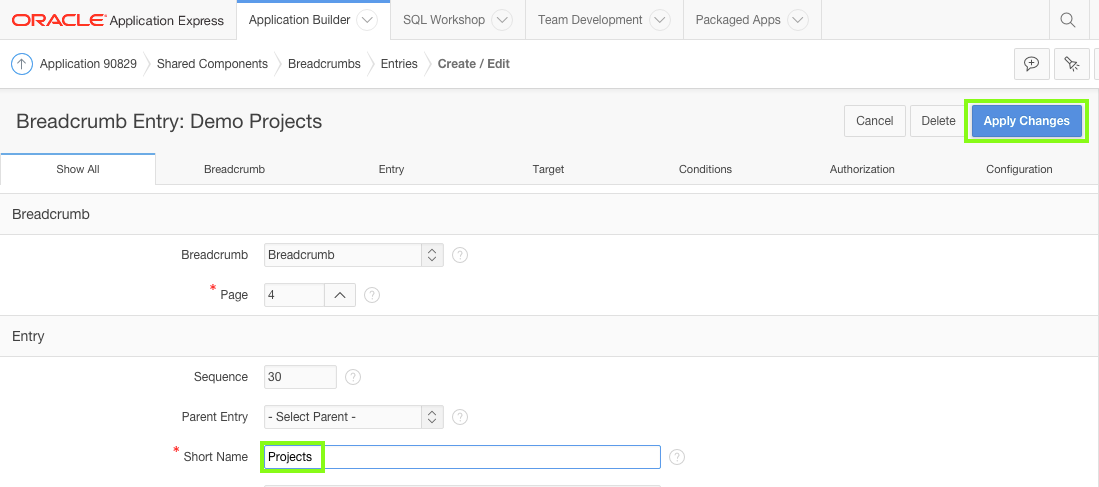
Click Edit Page 4 on the toolbar, to return to Page Designer.
-
Modify the existing Projects Interactive Report (Page 4) and update the SQL Query associated with the report to add summations for milestones and tasks.
Click the DEMO_PROJECTS region.
In the Property Editor, click the Code Editor: SQL Query button, and copy and paste the following SQL:select
"ID" ,
"NAME",
"DESCRIPTION",
"PROJECT_LEAD",
"COMPLETED_DATE",
"STATUS",
"CREATED",
"CREATED_BY",
"UPDATED",
"UPDATED_BY",
(select count('x')
from demo_milestones m
where m.project_id = p.id
) milestones,
(select count('x')
from demo_tasks t
where t.project_id = p.id
) tasks
from "DEMO_PROJECTS" pClick OK.
Note: The milestone and task statistics are determined using inner SQL select statements.
In the Rendering tree, under the Content Body region, expand DEMO_PROJECTS and click Attributes.
In the Property Editor, for Link Column select Exclude Link Column.
Click the Save and Run Page button on the toolbar.

-
Reconfigure which columns are displayed by default in the Interactive Report.
In the Interactive Report runtime window, click Actions and select Select Columns.
In the Display in Report column, hold the Ctrl key and click the following items:
- Id
- Description
- Created
- Created By
- Updated
- Updated By
Click the Remove button ( < ) in the center.

Move the Status column above the Completed Date column, by pressing the up arrow ( ↑ ) on the right side.
Click Apply.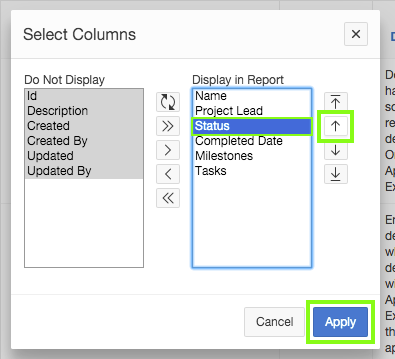
-
Make the Interactive Report functional by adding some aggregations and save the report as the "Primary Report" in the Interactive Report runtime.
In the Interactive Report page of the Demo Projects runtime window, click Actions, select Format, and select Aggregate.
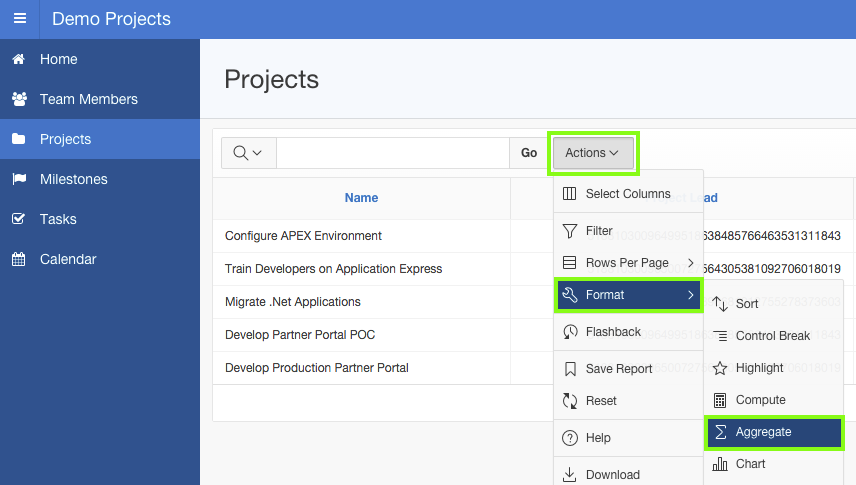
In the Aggregate window, select the following:
- Function - select Sum
- Column - select Milestones
Click Apply.

Repeat the above process (click Actions, select Format, and select Aggregate) to add a sum for Tasks.
Save the "Primary Report" within the Interactive Report runtime:
Click Actions and select Save Report.
For Save select As Default Report Settings.
Verify that Default Report Type is set as Primary and click Apply.
-
The Project Lead column is currently displaying an identifier intead of the team member's name. Defining a List of Values within Shared Components enables the same control to be used on this page and also the form page for proejcts.
In the runtime environment, click Edit Page 4 to return to the Page Designer.
In Page Designer, click the Shared Components button, found on the right side of the toolbar (not in the Rendering tree).
Under Other Components, click List of Values.

Click Create.

Verify Create List of Values is From Scratch. Click Next.
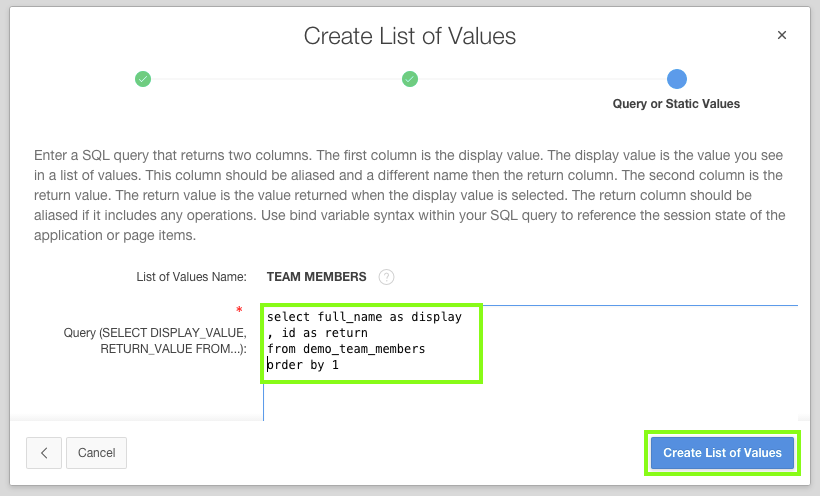
For Name enterTeam Membersand for Type select Dynamic. Click Next.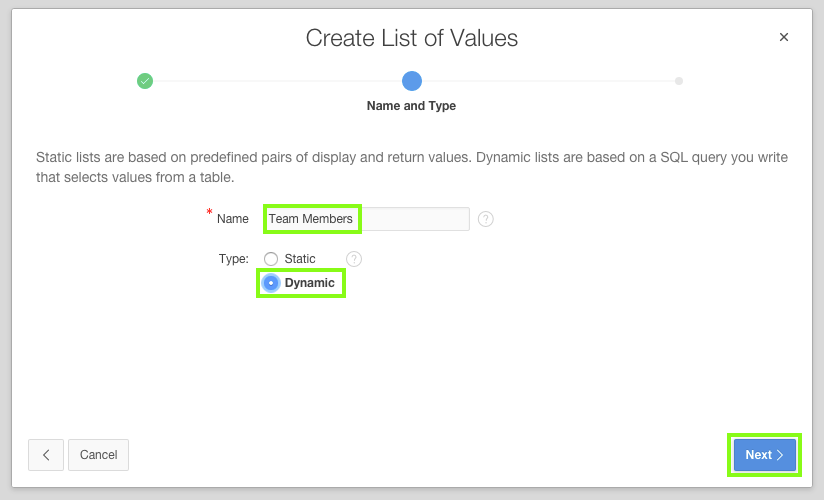
For Query, clear the field then copy and paste the following:
                    select full_name as display

                    , id as return

                    from demo_team_members

                    order by 1
Click Create List of Values.
Click Edit Page 4 on the toolbar, to return to Page Designer.
In the Rendering tree, expand the Columns folder under the DEMO_PROJECTS region. Click the PROJECT_LEAD column.
In the Property Editor:- Identification: Type - select Plain Text (based on List of Values)
- List of Values: List of Values - select TEAM MEMBERS
- Layout: Column Alignment - select left

-
The previous edit icon (pencil) for the Interactive Report has been removed. To navigate to the Project form page (Page 5), define a link on the Name column.
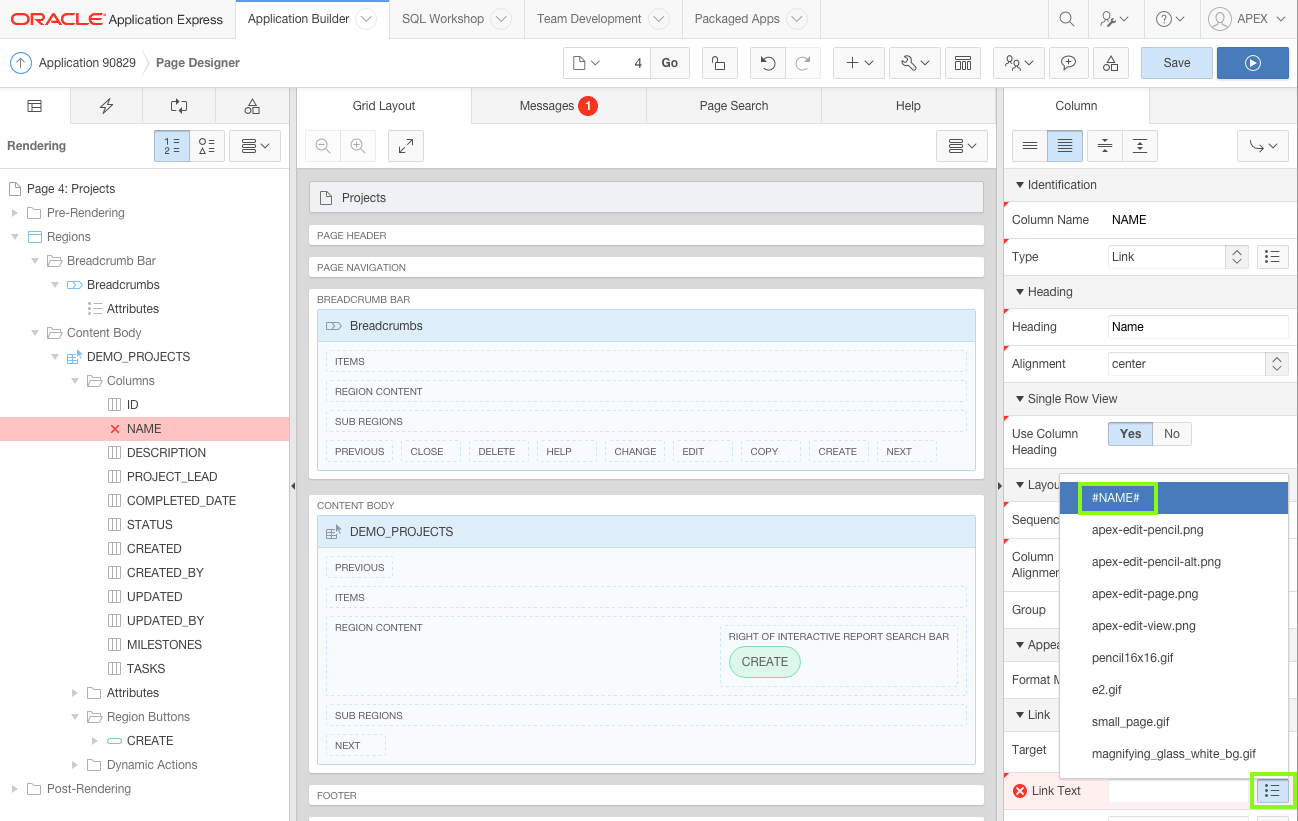
In the Rendering tree, under the Columns folder click Name.
In the Property Editor, for Type select Link
In the Property Editor, under Link: Target, click No Link Defined. Input the following:
- Page - enter
5 - Name - select P5_ID
- Value - select #ID#
- Clear Cache - enter
5
Click OK.
Note: the Link Builder button display changes in the Property Editor to reflect its current configuration.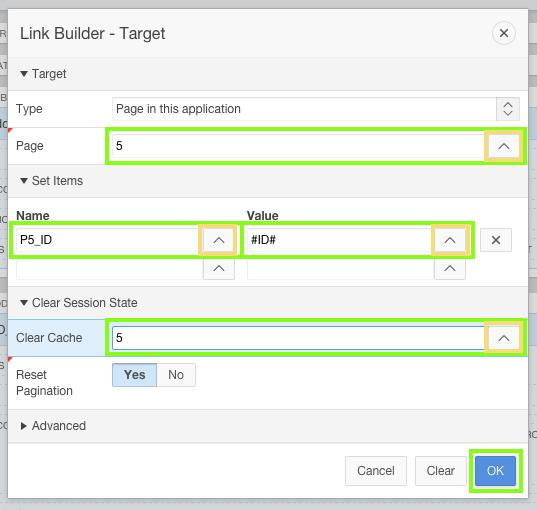
For Link Text, under Link, use the quick pick to select #NAME#.
- Page - enter
-
Currently the Create button is to the right of the Interactive Report action button. It would look more asthetically pleasing to place this button at the top of the page.
In the Grid Layout, locate the Breadcrumbs region. Note that there are several elements surrounded by dotted lines. These are placeholders for buttons.
Locate the DEMO_PROJECTS region. Click and hold the Create button and drag it up to the Breadcrumbs region and into the Create placeholder.

In the Property Editor, for Label enter
Create Project. For Hot select Yes.
Click Save and Run Page to see the completed page.
-
Modify the default Project form page to be more visually appealing and consistent with how the Maintain Team Member page was improved.
In the Demo Projects runtime environment, navigate to the Projects page and click one of the Project names (such as Configure APEX Environment), to open a modal dialog.
Next, make Name mandatory, expand Description so that is shows all the data, change some items, such as Project Lead and Status, to lists, and move the audit columns to a sub-region.In the runtime environment, after selecting a project, click Edit Page 5.
In the Property Editor:- Identification: Name - enter
Maintain Project - Identification: Title - enter
Maintain Project - Navigation: Cursor Focus - select First item on page


- Identification: Name - enter
-
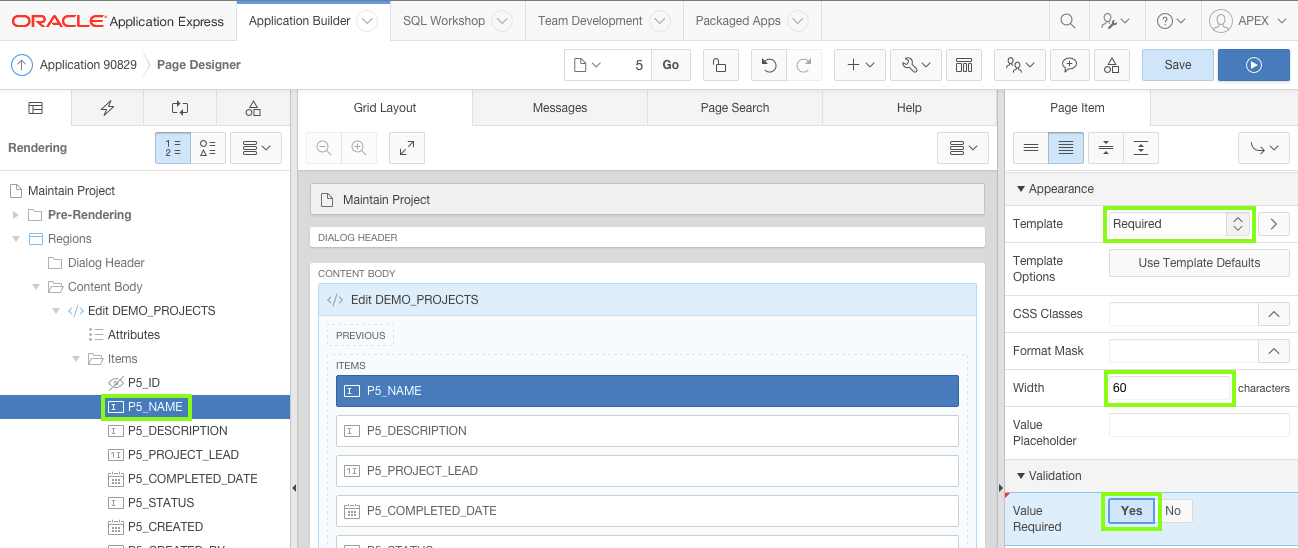
Update the page items.
In the Grid Layout, under Content Body, click the P5_NAME item.
In the Property Editor:- Appearance: Template - select Required
- Appearance: Width - enter
60 - Validation: Value Required - select Yes
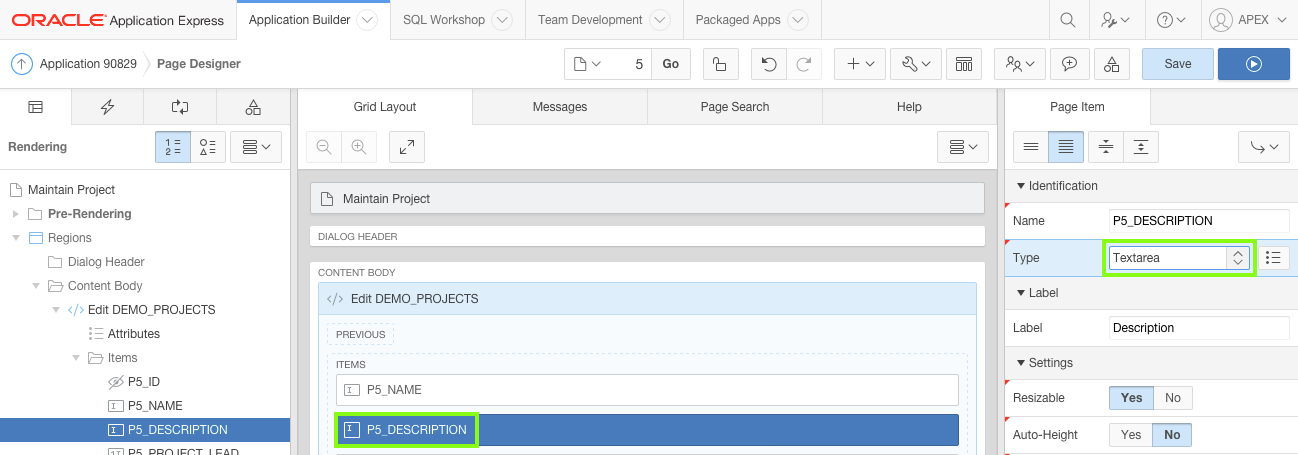
In the Grid Layout, click the P5_DESCRIPTION item.
In the Property Editor:- Identification: Type - select Textarea
- Appearance: Width - enter
70 - Help: Help Text - delete any text to clear the field


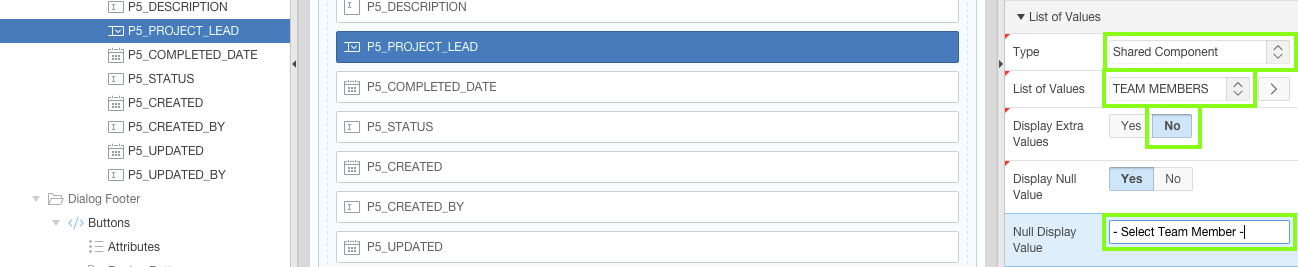
In the Grid Layout, click the P5_PROJECT_LEAD item.
In the Property Editor:- Identification: Type - select Select List
- List of Values: Type - select Shared Component
- List of Values: List of Values - select TEAM_MEMBERS
- List of Values: Display Extra Values - select No
- List of Values: Null Display Value - enter
- Select Team Member -
Note: The
P5_PROJECT_LEADitem is using the List of Values defined in Shared Components in an earlier topic.
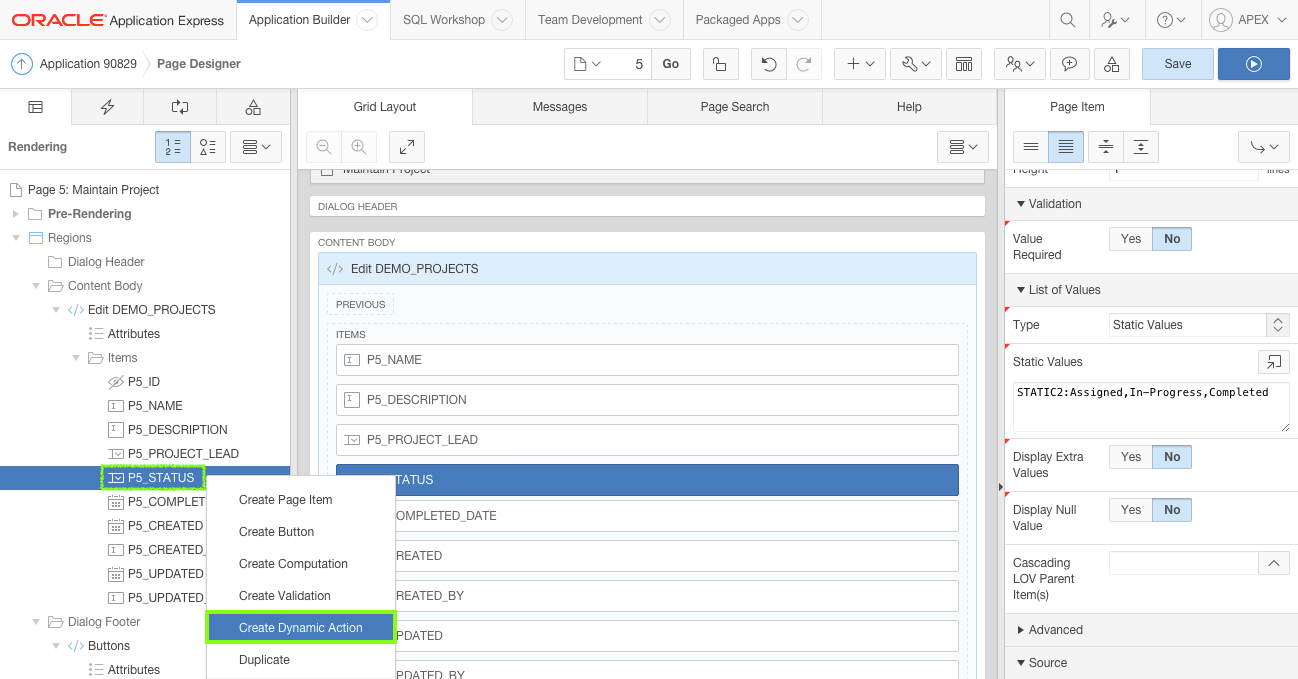
Next define a static list of statuses. You can not define a dynamic list, as you did for TEAM_MEMBERS, as there is not a separate table which stores the statuses.
In the Grid Layout, locate the P5_STATUS item. Click and hold P5_STATUS and drag it above the P5_COMPLETED_DATE column.
Note: The Status item should be placed before the Completed Date as the date should only be entered when the status is Completed.
In the Property Editor:
- Identification: Type - select Select List
- List of Values: Type - select Static Values
- List of Values: Static Values - enter
STATIC2:Assigned,In-Progress,Completed
Note: By specifyingSTATIC2the records will be displayed in the order entered, rather than in alphabetic order. - List of Values: Display Extra Values - select No
- List of Values: Display Null Values - select No

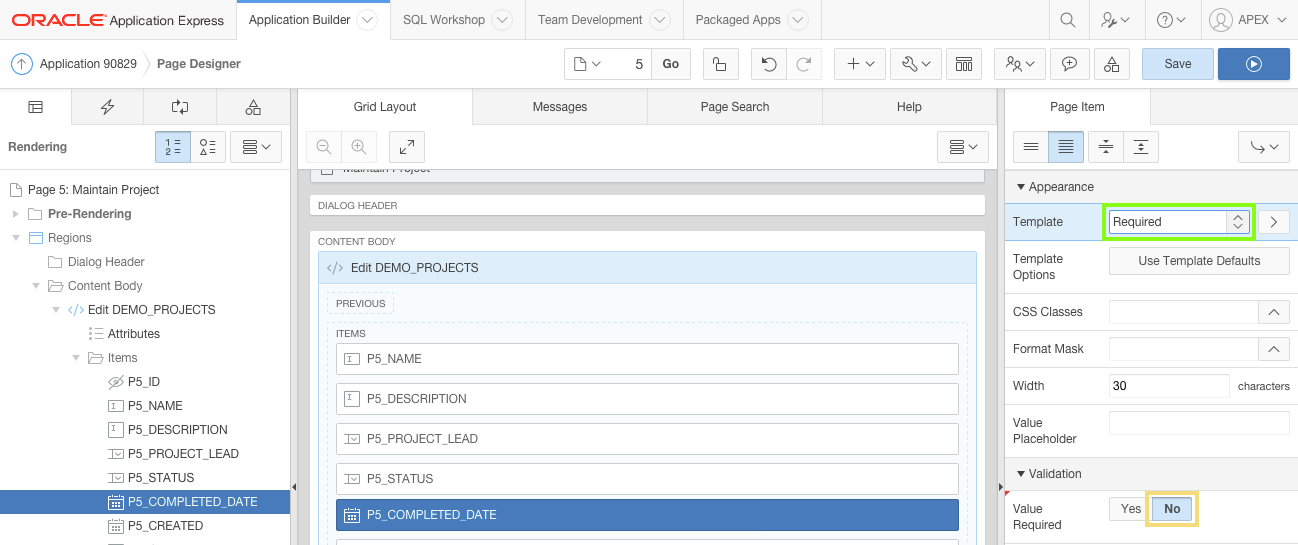
Click the P5_COMPLETED_DATE item, and for Template select Required.
Note: Generally when an item is mandatory you update the Template to Required and the Value Required to Yes. However, in this instance the Value Required attribute should remain No because the item is only mandatory when the status is Completed. A validation is added later in this section to accomodate this business rule.
-
Dynamic Actions within Application Express are used to declaratively define client-side behaviors without needing to write JavaScript or AJAX. Instead the Application Express engine implements the necessary code, based on your declaration.
Create a Dynamic Action.
Right-click the P5_STATUS item and select Create Dynamic Action.
In the Property Editor:
- Identification: Name - enter
Show Completed Date - When: Condition - select equal to
- When: Value - enter
Completed
Note: The capitalization and spelling of the value must match the data entry value exactly in order for the dynamic action to fire.
Note: The Item(s) already has the value P5_STATUS as you right-clicked on that item to create the dynamic action.
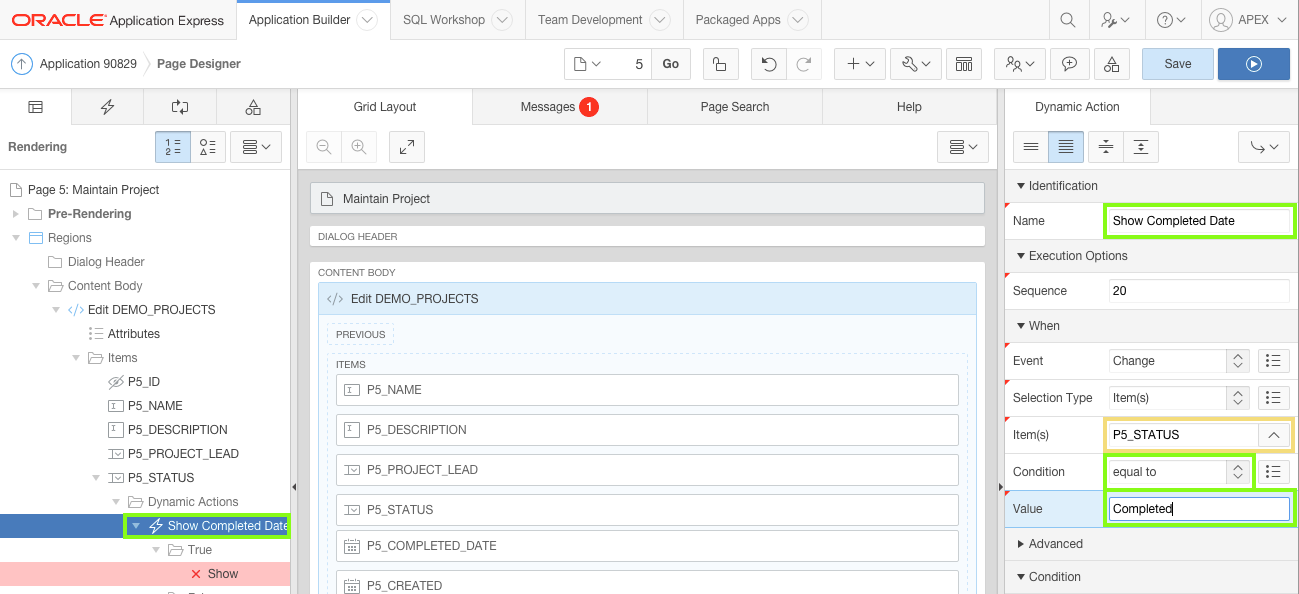
In the Rendering tree, under the Show Completed Date dynamic action, expand the True folder and select Show.
In the Property Editor, for Item(s) select P5_COMPLETED_DATE.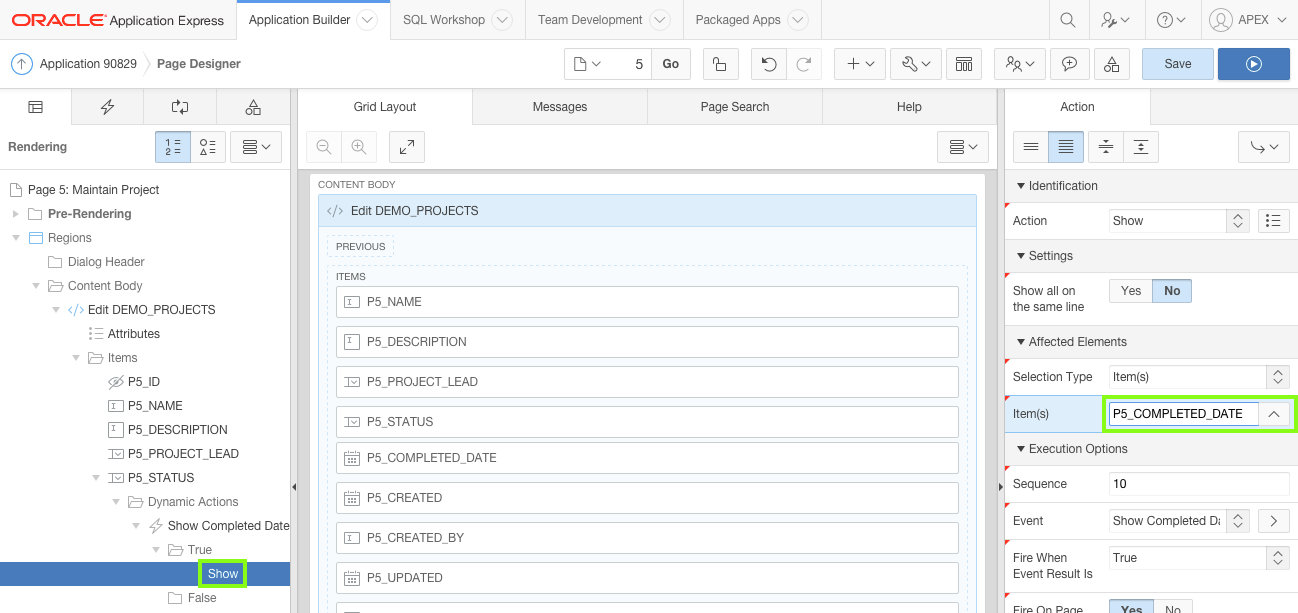
Right-click Show and select Create Opposite Action.
Note: For Dynamic Action types, such as Show, Enable, and Expand Tree, it is important to also include the corresponding opposite action. In that way the affected elements are set one way if the When Condition evaluates to True and the opposite if the When Condition evaluates to False. In this case the
P5_COMPLETED_DATEitem is shown whenP5_STATUSequals Completed, and is hidden when any other status is selected.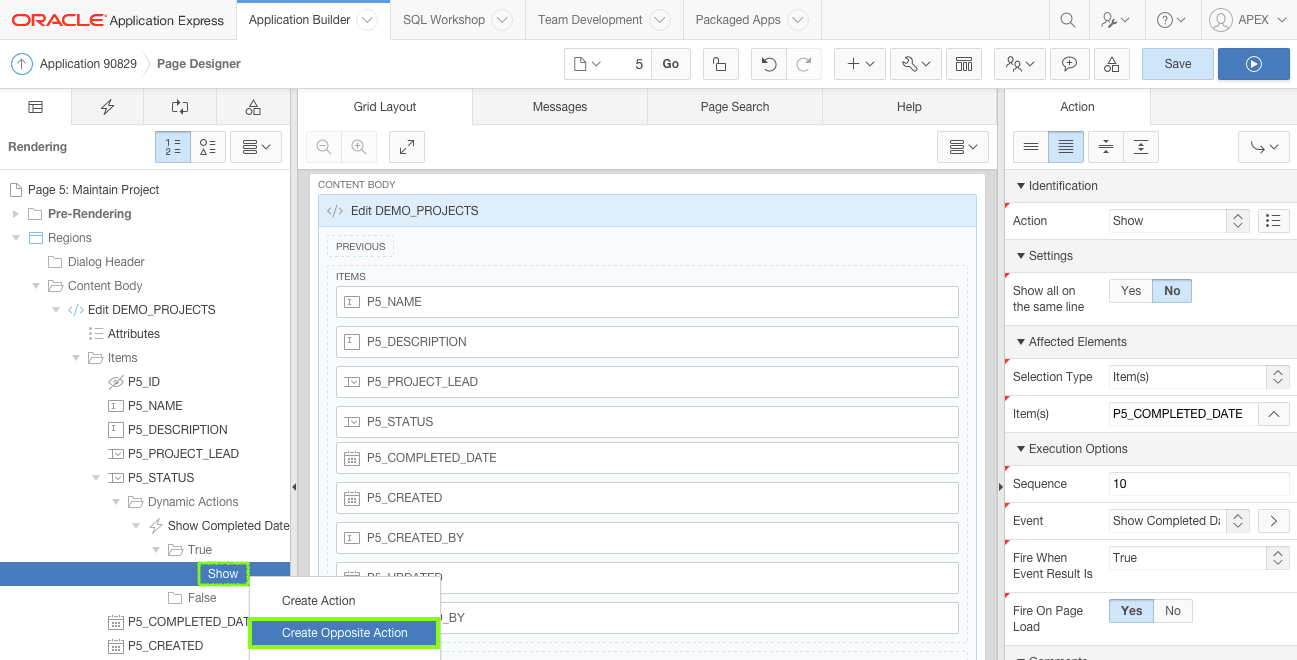
- Identification: Name - enter
-
Add validations to the Maintain Projects page so that when a user changes the staus to Completed, they add the Completed Date and that it is not forward-dated.
In the left pane, click the Processing tab.
Right-click the Validating node and select Create Validation.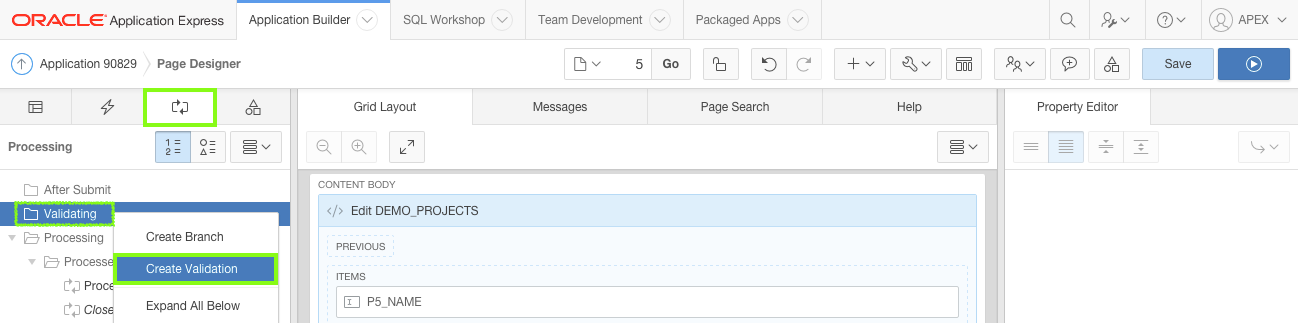
In the central pane, click the Help tab.
Note: The help text displays the currently selected attribute in the Property Editor (right pane). For example, clicking on the Validation Type attribute label (not the select list) displays a list of all the available options, together with a description of when each option will pass (not display the error message) or fail (displays the error message).In the Property Editor:
- Identification: Name - enter
Completed Date is Not Null - Validation: Type - select Item is NOT NULL
- Validation: Item - select P5_COMPLETED_DATE
- Error: Error Message - select the Error Message attribute label (not the data entry area), at which point the Help pane will display the help text for Error Message. On the Help pane under Examples, copy and paste the following
#LABEL# must have some valueinto the Property Editor attribute - Condition: Type - select Item = Value
- Condition: Item - select P5_STATUS
- Condition: Value - enter
Completed
Note: This condition ensures that the validation only fires when the Status item isCompleted.
Note: The
#LABEL#text within the Error Message will be substituted with the Label of the associated item. In this manner, if the item label is updated the error message will also reflect the updated value. This improves consistency and prevents messages having an out of date label reference.

In the Processing pane, right-click Validating and select Create Validation.
In the Property Editor:- Identification: Name - enter
Completed Date is not Forward Dated - Validation: PL/SQL Expression - enter
:P5_COMPLETED_DATE <= sysdate - Error: Error Message - enter
#LABEL# can not be forward dated - Error: Associated Item - select P5_COMPLETED_DATE
- Condition: Type - select Item is NOT NULL
- Condition: Item - select P5_COMPLETED_DATE
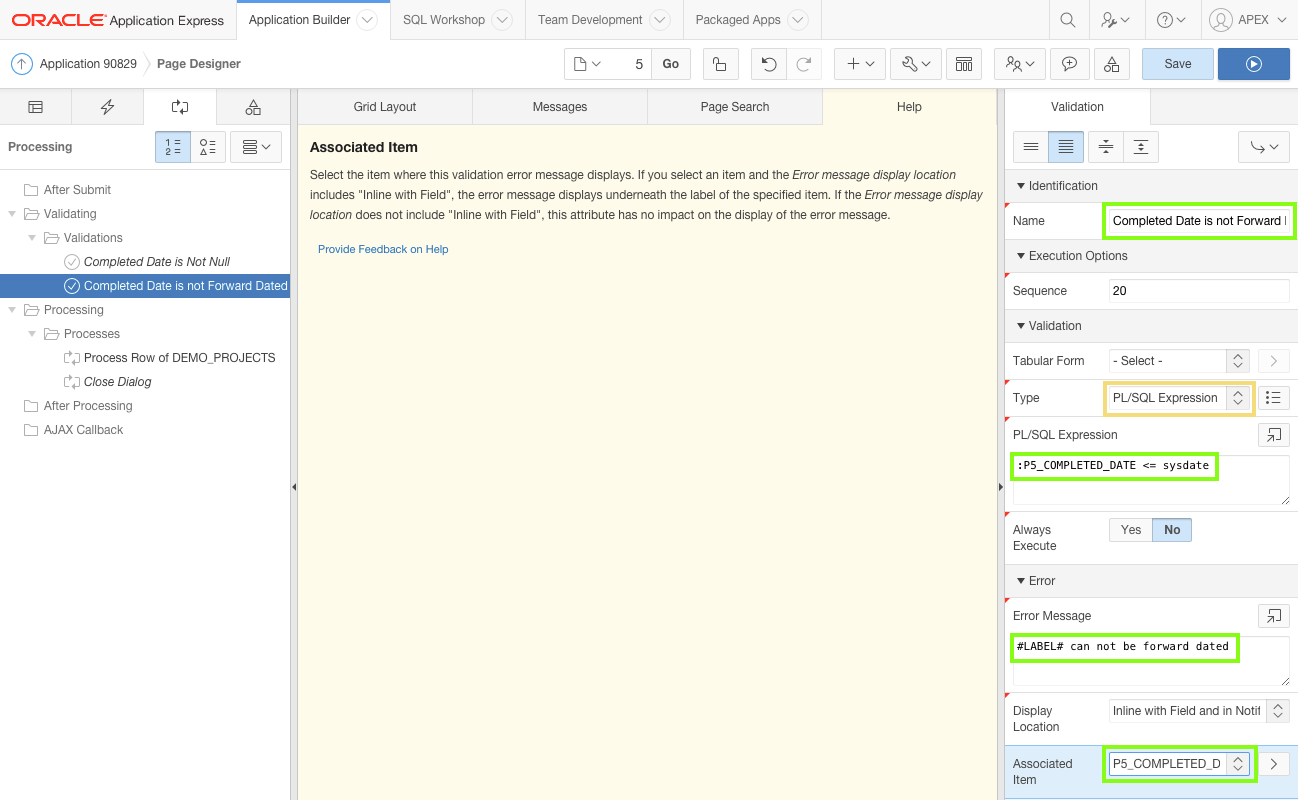

Click Save.
- Identification: Name - enter
-
In an earlier topic you created a sub-region called Audit Details for the Maintain Team Member page (Page 3). Since the four items included in that region are the same as those on the Maintain Project page and are associated with the exact same database columns, you can copy them to the Maintain Project page. This approach is easier than creating a new region and updating the items. Copying the region will also copy the previously defined template and template options.
Delete the four audit items before copying the Audit Details region to this page. If you do not delete them, the item names in the copied Audit Details region will be renamed with a unique name (for example, P5_CREATED will be renamed to P5_CREATED_1) to ensure all page items have unique names. Although this renaming will not break the page processing, Oracle does not recommend this approach.
In the left pane, click Rendering.
In the central pane, click Grid Layout
In the Grid Layout, hold the Ctrl key and click the following items:- P5_CREATED
- P5_CREATED_BY
- P5_UPDATED
- P5_UPDATED_BY
Press the Delete key or use the context menu (ricght-click) to remove the four items.

Click Save.
Copy the Audit Details region from Page 3 to Page 5.
In Page Designer, navigate to Page 3.
In the Rendering tree, right-click the Audit Details sub region and select Copy to other Page....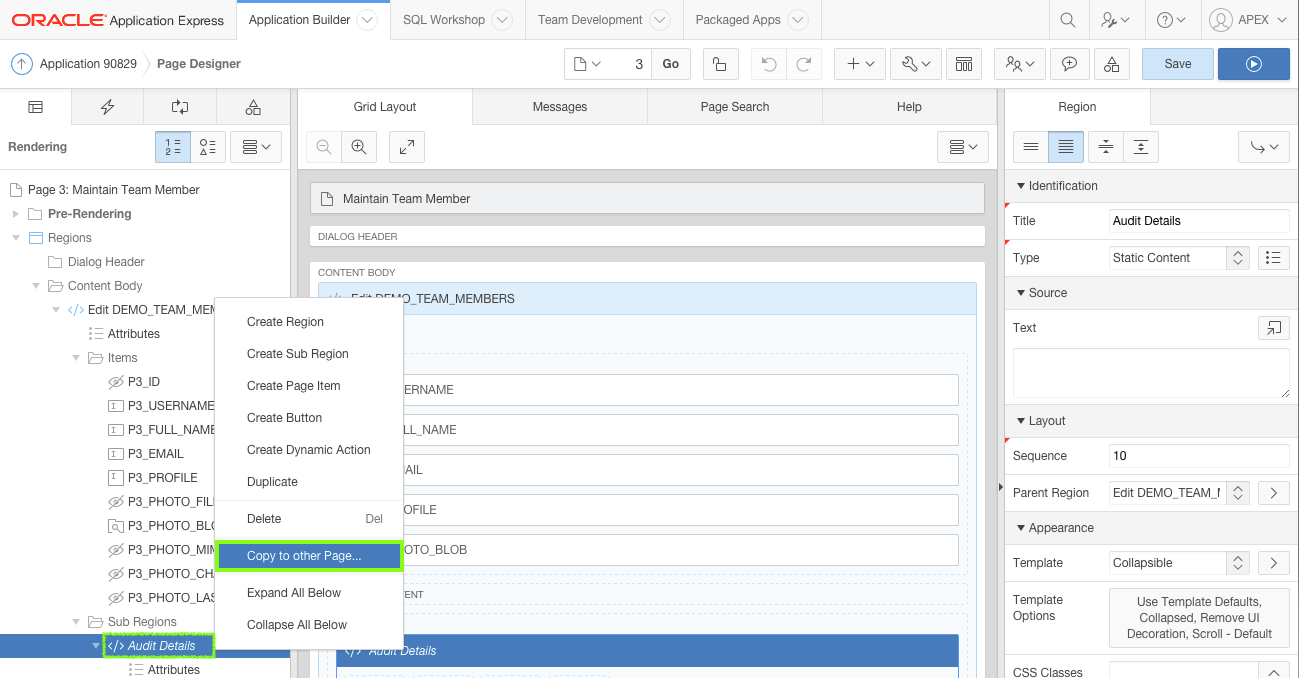
In the Copy Region dialog, input the following:
- To Page - enter
5 - Copy Region Items - select Yes
Click Next.

Click Copy.
In Page Designer, navigate back to Page 5.
In the Rendering tree, select the Audit Details sub region.
In the Property Editor, for Layout: Parent Region select Edit DEMO_PROJECTS.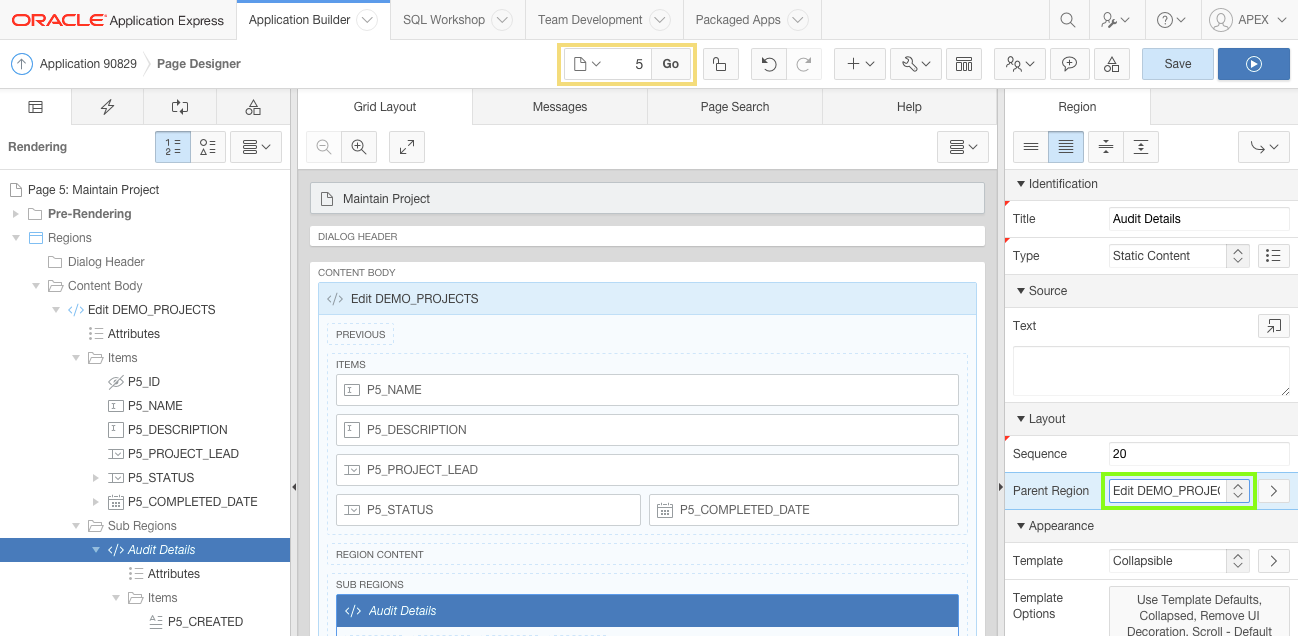
-
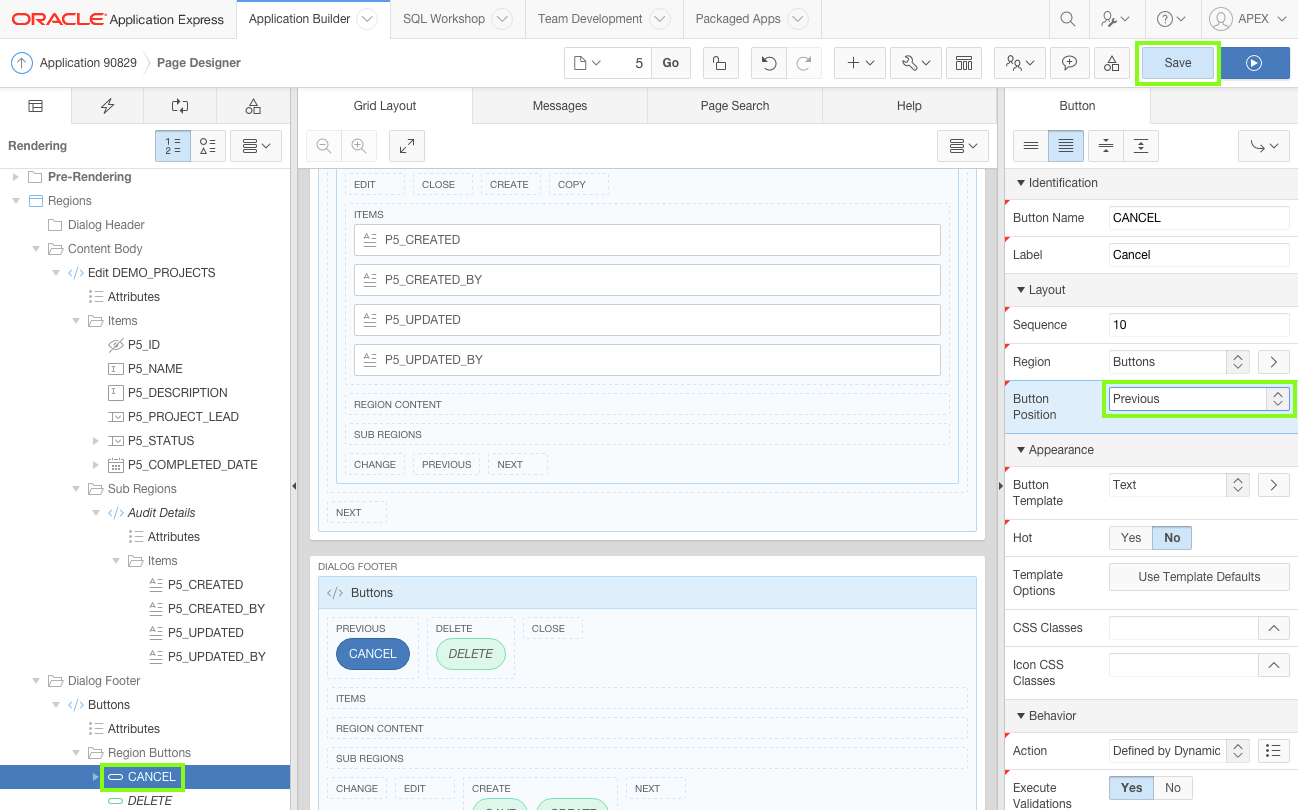
Reposition the buttons.
Click the CANCEL button.
In the Property Editor, for Layout: Button Position select Previous.Click Save.
-
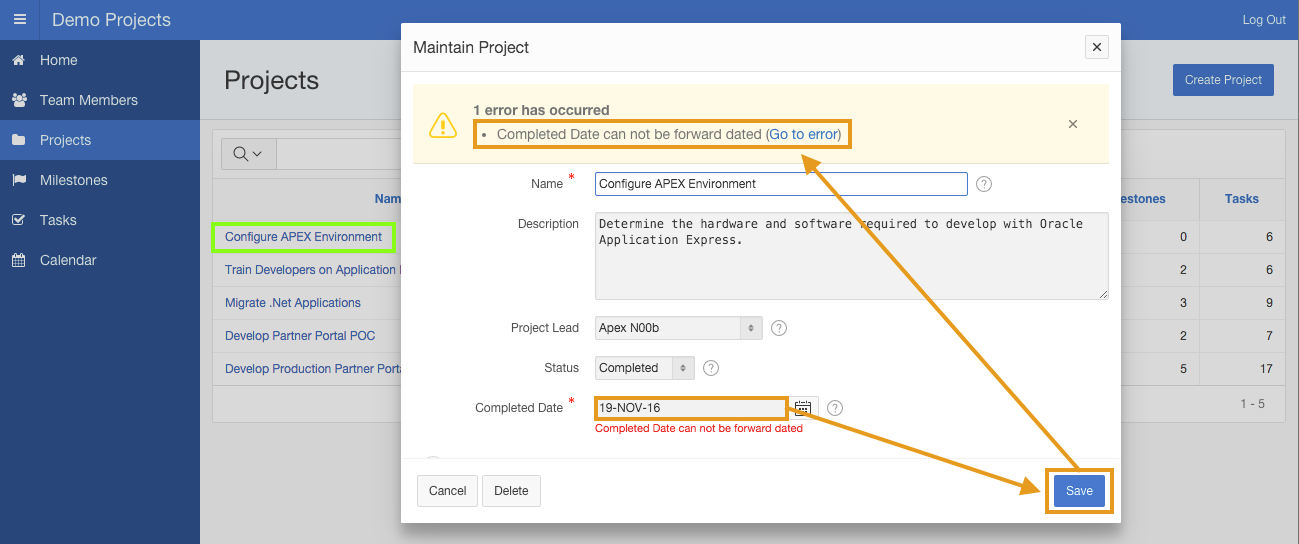
Navigate to Projects (Page 4) and run the page. In the runtime environment select a project, such as Configure APEX Environment.
Try out these functions to see how the page responds:
- Change the Status and see how the Completed Date is shown or hidden depending on the status selected.
- Save a record with a Status of Completed and no Completion Date - An error message should be displayed.
- Save a record with a Completion Date in the future - An error message should be displayed.
7. Updating the Milestone Pages
In this topic, you will update the report and form for milestones.
Note: If you have not completed the previous topic, you can import the Basic Projects App Export - Topic 6.sql file into your workspace, and continue working from this topic forward. You can find the export file in the /files subdirectory where you unzipped the original file. See Appendix A - Importing an Application.
-
Return to Application Builder, and navigate to 6 - Demo Milestones.
Update the page properties from Demo Milestones to Milestones.
In the Property Editor:- Identification: Name - enter
Milestones - Identification: Title - enter
Milestones
Click Save.

- Identification: Name - enter
-
Update the breadcrumb entry for the page.
In the Rendering tree, click the Shared Components tab.
Expand the Breadcrumbs folder and click the Breadcrumb entry.
In the Property Editor, click the Edit Component button.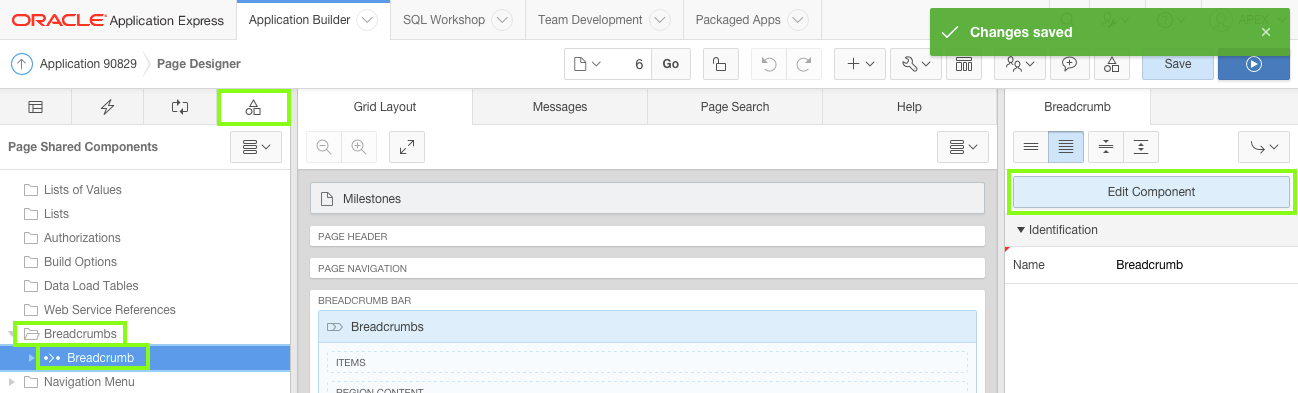
Click the Demo Milestones breadcrumb entry.
For Short Name, enter
Milestones, and click Apply Changes.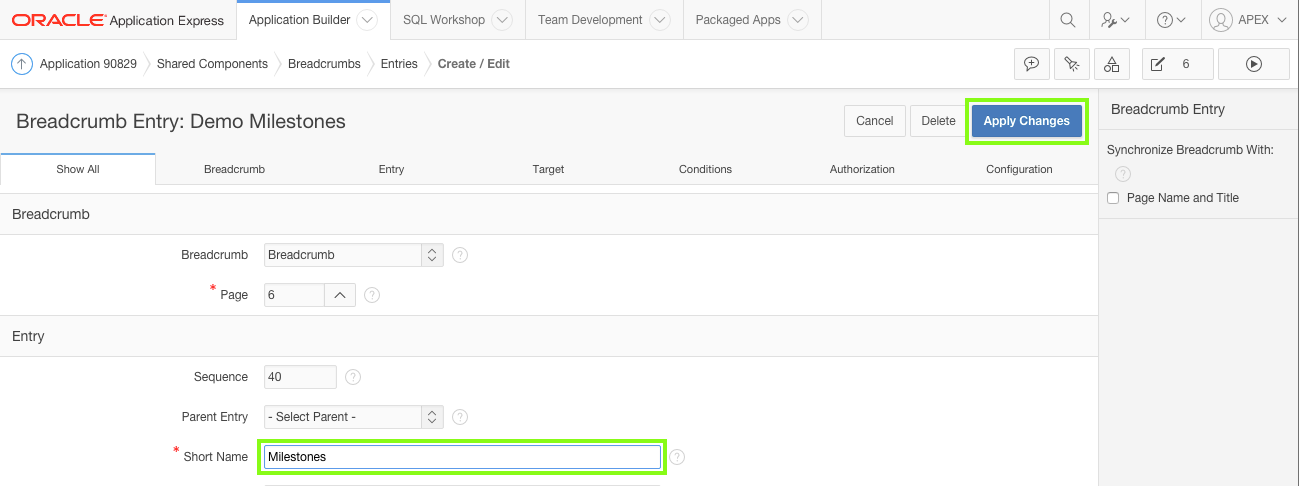
Click Edit Page 6 on the toolbar to return to Page Designer.
-
Modify the existing Milestones Interactive Report (Page 6) and update the SQL Query associated with the report to add a new column.
Click the DEMO_MILESTONES region.
In the Property Editor, click the Code Editor: SQL Query button, and copy and paste the following SQL:select
"ID" ,
"PROJECT_ID",
"NAME",
"DESCRIPTION",
"DUE_DATE",
"CREATED",
"CREATED_BY",
"UPDATED",
"UPDATED_BY",
(select count('x')
from demo_tasks t
where t.milestone_id = m.id
) tasks
from "DEMO_MILESTONES" mClick OK.

Click the Save and Run Page button on the toolbar.
-
Reconfigure which columns are displayed by default in the Interactive Report.
In the Interactive Report runtime window, click Actions and select Select Columns.
In the Display in Report column, hold the Ctrl key and click the following items:
- Id
- Description
- Created
- Created By
- Updated
- Updated By
Click the Remove button ( < ) in the center.
Click Apply.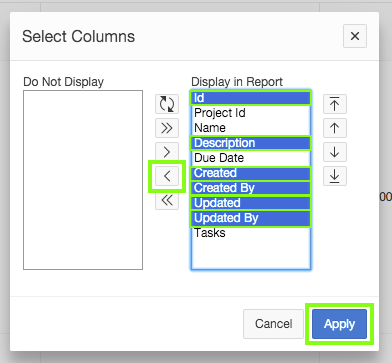
-
Group the records by Project and order them by Due Date.
In the Interactive Report runtime window, click the Project Id column
Click Control Break.
In the Interactive Report runtime window, click Actions, then select Format, and select Sort.
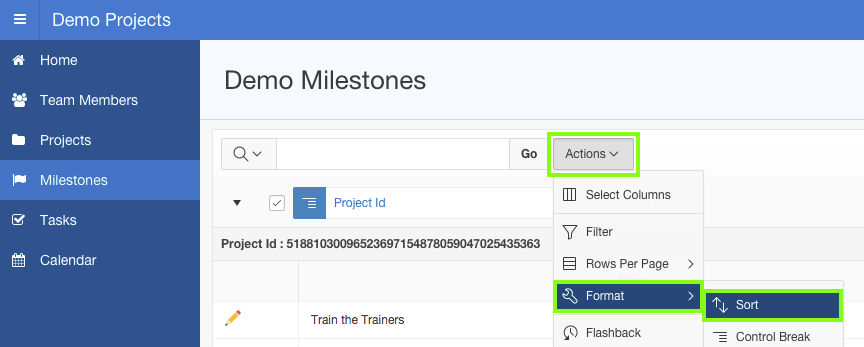
For Column select Due Date, verify Direction is Ascending. For Null Sorting select Nulls Always Last.
Click Apply.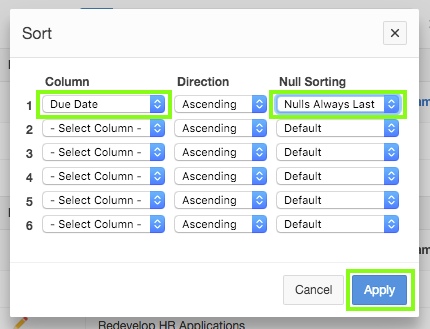
-
Make the Interactive Report functional by adding an aggregation and save the report as the "Primary Report" in the Interactive Report runtime.
In the Interactive Report page of the Demo Projects runtime window, click Actions, select Format, and select Aggregate.
In the Aggregate window, select the following:
- Function - select Sum
- Column - select Tasks
Click Apply.
Note: In this report the Tasks are aggregated for each Project, as the report breaks for each Project.
Save the "Primary Report" within the Interactive Report runtime:
Click Actions and select Save Report.
For Save select As Default Report Settings.
Verify that Default Report Type is set as Primary and click Apply. -
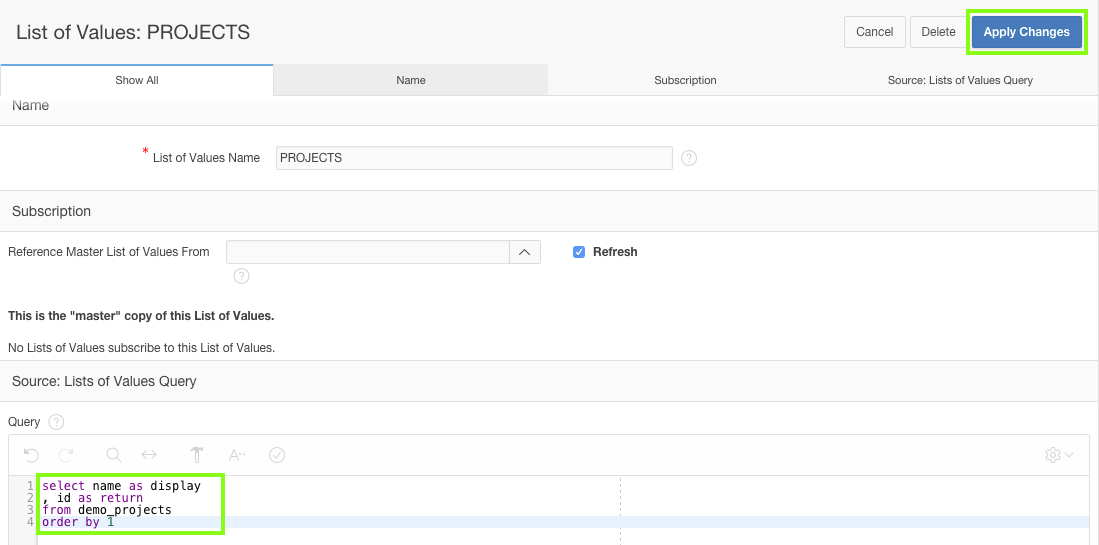
The Project Id column is currently displaying an identifier instead of the project name. Defining a List of Values within Shared Components enables the same control to be used on this page, the form page for milestones, and the task pages.
In the runtime environment, click Edit Page 6 to return to the Page Designer.
In Page Designer, click Shared Components found on the right on the toolbar.Under Other Components, click List of Values.
Click Copy.
For Copy List of Values select TEAM MEMBERS - Dynamic.
For New List of Values Name enterProjects.
Click Copy.
Click the PROJECTS List of Values entry.
For Query, copy and paste the folliwing:
                    select name as display

                    , id as return

                    from demo_projects

                    order by 1
Click Apply Changes.
Click Edit Page 6 on the toolbar, to return to Page Designer.
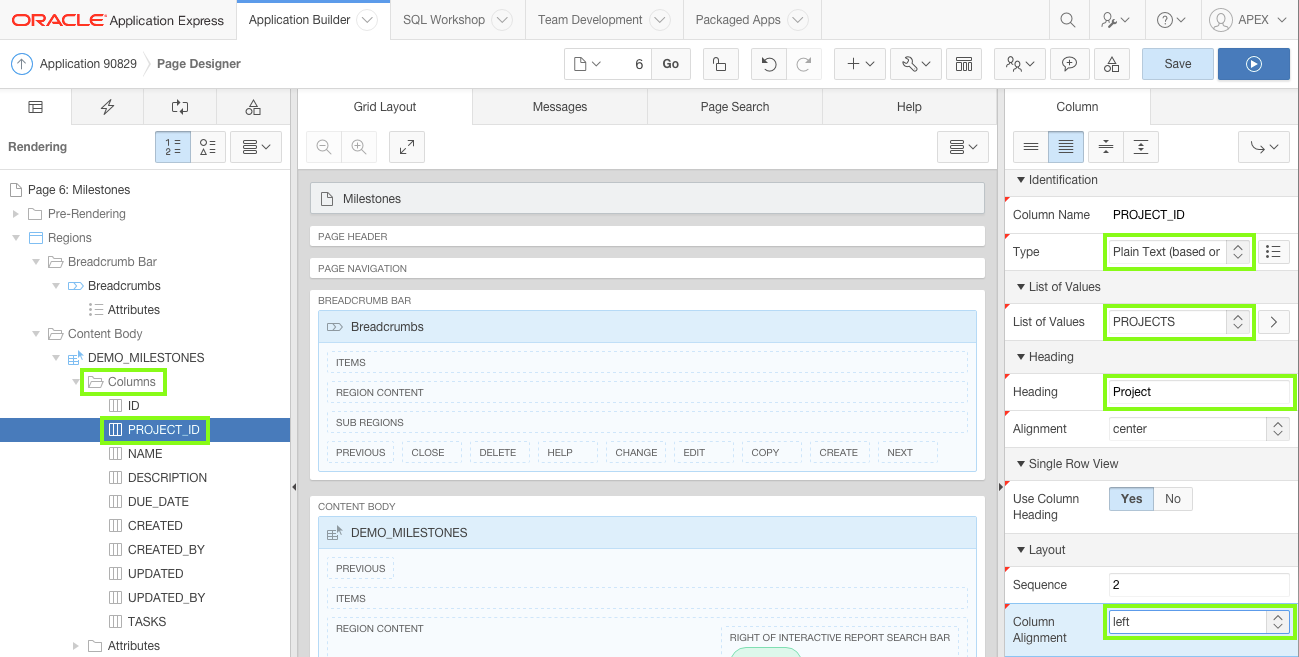
In the Rendering tree, expand the Columns folder under the DEMO_MILESTONES region. Click the PROJECT_ID column.
In the Property Editor:- Identification: Type - select Plain Text (based on List of Values)
- List of Values: List of Values - select PROJECTS
- Heading: Heading - enter
Project - Layout: Column Alignment - select left
-
The Name column is ambiguous and should be relabelled.
In the Rendering tree, click the Name column.
In the Property Editor, for Heading enterMilestone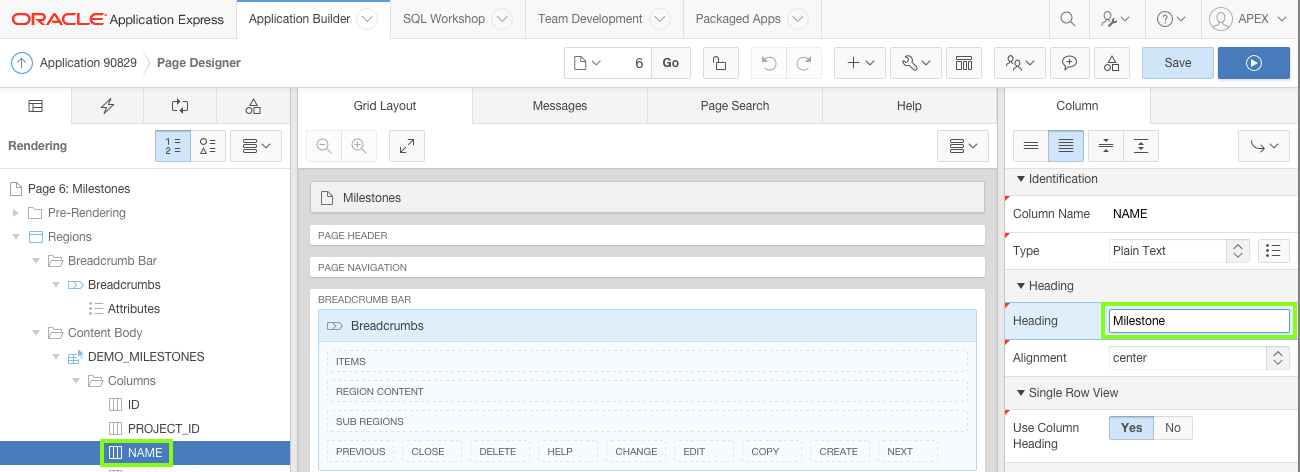
-
Reposition the CREATE button to the top of the page.
Locate the DEMO_MILESTONES region. Click the Create button.
In the Property Editor:- Identification: Label - enter
Create Milestone - Layout: Region - select Breadcrumbs
- Layout: Button Position - select Create
- Appearance: Hot - select Yes
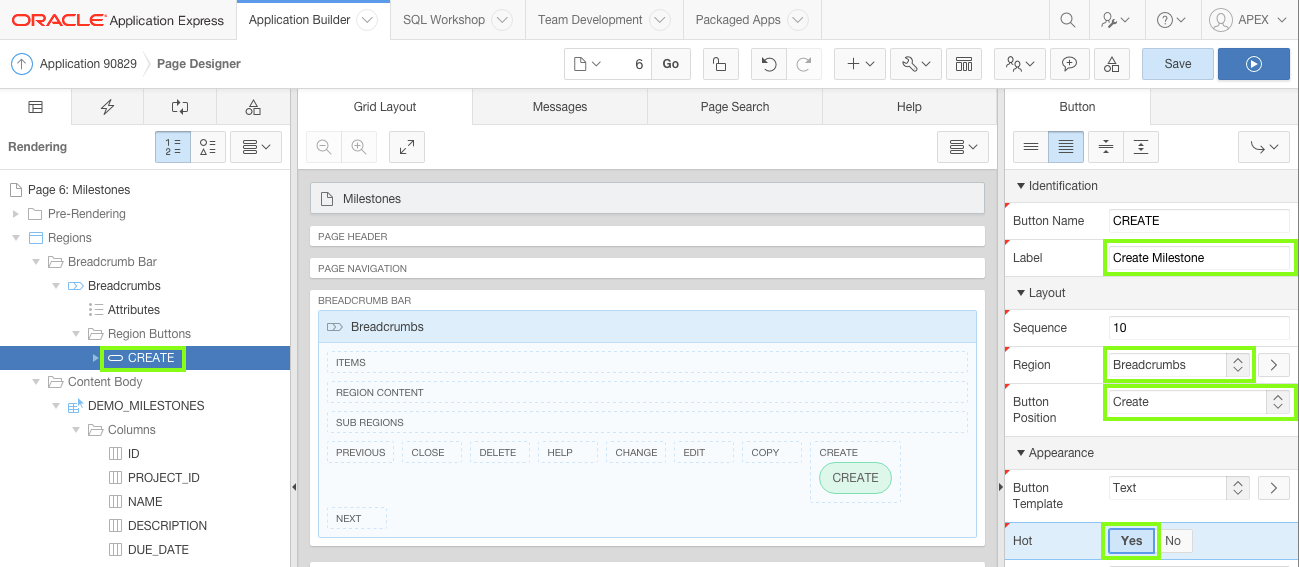
- Identification: Label - enter
-
Click Save and Run Page to see the completed page.
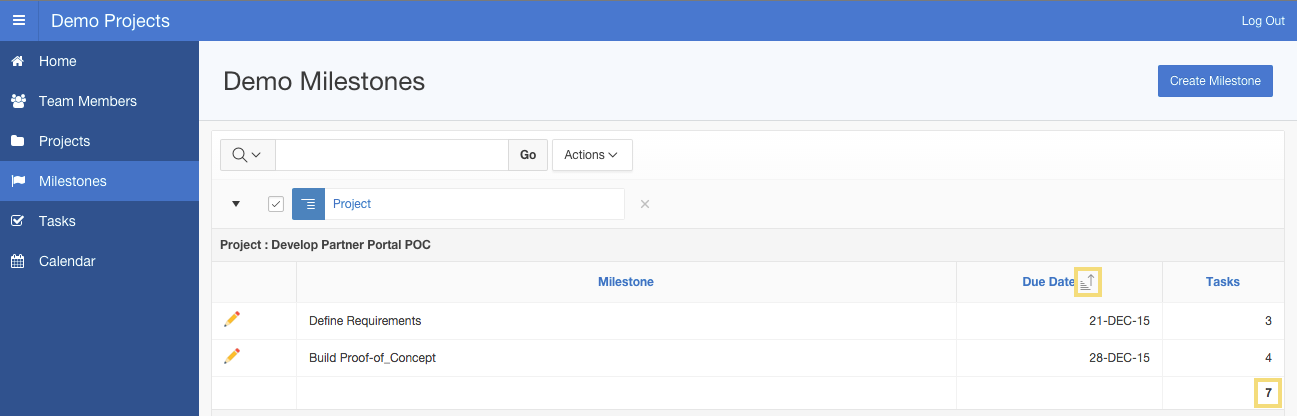
-
Modify the default Milestone form page to be more visually appealing
In the Demo Projects runtime environment, navigate to the Milestones page and open one of the records by clicking the edit icon (pencil).
Next, make Project Id and Name mandatory, expand Description so that is shows all the data, and move the audit columns to a sub-region.Run the page and select a milestone. Then, click Edit Page 7 on the Developer toolbar.
In the Property Editor:- Identification: Name - enter
Maintain Milestone - Identification: Title - enter
Maintain Milestone - Navigation: Cursor Focus - select First item on page
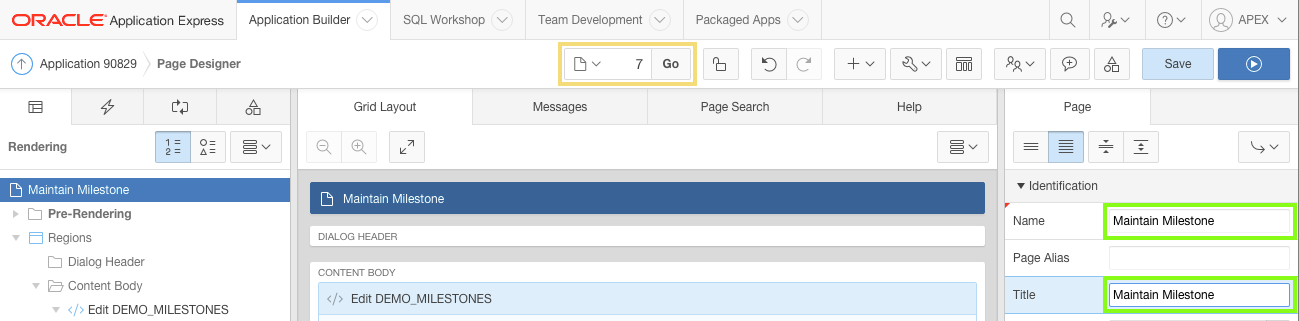

- Identification: Name - enter
-
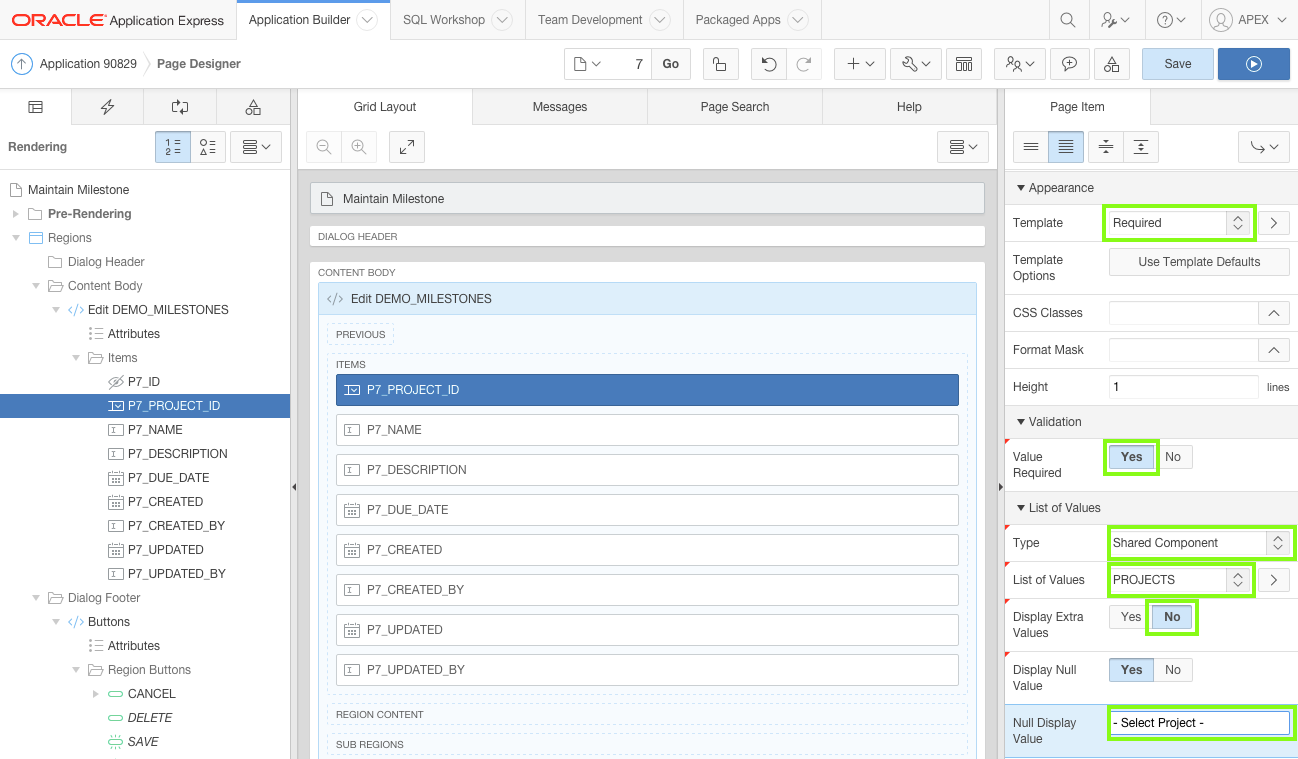
Update the page items.
In the Grid Layout, under Content Body, click the P7_PROJECT_ID item.
In the Property Editor:- Identification: Type - select Select List
- Label: Label - enter
Project - Appearance: Template - select Required
- Validation: Value Required - select Yes
- List of Values: Type - select Shared Component
- List of Values: List of Values - select PROJECTS
- List of Values: Display Extra Values - select No
- List of Values: Null Display Value - enter
- Select Project -

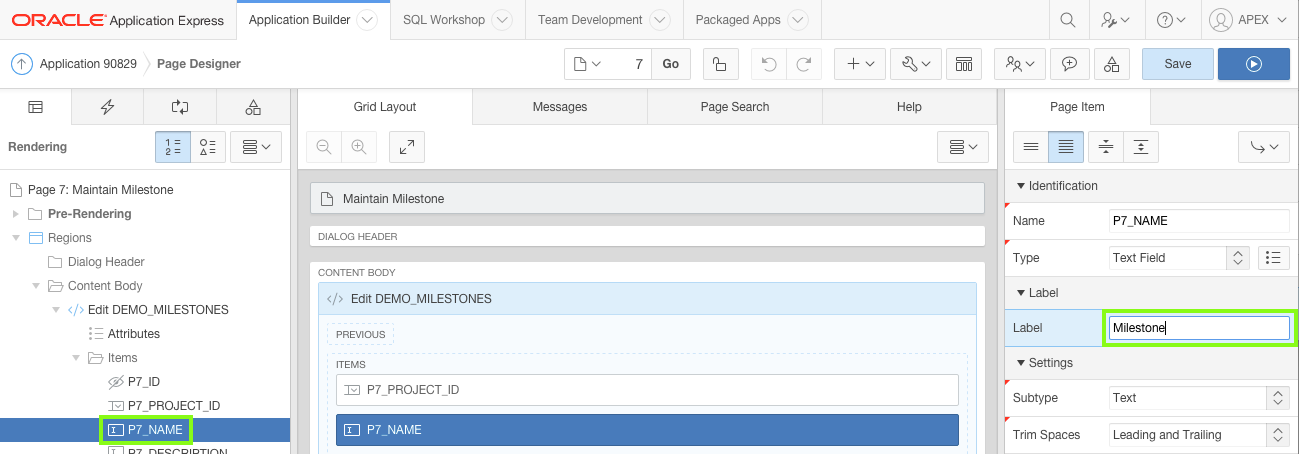
In the Rendering tree, click the P7_NAME item.
In the Property Editor:- Label: Label - enter
Milestone - Appearance: Template - select Required
- Appearance: Width - enter
60 - Validation: Value Required - select Yes

In the Grid Layout, click the P7_DESCRIPTION item.
In the Property Editor:- Identification: Type - select Textarea
- Appearance: Width - enter
70 - Help: Help Text - delete any text to clear the field


-
Delete the four audit items from the Maintain Milestone page.
In the Rendering tree, hold the Ctrl key and click the following items:
- P7_CREATED
- P7_CREATED_BY
- P7_UPDATED
- P7_UPDATED_BY
Press the Delete key or use the contxt menu (right-click) to remove the four items.
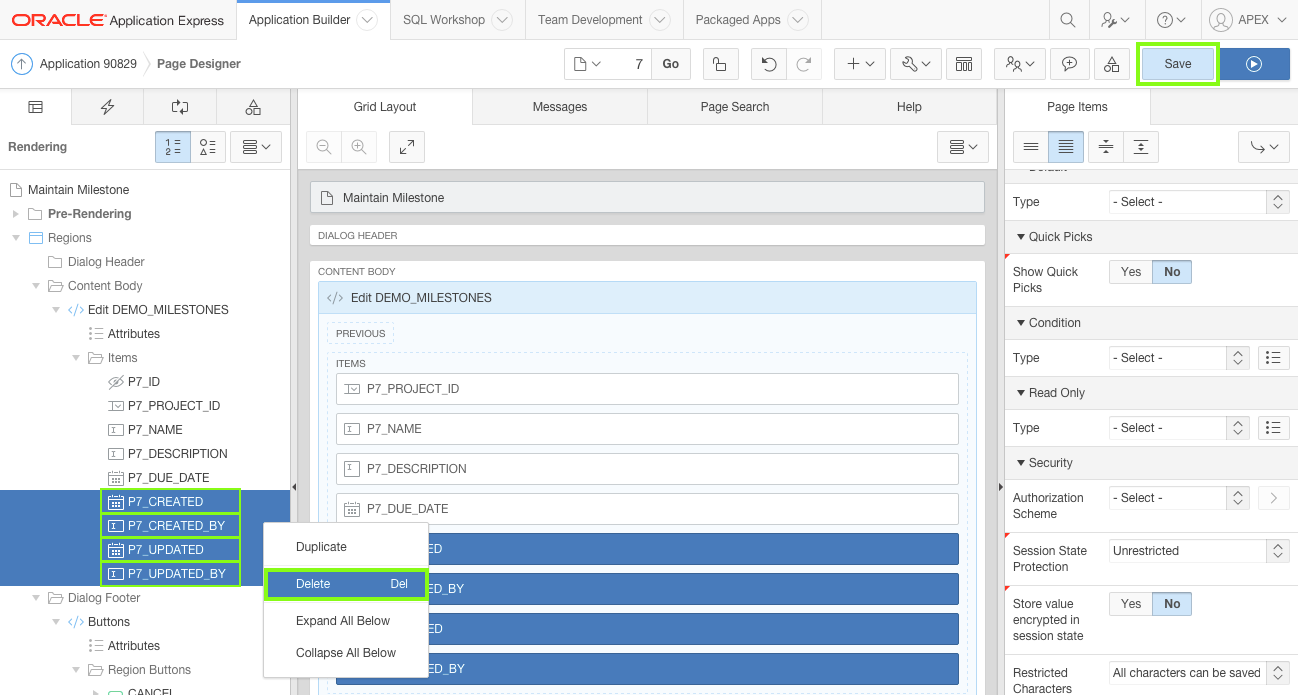
Click Save.
Copy the Audit Details region from Page 3 to Page 7.
In Page Designer, navigate to Page 3.
In the Rendering tree, right-click the Audit Details sub region and select Copy to other Page....In the Copy Region dialog, input the following:
- To Page - enter
7 - Copy Region Items - select Yes
Click Next.
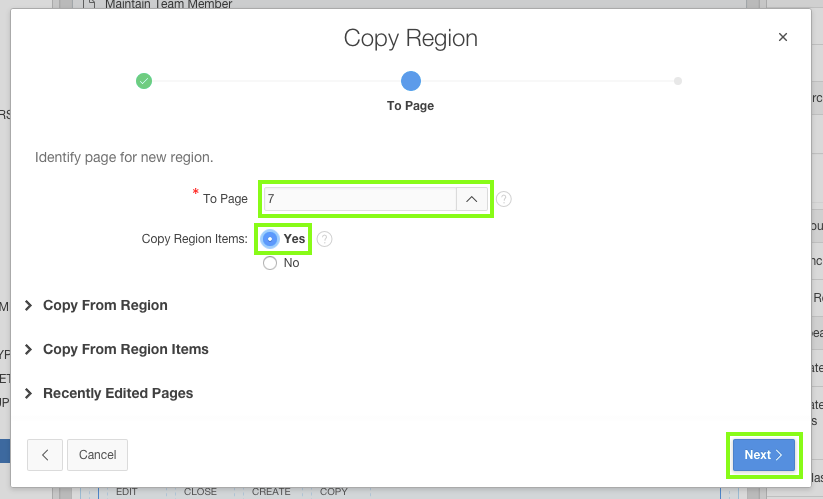
Click Copy.
In Page Designer, navigate back to Page 7.
In the Rendering tree, select the Audit Details sub region.
In the Property Editor, for Layout: Parent Region select Edit DEMO_MILESTONES.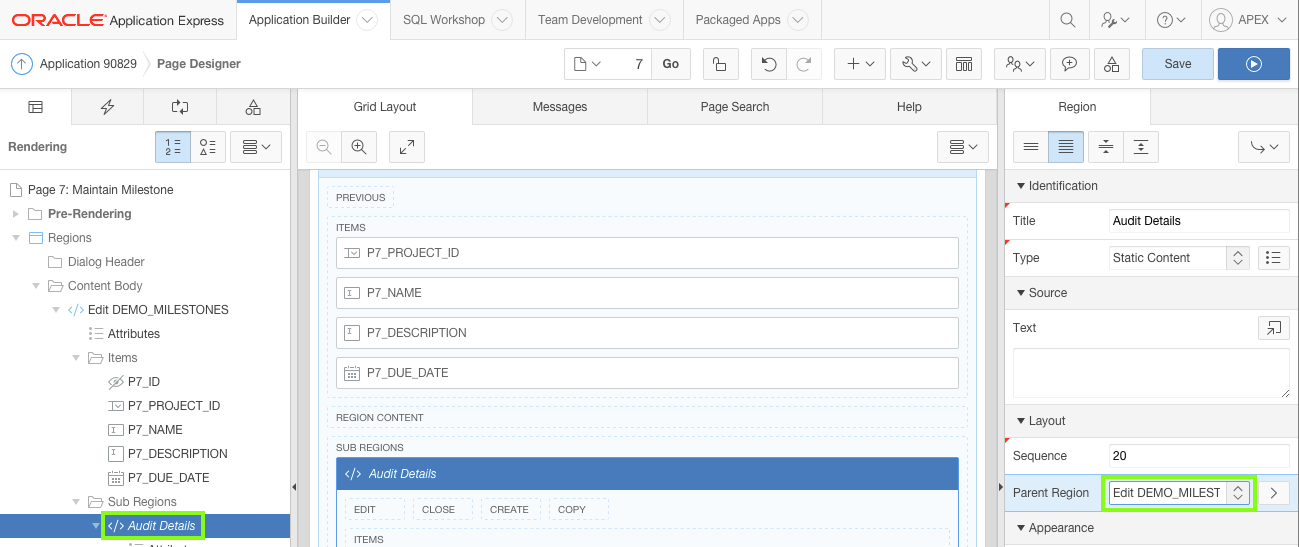
-
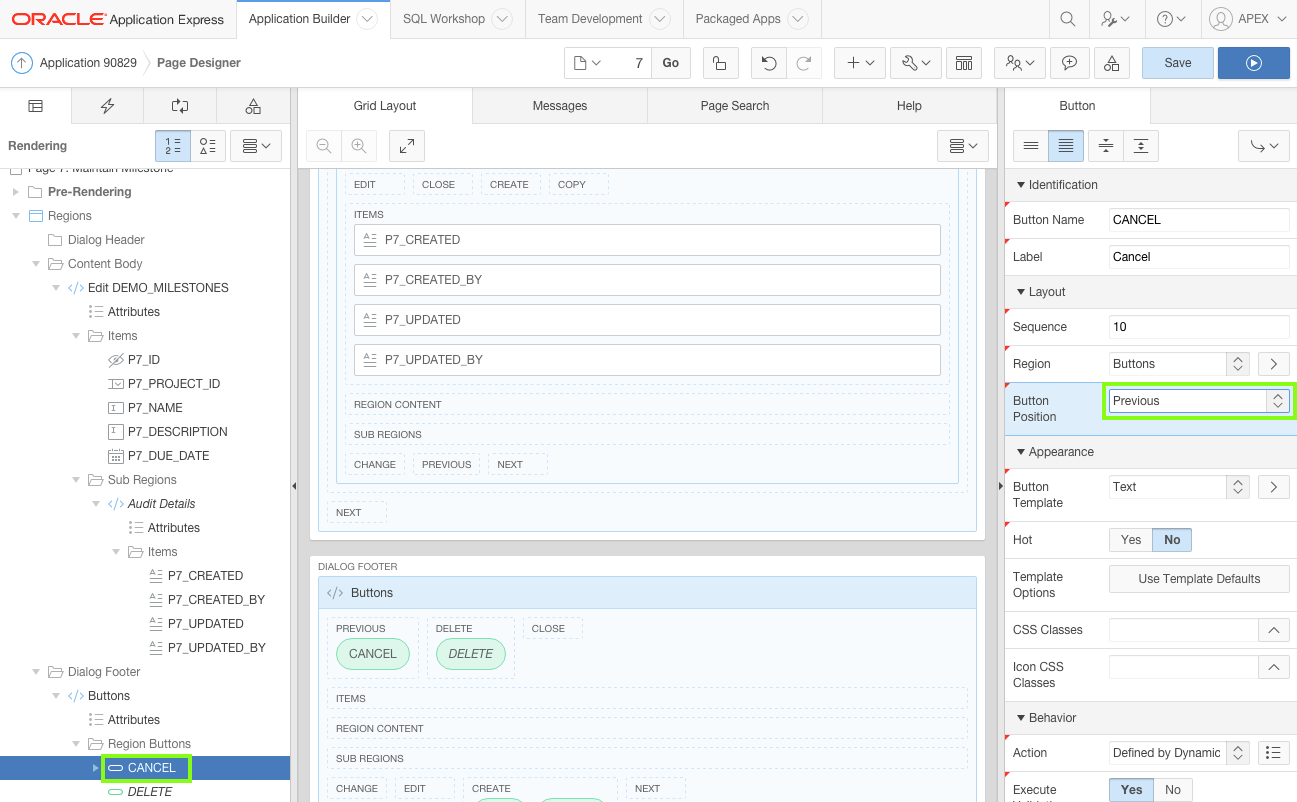
Reposition the buttons.
Click the CANCEL button.
In the Property Editor, for Layout: Button Position select Previous.Click Save.
-
Navigate back to Milestones (Page 6) and run the page. Click a milestone to view Maintain Milestones (Page 7).
8. Updating the Task Pages
In this topic, you will update the report and form for tasks.
Note: If you have not completed the previous topic, you can import the Basic Projects App Export - Topic 7.sql file into your workspace, and continue working from this topic forward. You can find the export file in the /files subdirectory where you unzipped the original file. See Appendix A - Importing an Application.
-
Return to Application Builder and navigate to 8 - Demo Tasks.
Update the page properties from Demo Tasks to Tasks.
In the Property Editor:- Identification: Name - enter
Tasks - Identification: Title - enter
Tasks
Click Save.
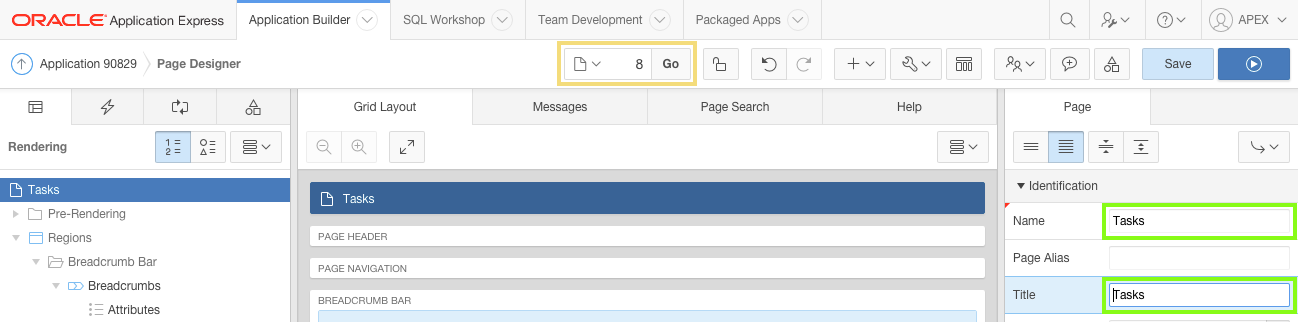
- Identification: Name - enter
-
Update the breadcrumb entry for the page.
In the Rendering tree, click the Shared Components tab.
Expand the Breadcrumbs folder and click the Breadcrumb entry.
In the Property Editor, click the Edit Component button.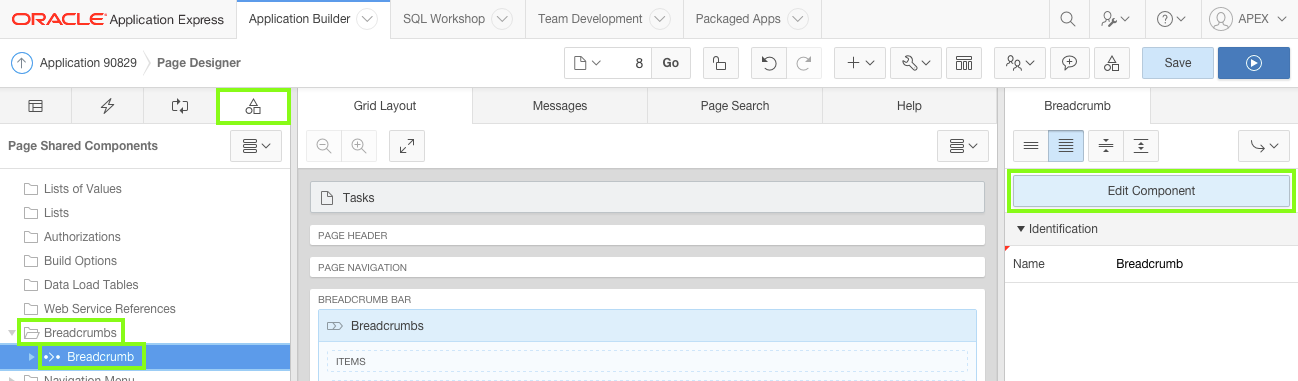
Click the Demo Tasks breadcrumb entry.
For Short Name, enter
Tasks, and click Apply Changes.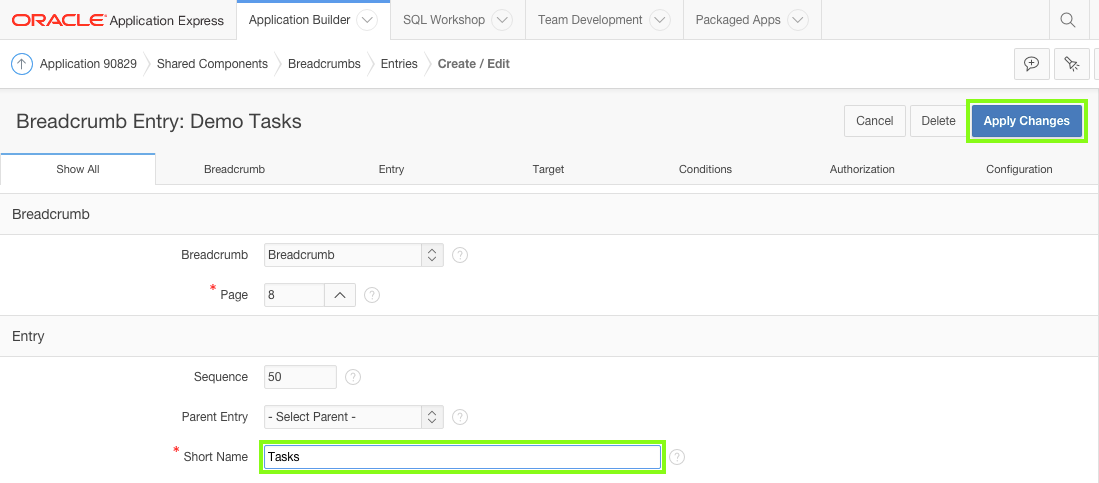
Click Run Page 8 on the toolbar (far right), to go to the runtime environment.

-
Reconfigure which columns are displayed by default in the Interactive Report.
In the Interactive Report runtime window, click Actions and select Select Columns.
In the Display in Report column, hold the Ctrl key and click the following items:
- Id
- Description
- Created
- Created By
- Updated
- Updated By
Click the Remove button ( < ) in the center.
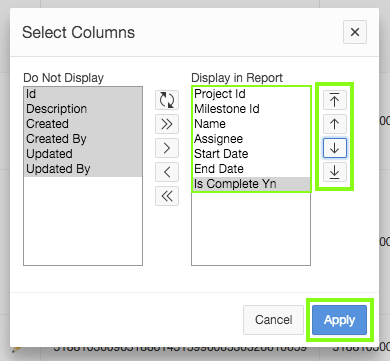
Reorder the displayed columns
In the DIsplay in Report column, use the up and down arrows on the left to order the items in the following order:- Project Id
- Milestone Id
- Name
- Assignee
- Start Date
- End Date
- Is Complete Yn
Click Apply.
-
Group the records by Project and Milestone, order them by Start Date, and save the report.
In the Interactive Report runtime window, click Actions
Click Format, and then select Control Break.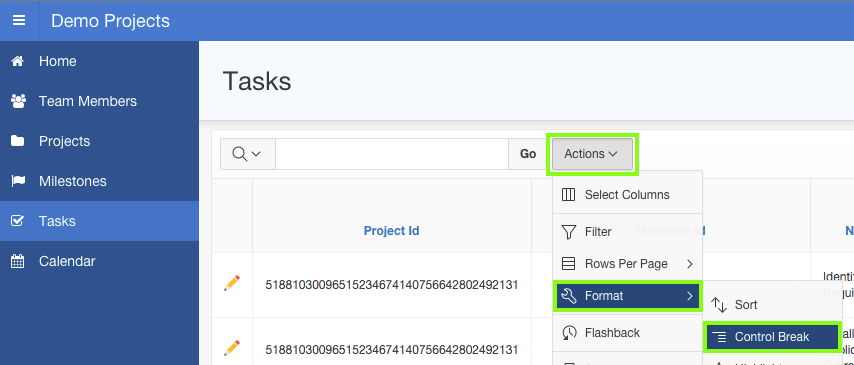
For Column 1 select Project Id. For Column 2 select Milestone Id.
Click Apply.
In the Interactive Report runtime window, click Actions, then select Format, and select Sort.
For Column select Start Date, verify Direction is Ascending. For Null Sorting select Nulls Always Last.
Click Apply.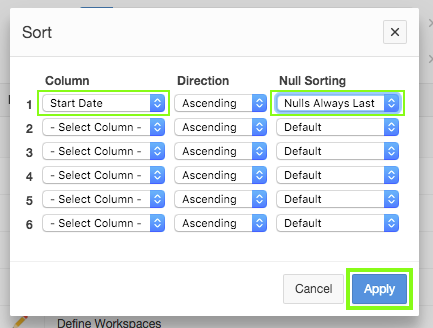
Save the Primary Report.
Click Actions and select Save Report.
For Save select As Default Report Settings.
Verify that Default Report Type is set as Primary and click Apply. -
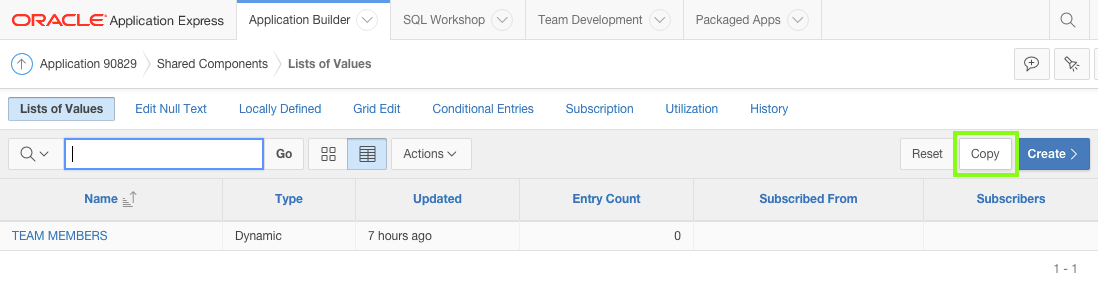
The Project Id, Milestone Id, and Assignee columns are currently displaying identifiers intead of the names. You already created a List of Values for projects and assignees (Team Members), therefore, you only need to create a List of Values for milestones.
In the runtime environment, click Edit Page 8 to return to the Page Designer.
In Page Designer, click Shared Components found on the right on the toolbar.Under Other Components, click List of Values.
Click Copy.

For Copy List of Values select PROJECTS - Dynamic.
For New List of Values Name enterMilestones.
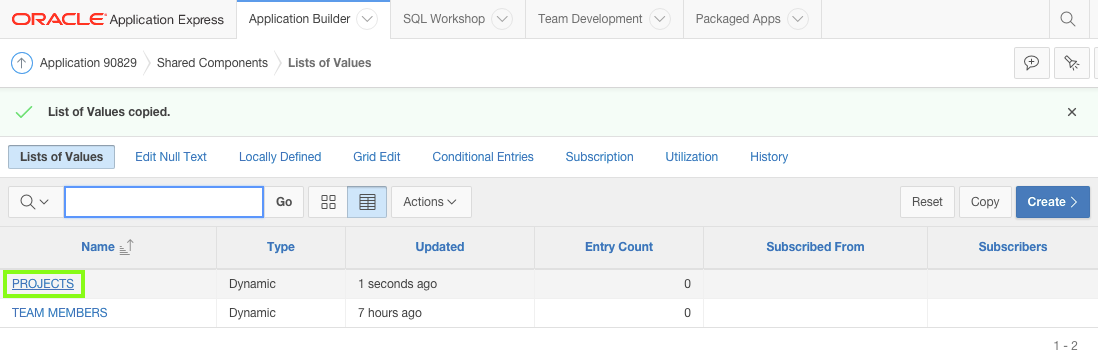
Click Copy.
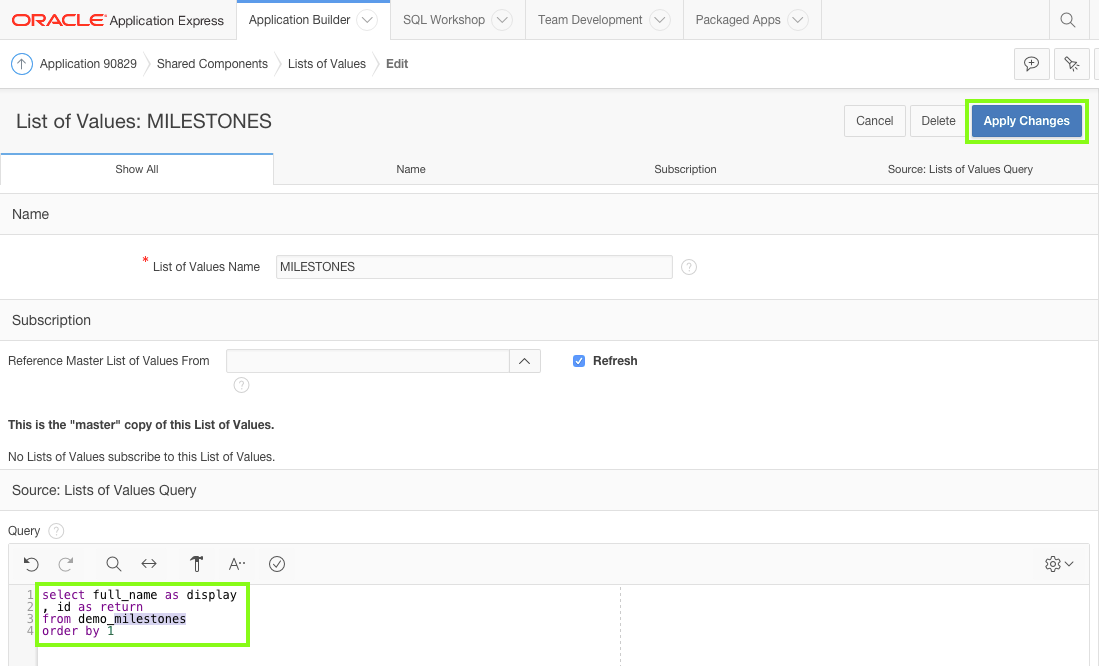
Click the MILESTONES List of Values entry.
For Query, copy and paste the folliwing:
                    select name as display

                    , id as return

                    from demo_milestones

                    order by 1
Click Apply Changes.
Click Edit Page 8 on the toolbar, to return to Page Designer.
In the Rendering tree, locate the DEMO_TASKS region. Expand the Columns folder, and click the ASSIGNEE column.
In the Property Editor:- Identification: Type - select Plain Text (based on List of Values)
- List of Values: List of Values - select TEAM MEMBERS
- Layout: Column Alignment - select left

In the Rendering tree, click the PROJECT_ID column.
In the Property Editor:- Identification: Type - select Plain Text (based on List of Values)
- List of Values: List of Values - select PROJECTS
- Heading: Heading - enter
Project - Layout: Column Alignment - select left

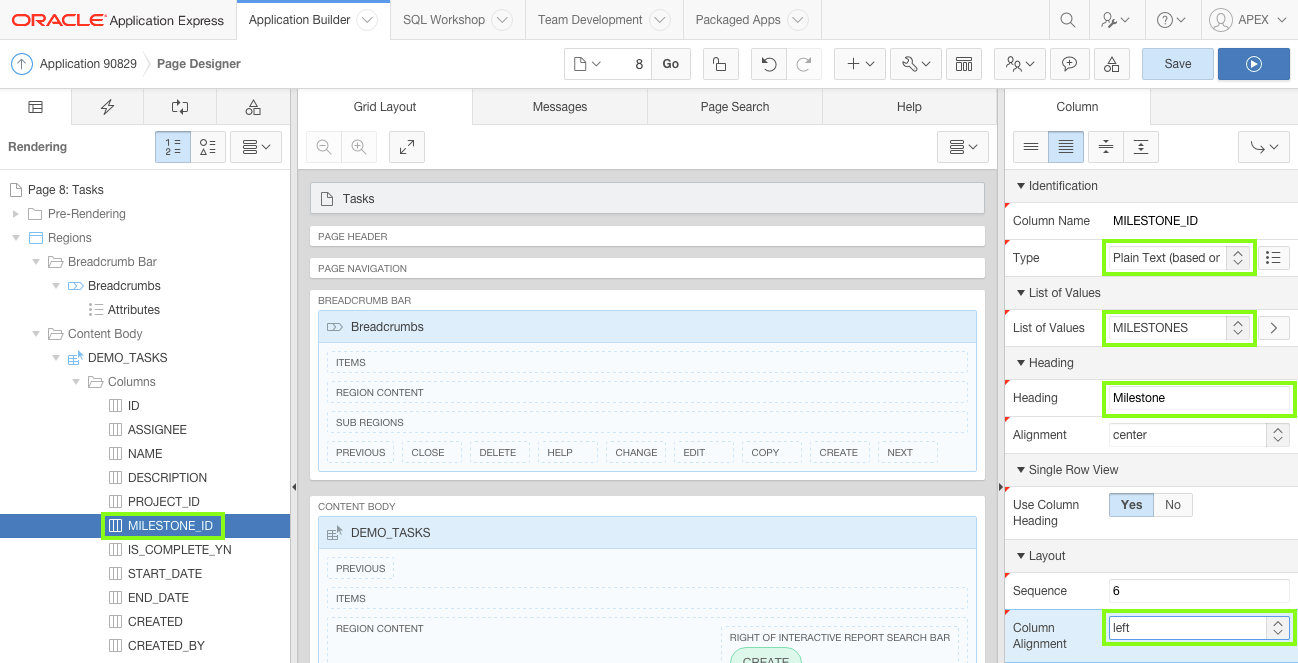
In the Rendering tree, click the MILESTONE_ID column.
In the Property Editor:- Identification: Type - select Plain Text (based on List of Values)
- List of Values: List of Values - select MILESTONES
- Heading: Heading - enter
Milestone - Layout: Column Alignment - select left
-
The Name column is ambiguous and should be relabelled.
In the Rendering tree, click the NAME column.
In the Property Editor, for Heading enterTask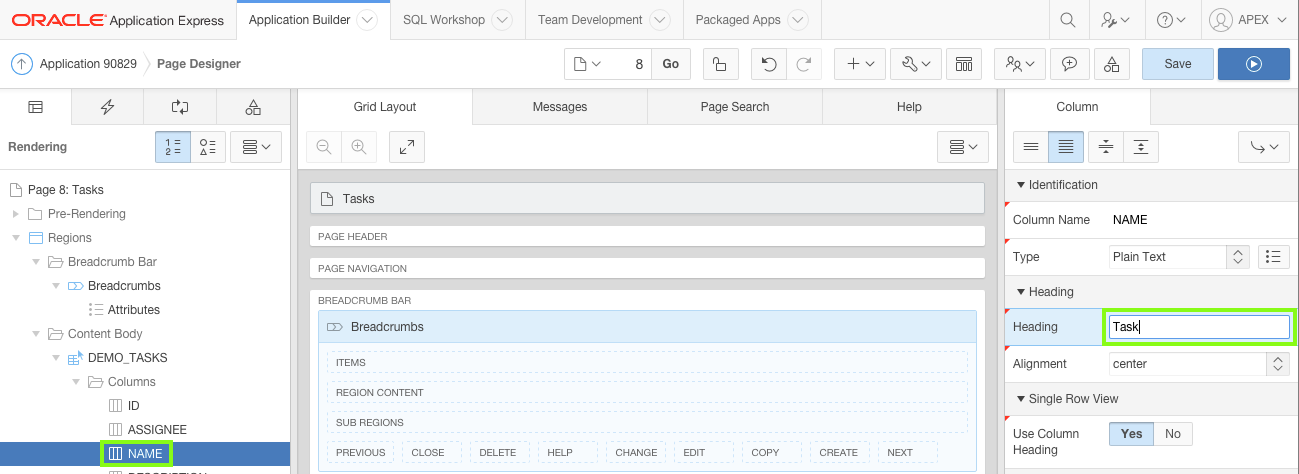
-
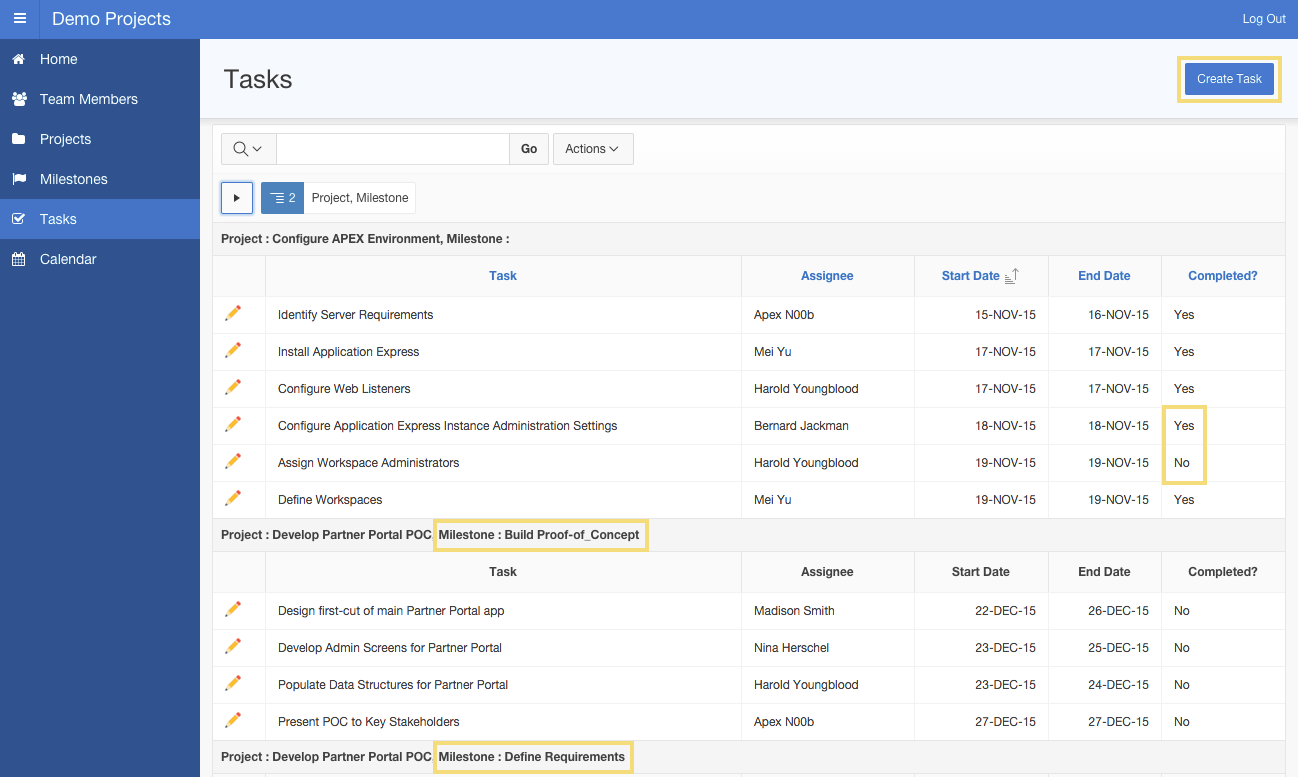
The IS_COMPLETE_YN column should be relabelled and the values should be Yes / No, rather than Y / N.
To change the displayed value, you can either modify the SQL Source for the report, or define a List of Values.In the Rendering tree, select the DEMO_TASKS region.
For the SQL Query, replace"IS_COMPLETE_YN",with:
decode (IS_COMPLETE_YN, 'Y', 'Yes', 'No') as "IS_COMPLETE_YN",
In the Rendering tree, click the IS_COMPLETE_YN column.
In the Property Editor, for Heading enterCompleted?
-
Reposition the CREATE button to the top of the page.
Locate the DEMO_TASKS region. Click the Create button.
In the Property Editor:- Identification: Label - enter
Create Task - Layout: Region - select Breadcrumbs
- Layout: Button Position - select Create
- Appearance: Hot - select Yes

- Identification: Label - enter
-
Click Save and Run Page to see the completed page.
-
Modify the default Task form page to be more visually appealing
In the runtime environment, view a record by clicking the Edit icon (pencil) for a task.
Click Edit Page 9 on the Developer Toolbar.
In the Property Editor:- Identification: Name - enter
Maintain Task - Identification: Title - enter
Maintain Task - Navigation: Cursor Focus - select First item on page


- Identification: Name - enter
-
Update the page items.
The first requirement is to shuffle the page items, using drag and drop in either the Rendering tree or the Grid Layout, such that the items are in the following order:
- P9_PROJECT_ID
- P9_MILESTONE_ID
- P9_NAME
- P9_DESCRIPTION
- P9_ASSIGNEE
- P9_START_DATE
- P9_END_DATE
- P9_IS_COMPLETE_YN

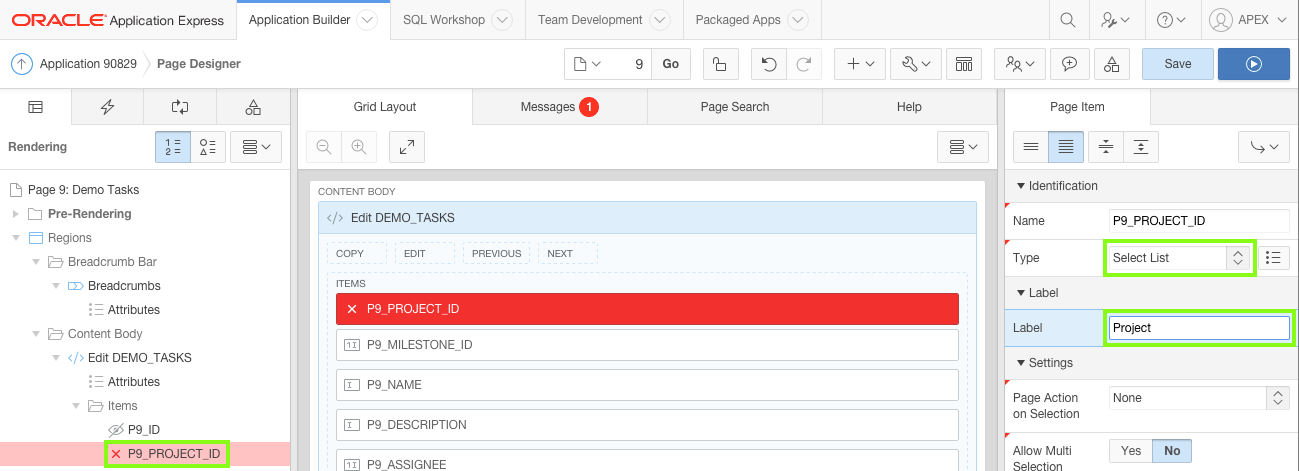
In the Grid Layout, under Content Body, click the P9_PROJECT_ID item.
In the Property Editor:- Identification: Type - select Select List
- Label: Label - enter
Project - Appearance: Template - select Required
- Validation: Value Required - select Yes
- List of Values: Type - select Shared Component
- List of Values: List of Values - select PROJECTS
- List of Values: Display Extra Values - select No
- List of Values: Null Display Value - enter
- Select Project -

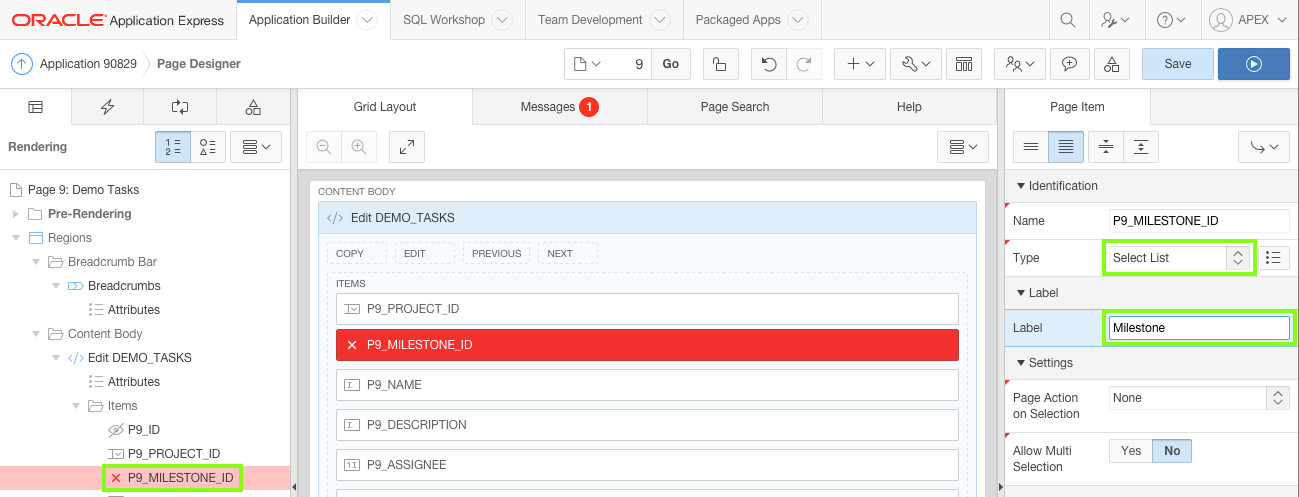
The Milstones item should be defined as a Cascading List of Values, whereby only the milestones for the currently selected Project item are displayed.
In the Grid Layout, under Content Body, click the P9_MILESTONE_ID item.
In the Property Editor:- Identification: Type - select Select List
- Label: Label - enter
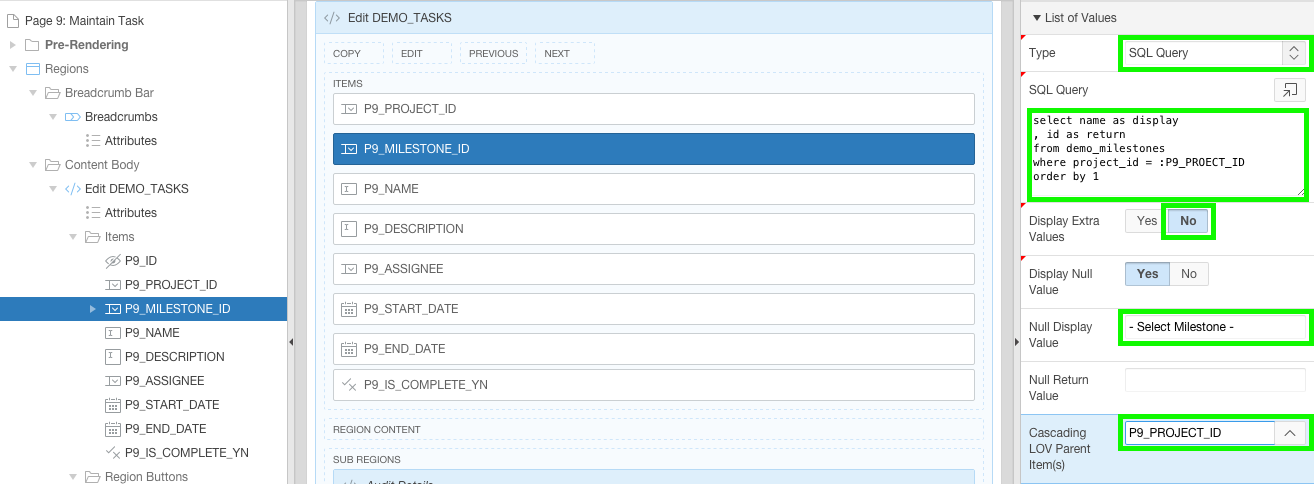
Milestone - List of Values: Type - select SQL Query
- List of Values: SQL Query - cut and paste the following:
                        select name as display

                        , id as return

                        from demo_milestones

                        where project_id = :P9_PROECT_ID

                        order by 1
- List of Values: Display Extra Values - select No
- List of Values: Null Display Value - enter
- Select Milestone - - List of Values: Cascading LOV Parent Item(s) - select P9_PROJECT_ID
Note: You can not use the MILESTONES List of Values for this item, as this query needs to limit the milestone records returned to those for the selected project, using P9_PROJECT_ID.
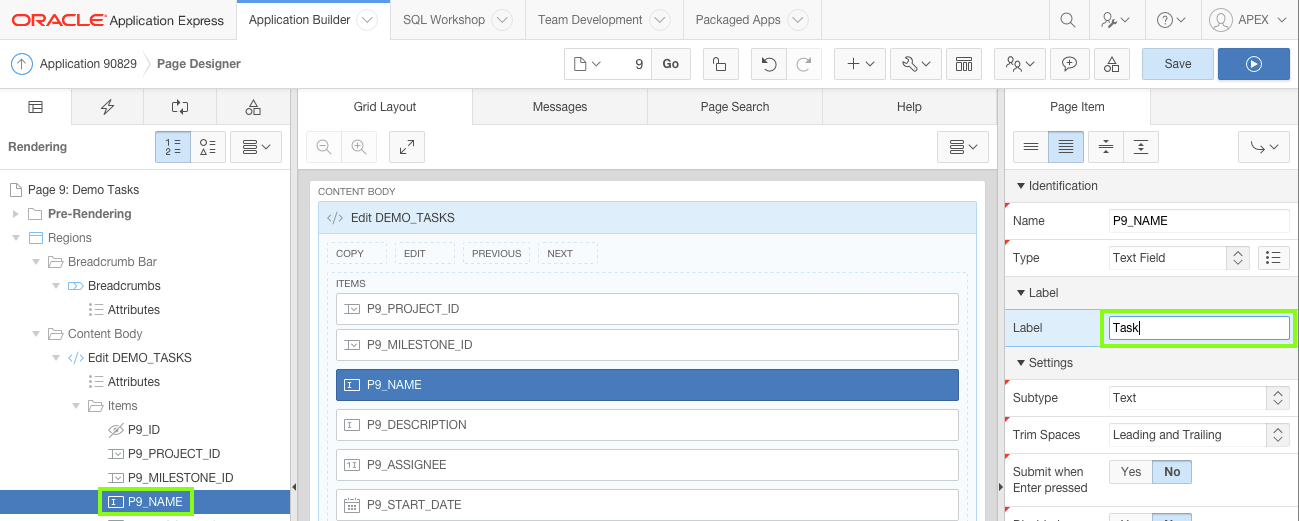
In the Rendering tree, click the P9_NAME item.
In the Property Editor:- Label: Label - enter
Task - Appearance: Template - select Required
- Appearance: Width - enter
60 - Validation: Value Required - select Yes

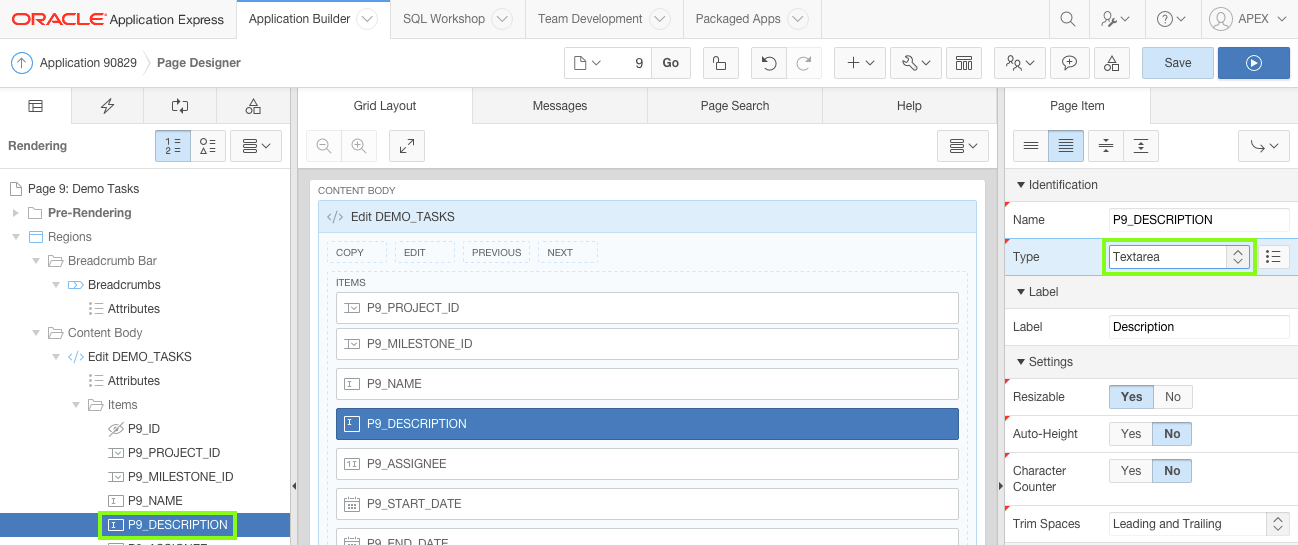
In the Grid Layout, click the P9_DESCRIPTION item.
In the Property Editor:- Identification: Type - select Textarea
- Appearance: Width - enter
70 - Help: Help Text - delete any text to clear the field


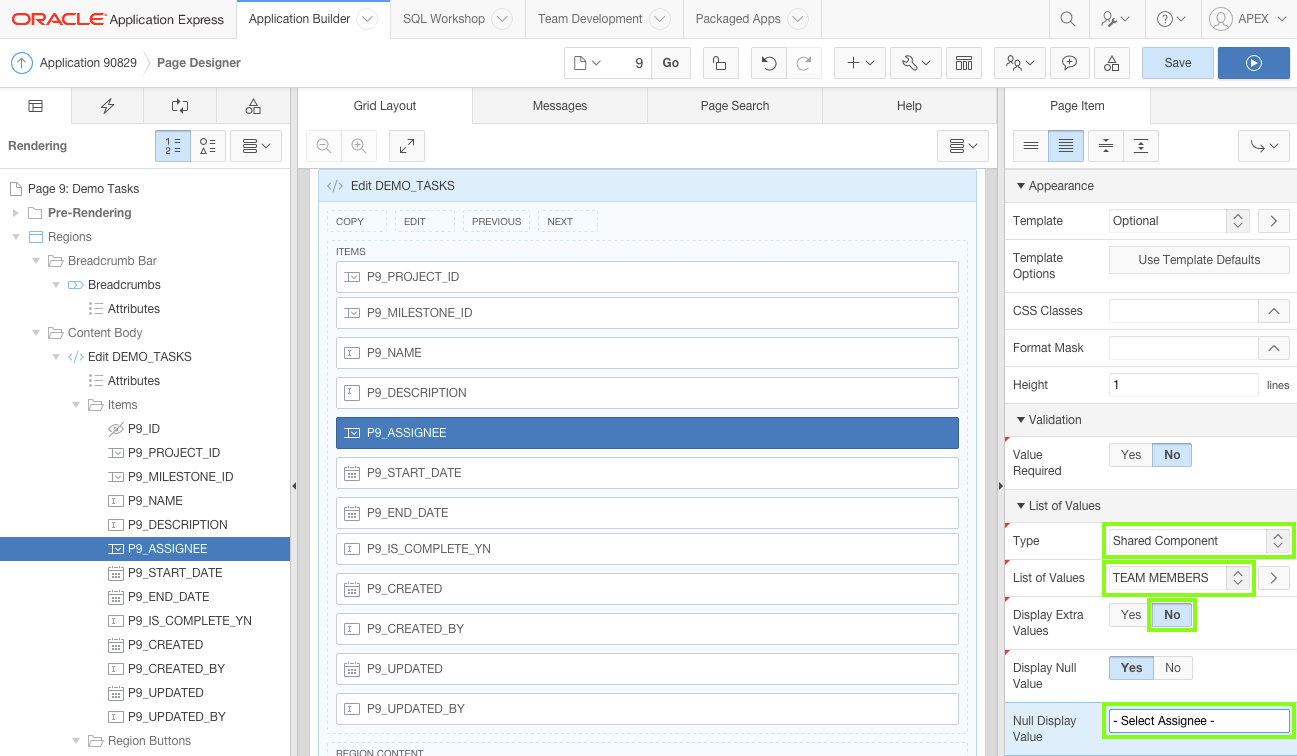
In the Grid Layout, under Content Body, click the P9_ASSIGNEE item.
In the Property Editor:- Identification: Type - select Select List
- List of Values: Type - select Shared Component
- List of Values: List of Values - select TEAM_MEMBERS
- List of Values: Display Extra Values - select No
- List of Values: Null Display Value - enter
- Select Assignee -

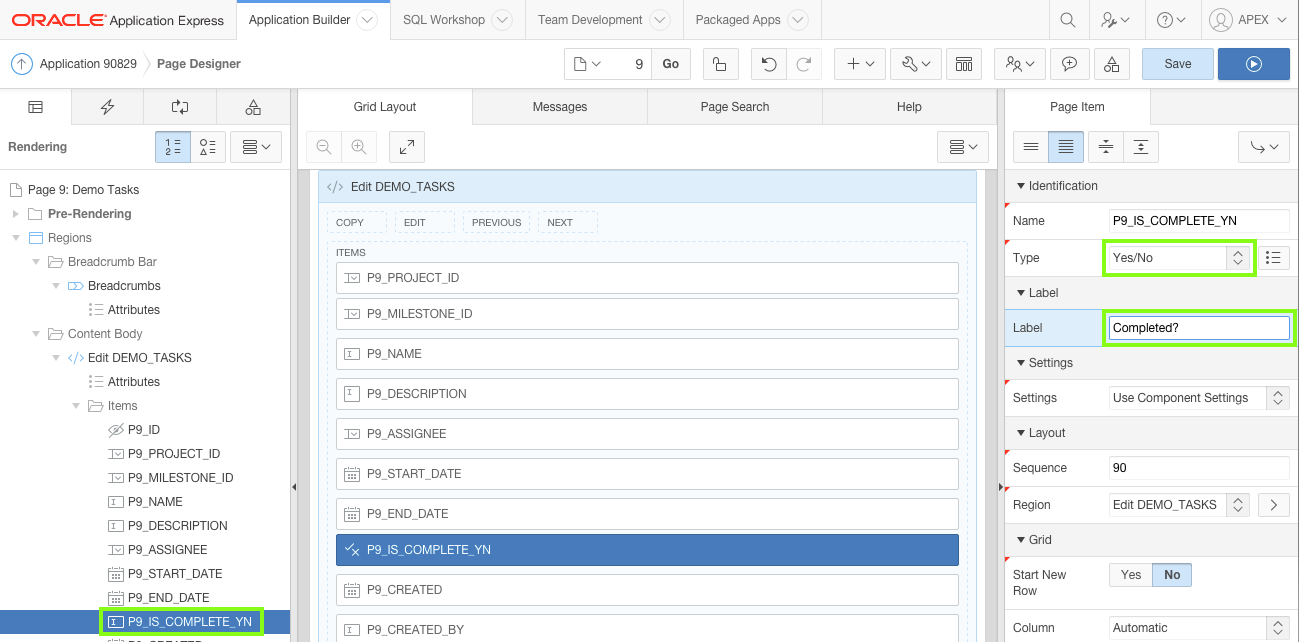
In the Rendering tree, click the P9_IS_COMPLETE_YN item.
In the Property Editor:- Identification: Type - select Yes/No
- Label: Label - enter
Completed?
-
Delete the four audit items from the Maintain Milestone page.
In the Rendering tree, hold the Ctrl key and click the following items to select them all:
- P9_CREATED
- P9_CREATED_BY
- P9_UPDATED
- P9_UPDATED_BY
Press the Delete key to remove the four items.
Click Save.
Copy the Audit Details region from Page 3 to Page 9.
In Page Designer, navigate to Page 3.
In the Rendering tree, right-click the Audit Details sub region and select Copy to other Page....In the Copy Region dialog, input the following:
- To Page - enter
9 - Copy Region Items - select Yes
Click Next.

Click Copy.
In Page Designer, navigate back to Page 9.
In the Rendering tree, select the Audit Details sub region.
In the Property Editor, for Parent Region select Edit DEMO_TASKS.
-
Given that the Maintain Task page is a normal page, rather than a modal page, you can simply click Save and Run Page to review the page.

-
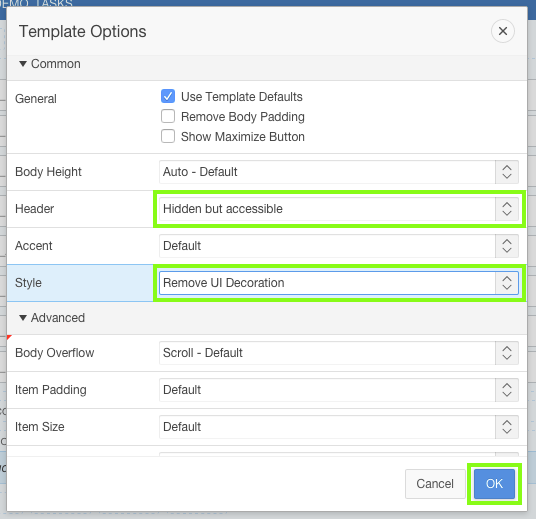
The Maintain Task displays the region title Edit DEMO_TASKS and also has a border around the region.
It would also be beneficial to include the Milestone Due Date on the page so it can be compared to the Task End Date.In the runtime environment, click Edit Page 9 in the Develop Toolbar, to return to Page Designer.
In the Rendering tree, click the Edit DEMO_TASKS region.
In the Property Editor, click the Template Options button and input the following:- Header - select Hidden but accessible
- Style - select Remove UI Decoration
Click OK.
-
If a Milestone is selected it would be beneficial to display the milestone due date to help when reviewing the task start date and end date. To facilitate this add a display only item and then populate the item based on the selected Milestone using a dynamic action.
In the Grid Layout, click the bottom divider to display the Gallery.

In the Gallery, click Items and locate Display Only.
Click and hold Display Only and drag it to the left of the P9_MILESTONE_ID in the Grid Layout.
Note: You will need to hover to the left of the existing item before the dark yellow box displays next to the existing item.
Set the attributes for the new item.
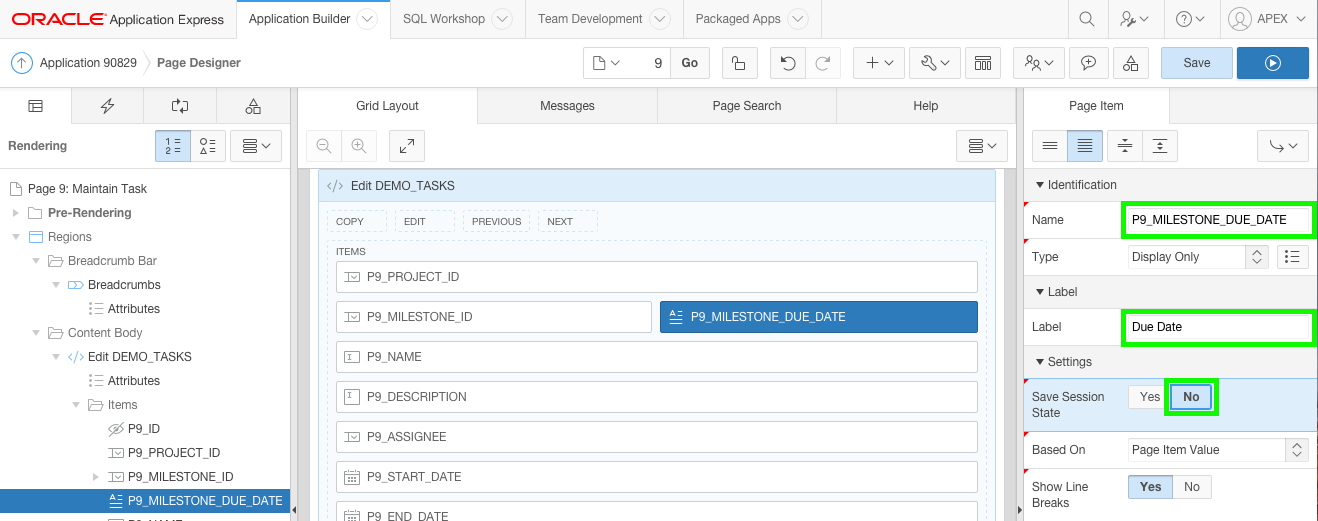
In the Property Editor:- Identification: Name - enter
P9_MILESTONE_DUE_DATE - Label: Label - enter
Due Date - Settings: Save Session State - select No
- Source: Type - select Null
Note: This item is display only and is not based on a Database Column. As such it is very important to not save session state for this item and to set the source type appropriately.

In the Rendering tree, click P9_MILESTONE_ID and clear the help text attribute.
- Identification: Name - enter
-
For the Maintain Project page (Page 5) you added a dynamic action to show or hide the Completed Date based on the value of Status.
On this page, you want to populate the Due Date whenever the Milestone is changed. In order to achieve this you will use a Dynamic Action with an action of Set Value, which can execute an AJAX call to retrieve data from the database.In the Rendering tree, right-click P9_MILESTONE_ID and select Create Dynamic Action.
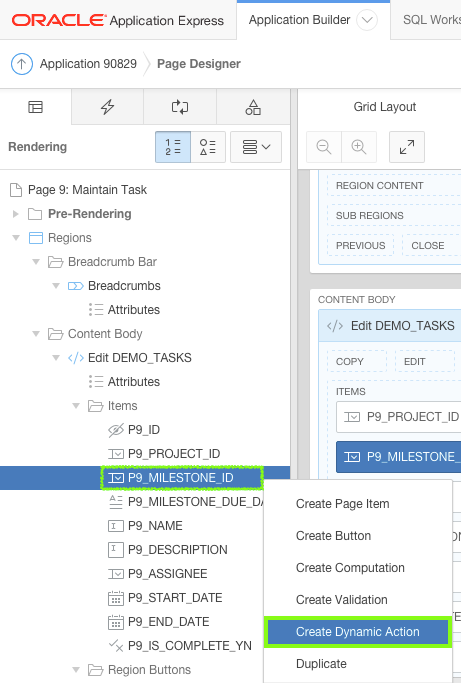
For the new Dynamic Action, in the Property Editor for Name enter
Get Due Date.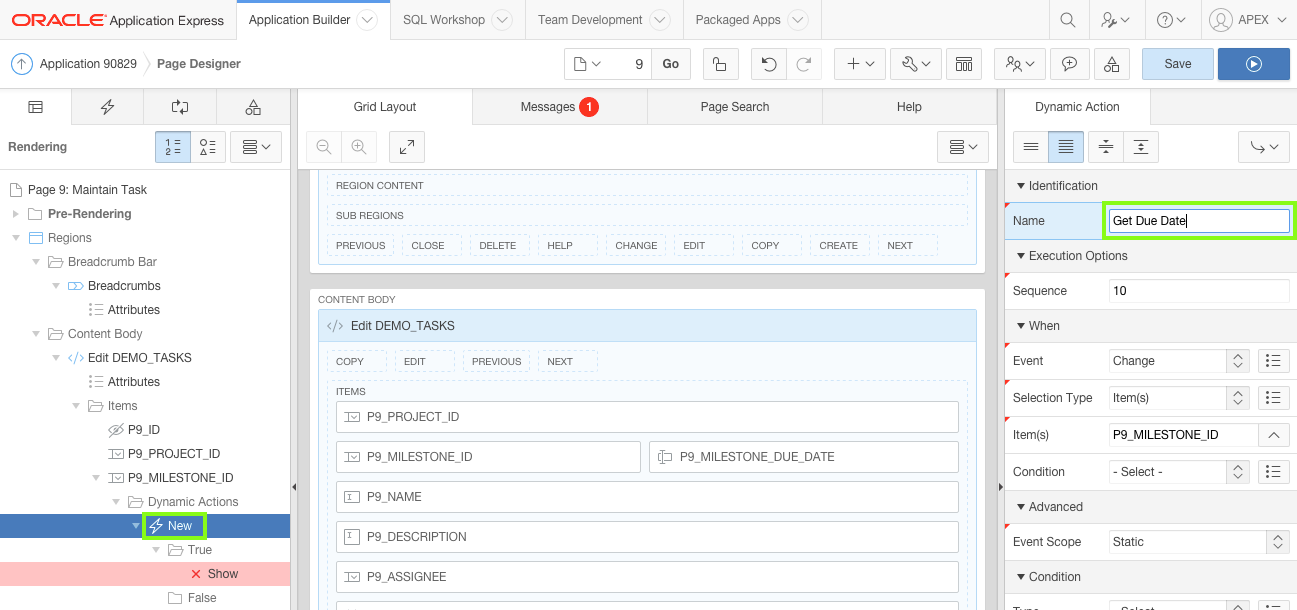
In the Rendering tree, under the P9_MILESTONE_ID item, select the Action within the True folder (currenly labeled X Show).
In the Property Editor:- Identification: Action - select Set Value
- Settings: Set Type - select SQL Statement
- Settings: SQL Statement - copy and paste the following code:
                        select due_date

                        from demo_milestones

                        where id = :P9_MILESTONE_ID
- Settings: Page Items to Submit - select P9_MILESTONE_ID
- Affected Elements: Item(s) - select P9_MILESTONE_DUE_DATE
Note: It is critical to submit the page items that are referenced within the SQL Statement. Otherwise, the currently selected value, in this case P9_MILESTONE_ID, will not be saved to session state, and the query will not return the correct results.

-
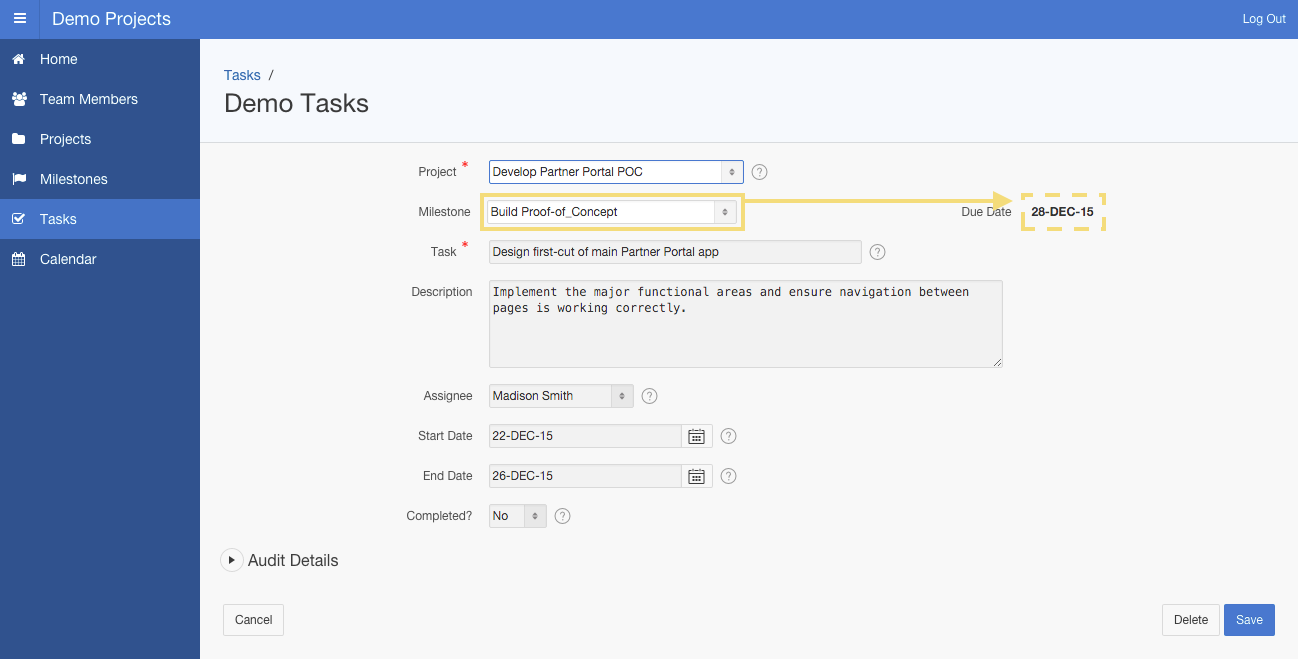
Click Save and Run Page to review the completed page.
Try selecting different Milestones to see how the Due Date is updated based on the selection.
9. Updating the Calendar Page
In this topic, you will make the Calendar page connect to the Maintain Task page.
Note: If you have not completed the previous topic, you can import the Basic Projects App Export - Topic 8.sql file into your workspace, and continue working from this topic forward. You can find the export file in the /files subdirectory where you unzipped the original file. See Appendix A - Importing an Application.
-
In the runtime environment, click Calendar in the Navigation Menu.
The Calendar page displays the region title Calendar, and also has a border around the region.
In the runtime environment, click Edit Page 10 in the Develop Toolbar, to return to Page Designer.
In the Rendering tree, locate the Calendar region. Click Calendar
In the Property Editor, click the Template Options button and input the following:- Header - select Hidden but accessible
- Style - select Remove UI Decoration
Click OK.

-
Given that the Calendar page is based on a single table, DEMO_TASKS, the code required for Drag and Drop functionality was generated by the Create Page wizard. However, the wizard did not generate create or edit links. These links can very easily be added to the calendar to allow users to readily navigate to the Maintain Task page to review and manipulate Tasks.
In the Rendering tree, locate the Calendar region. Click Attributes under the Calendar region.
In the Property Editor, locate Create Link and click No Link Defined. In Link Builder - Create Link, input the following:- Page - select 9 - Maintain Task
- Clear Cache - enter
9
Click OK.
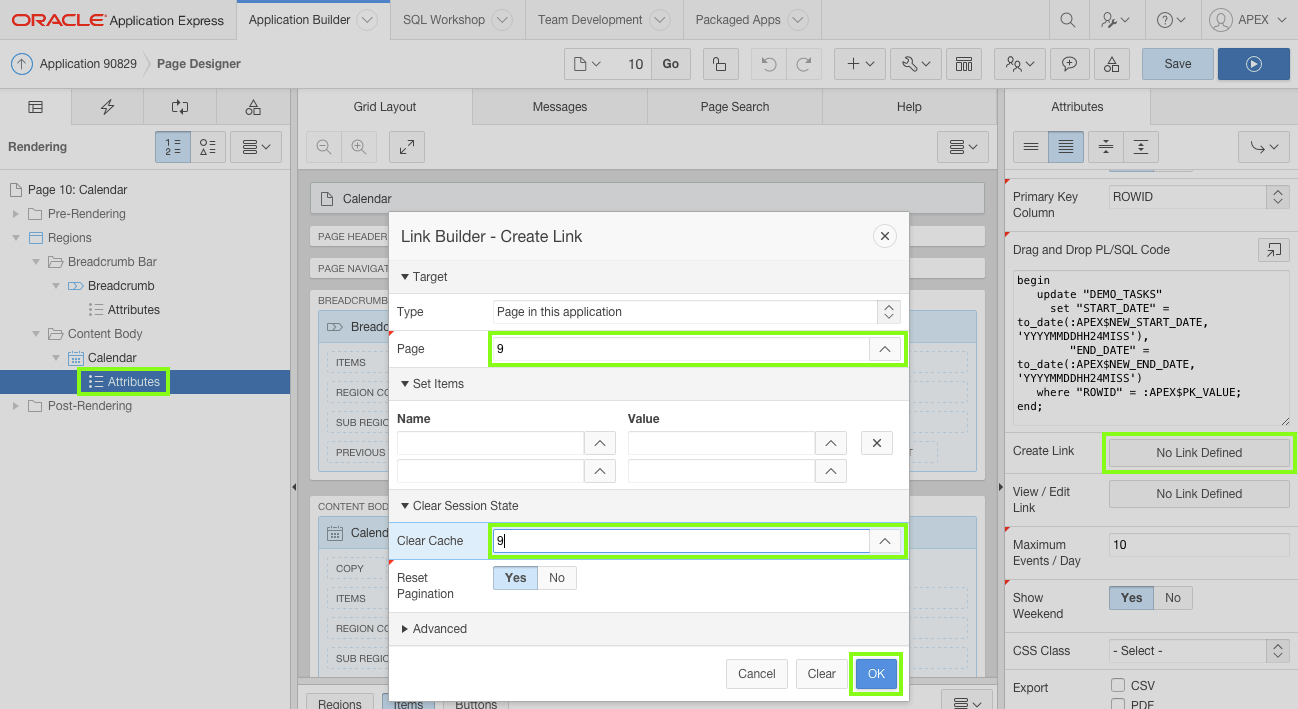
In the Property Editor, locate View/Edit Link and click No Link Defined, and input the following:
- Page - select 9 - Maintain Task
- Name - select P9_ID
- Value - select ID or enter
&ID. - Clear Cache - enter
9
Click OK.
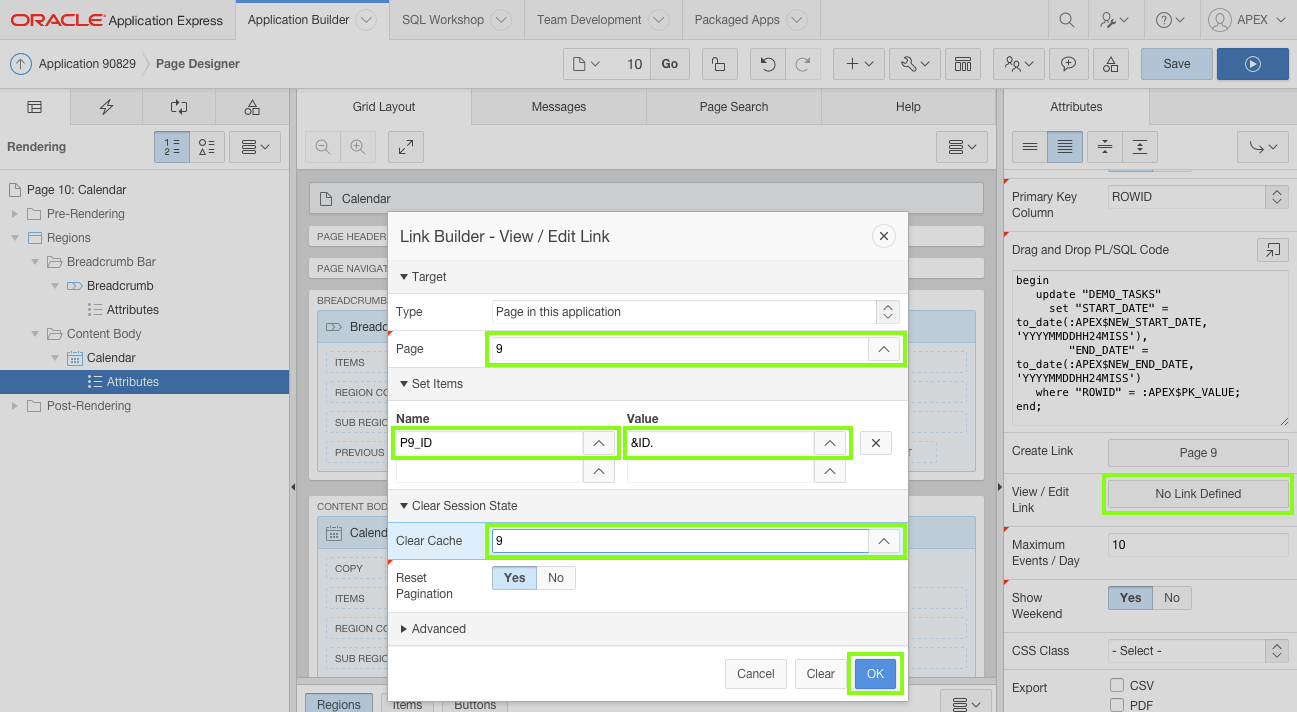
-
Click Save and Run Page to review the calendar functionality.
Try out these functions to see how the page responds:
- Hover over a calendar entry to see the tooltip, which displays the Task Name, Start Date and End Date.
- Click on an empty day and see how a blank Maintain Task page is displayed.
- Click on an existing calendar entry and see how the Maintain Task page appears, populated with the calendar entry details.
- Click and hold a calendar entry and move it to a new date in the calendar and see how the Start Date and End Date for the selected Task are updated.
- Click and hold on the end of a calendar entry and move left or right and see how just the End Date for the selected Task is updated.
- Click the List button to see the list of events for the current month.
Note: After performing a drag and drop operation, click on the calendar entry to check that the dates for that task have changed.

10. Summary
Note: If you choose, you can import the Basic Projects App Export - Topic 9 (Final).sql file into your workspace, which is the completed application. You can find the export file in the /files subdirectory where you unzipped the original file. See Appendix A - Importing an Application.
In this tutorial, you learned how to:
- Load script files to create tables and packages, and then run a package to load data.
- Use the Create Application wizard to create the first-cut pages.
- Use Create Page wizard to create additional pages.
- Use drag and drop in Page Designer to create and move page components.
- Use the right-click mouse options to access context sensitive options.
- Manipulate the queries associateed with Interactive Reports.
- Save "Primary" Interactive Reports.
- Update the Navigation Menu, including adding images.
- Add Shared Components > List of Values for use on various pages.
- Improve form pages to be more visually appealing.
- Add dynamic actions to perform client-side processing.
- Create a sub-region for Audit Details, and copy that region to numerous other pages.
- Define create and edit links for a calendar.
Next Steps
The Building an Advanced Demo Project Application Using Oracle Application Express 5.0 lab continues on from where this lab finishes. In the second workshop you will greatly improve the application and utilize a number of advanced techniques to make a very polished application.
Resources
- Oracle Application Express OTN Home Page
- To learn more about Application Express, refer to additional OBEs in the Oracle Learning Library
- Oracle Application Express: Developing Web Applications
- Oracle University
Credits
- Lead Curriculum Developer: David Peake
- Other Contributors: Shakeeb Rahman, John Godfrey, Terri Jennings
Appendix A - Importing an Application
If you wish to import an application export into your environment follow these procedures:
Note: These procedures will overwrite your existing application definition with the file you are importing.
-
Navigate to the Application Builder Home Page, by clicking the Application Builder tab, or the up arrow.

-
Click Import.
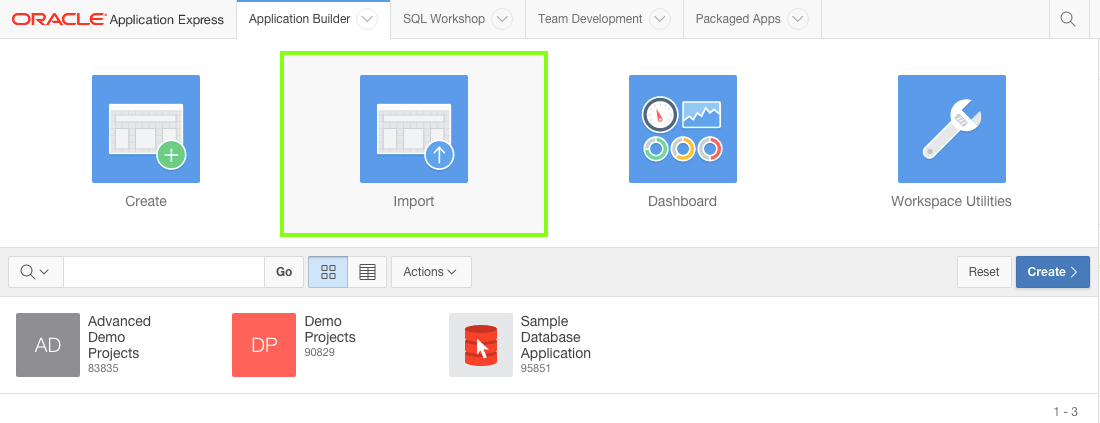
For Import File, click Choose File, where you extracted
apex-basic-demo-projects-2848024.zip, open thefilesfolder.
Locate the appropriate Basic Projects App Export file, and double-click the file or click the file and then click Open.
Verify that the File Type is Database Application, Page or Component Export.
Click Next.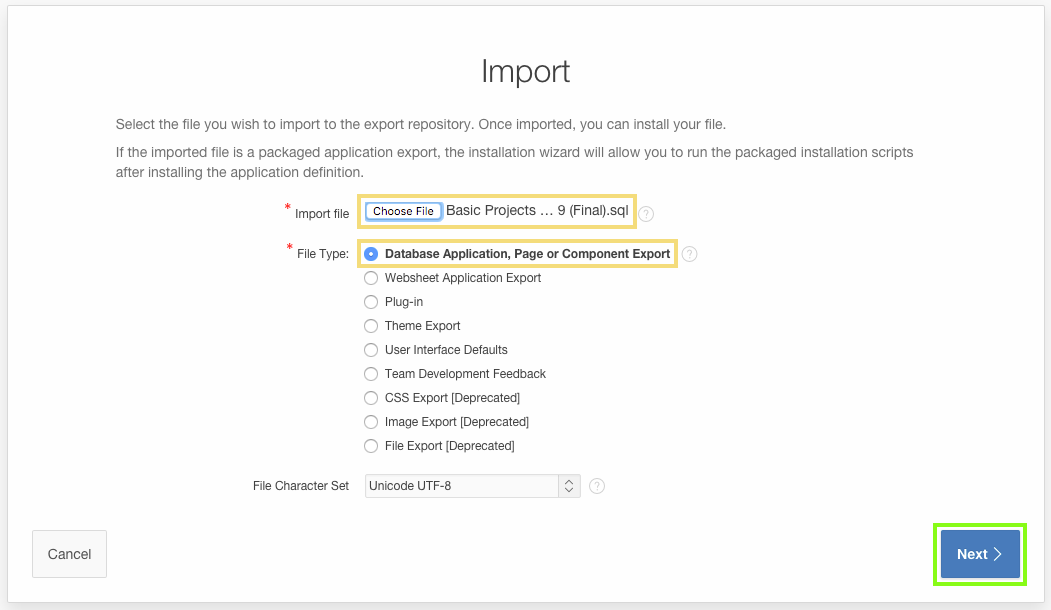
For the File Import Confirmation step, click Next.
For the Install step:
- Parsing Schema - verify the schema is correct
- Build Status - verify the selection is Run and Build Application
- Install As Application - select Change Application Id
Note: If you don't want to overwrite your existing application but create a new application, select Auto Assign New Application ID. - New Application - enter the Application Id for your existing application.
Note: The New Application text field will only be displayed after the Change Application Id option has been selected.
Click Install Application.
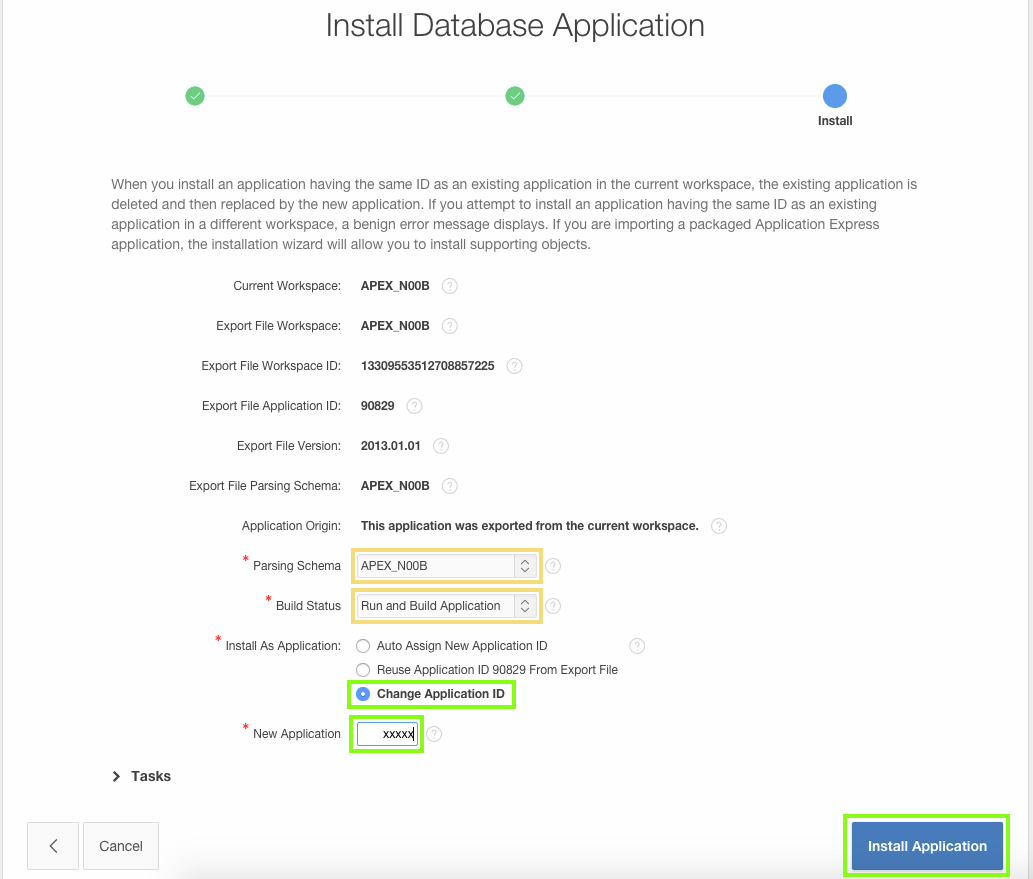
On the Confirm Replace Application step, click Replace Application.
Note: If this step doesn't display then you did not enter the existing Application Id on the previous step.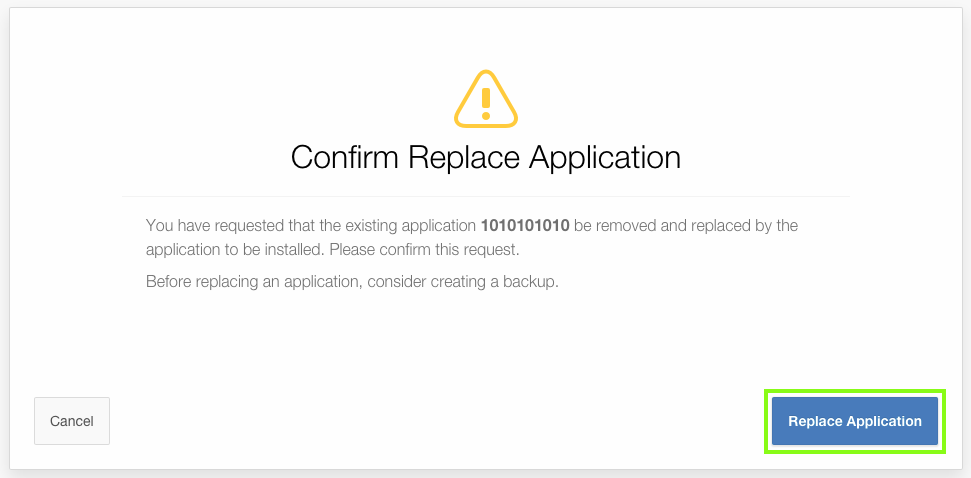
A box with Installing Application ... will be displayed for a short period (< 1 minute).
Once the application has been successfully installed, click Edit Application.
-
Continue with the appropriate topic!
Note: Some of the labels outlined below may be different based on the browser you are using.
Appendix B - Migrating your Application Development between Environments
Overview
An application written with Application Express can readily be moved from one environment to another. It is normal development practice to move an application from development to test to production. This generally involves exporting the application from development and importing it into the test or production environment. If the latest development also requires changes to database object structures, such as creating a new table or adding a new column, then a separate Database Definition Language (DDL) script should be written for updating the other environments. Similarly, if data needs to be manipulated, such as inserting or updating records, then a Data Manipulation Language (DML) script should be written.
Migrating where you do your application development, for example from on-premise to the cloud, is much the same as the steps required for rolling out a new version of your application to test or production.
However, rather than just providing scripts for the deltas between the current production and development environments, you need to create scripts for all of the database objects (DDL) and you need to move all of the data from development into the new environment.
This section covers the steps required to move your development environment from one Oracle Application Express installation to another.
Oracle Database Cloud Service: There are currently three Oracle Database Cloud services available - Database Schema Service, Database as a Service (DBaaS), and Exadata Service.
With the Schema Service you are subscribing to a slice (single schema) of an Oracle Database, which you share with many other tenants.
For the security of all tenants, external access to the service is restricted to RESTful Web Services and Application Express applications.
Oracle SQL Developer 4.0, and above, enables you to define a RESTful connection to your Schema Service.
This connection can be used to easily move database objects and table data from any Oracle Database you can access to the cloud.
However, this RESTful connection can not be used to move data from your Schema Service to an external Oracle Database.
Database as a Service and Exadata Service both provide full access to the underlying Oracle Database.
For security reasons, most ports, such as 1521 which is generally used for database communication, are not accessible.
However, port 22 is available and together with SSH Tunneling can be used to define a connection to the database in your service.
Using SQL Developer 4.0, and above, you can move databse objects and data into or out of your Database as a Service and Exadata Services.
Warning:
You cannot import an application into an earlier release of Application Express.
For example, if you are exporting an application from the Oracle Database Cloud - Schema Service, which is currently Application Express 5.0, you can not import that application into an on-premise installation that is only running Application Express 4.2.
You will need to update the target Application Express environment prior to importing the application.
Check the version of Application Express in both your current development environment and the environment you are migrating to.
In any release of Application Express, check the bottom right corner for the version information.
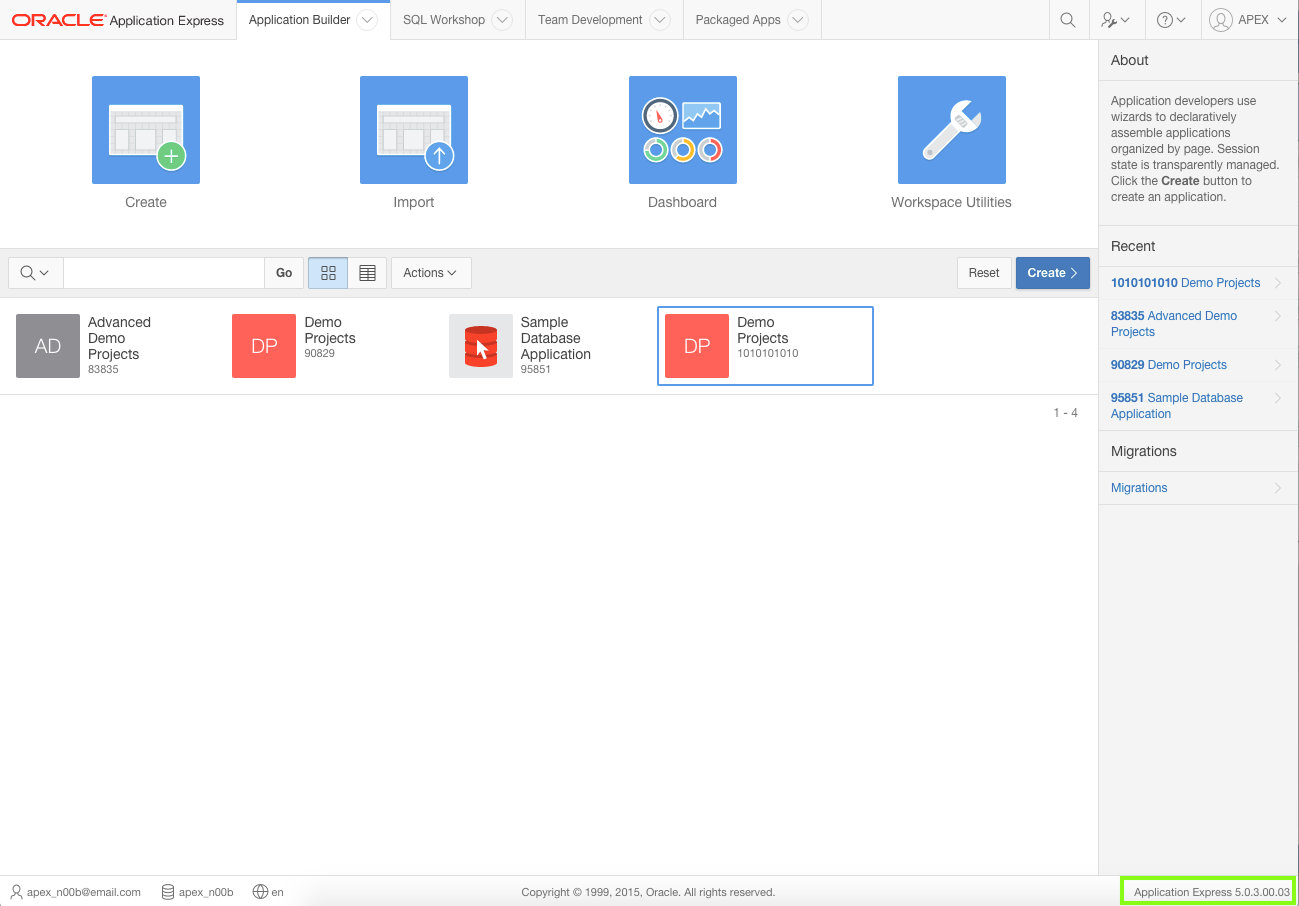
In Application Express 5.0 and above, you can also click Help and then select About.


Migration Steps
Up until this point, you may have been developing on a local development instance, and now want to move your development to the Oracle Database Cloud service to continue.
Migrating the environment where you develop your application involves the following:
- Exporting the application from the current environment, and importing it into the new environment
- Recreating all of the database objects, such as tables, packages and so forth, and then populating the tables with the data from the current environment
- Testing the application in the new environment
-
Migrating the Application
An application written in Application Express is stored as meta-data in the Oracle Database. As you define applications, pages, regions, items, and so forth, the definitions are saved in various tables defined within the Application Express Engine schema. When you export an application a single SQL file is created by extracting the application definitions from the meta-data tables. When importing the application, records are inserted (or updated if overwriting an existing application) into the Application Express meta-data tables, of the environment being imported into. Therefore, once an application is imported, all of the application definitions can be reviewed from the Application Builder, and the application can be run immediatley. However, running the application will produce errors if the required database objects are not available in the workspace.
Note: The export only captures the application definition, and does not export any of the underlying database objects or data that may be associated with the application. Application Express does include the ability to define installation and update scripts within Supporting Objects. However, developers must manually define these scripts. The use of Supporting Objects is not covered in this workshop.
-
From your current development environment, navigate to the Home Page for your current application.
Click Export / Import.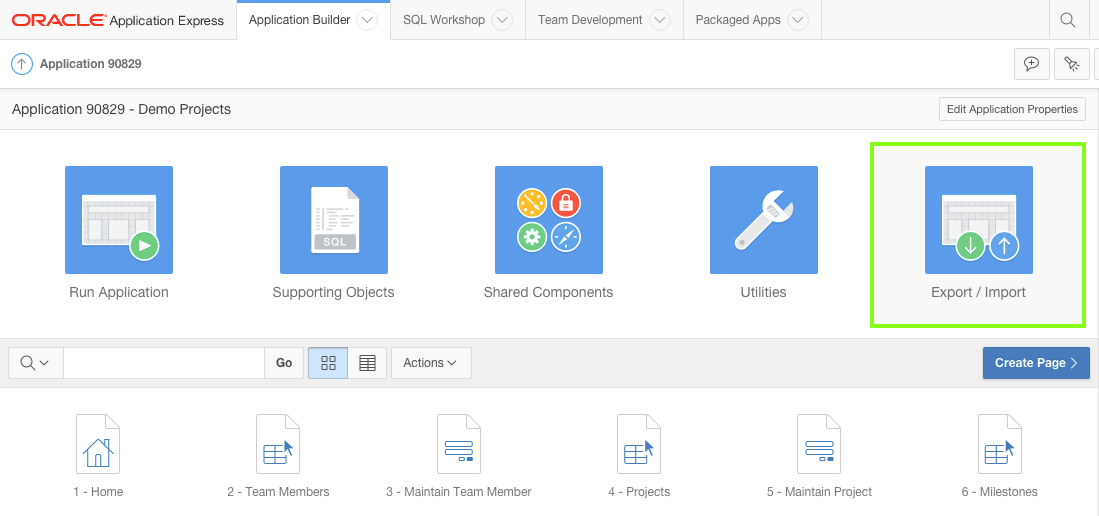
Click Export.
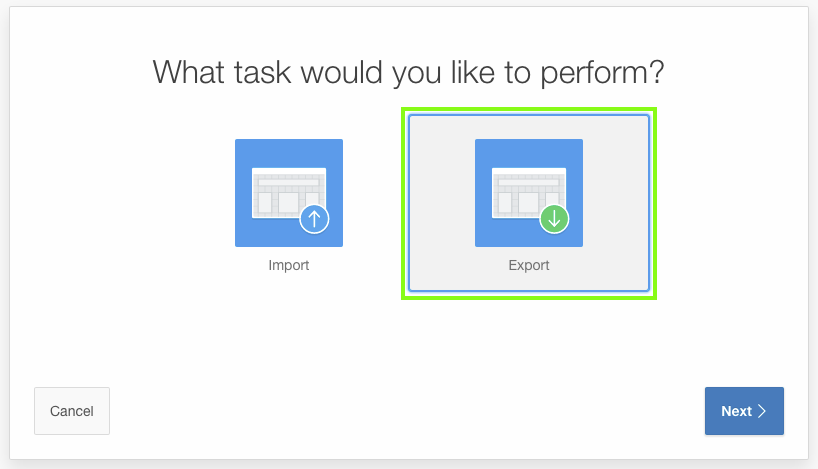
For Export Preferences set the following:
- Export Private Interactive Reports - select Yes
- Export with Original IDs - select Yes
Note: Exporting with the Original IDs will allow an export from the target environment to be reimported back into this current environment, if necessary at some later date.
Click Export.
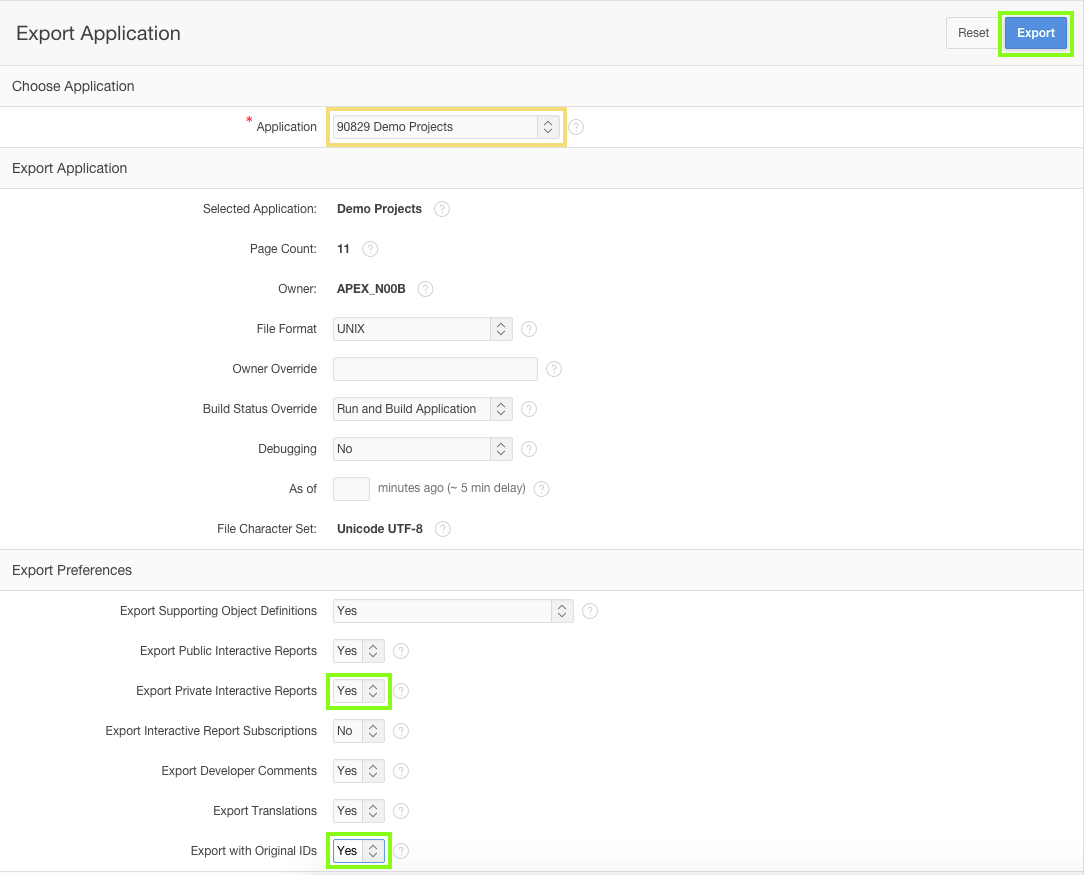
In the Save Dialog, click Save.
Note: It is good practice to rename the export file and include a version or date so that subsequent exports do not overwrite previous exports.
Creating a subdirectory, specifically for all of the files required for the migration, makes it easier to locate the files when using them within the target environment.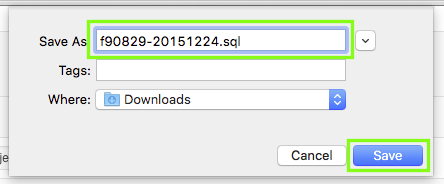
-
Log into your target Application Express environment.
Navigate to the Application Builder Home Page.
Note: Some of the labels outlined below may be different based on the browser you are using.
Click Import.
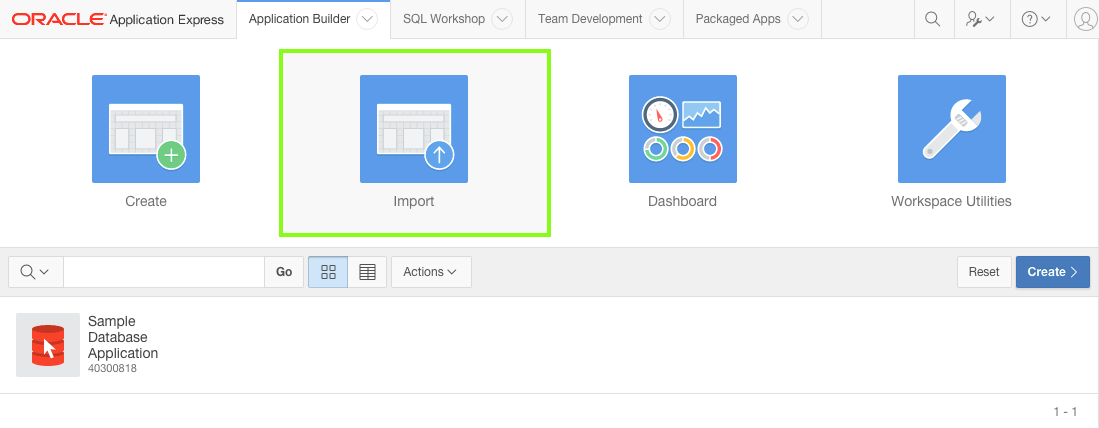
For Import File, click Choose File. In the operating system File Browser, navigate to the subdirectory where you saved the export file.
Locate the export file, and double-click the file or click the file and then click Open.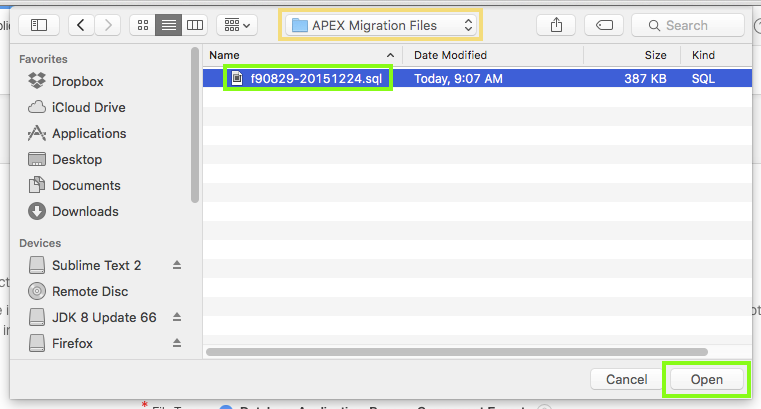
Verify that the File Type is Database Application, Page or Component Export
Click Next.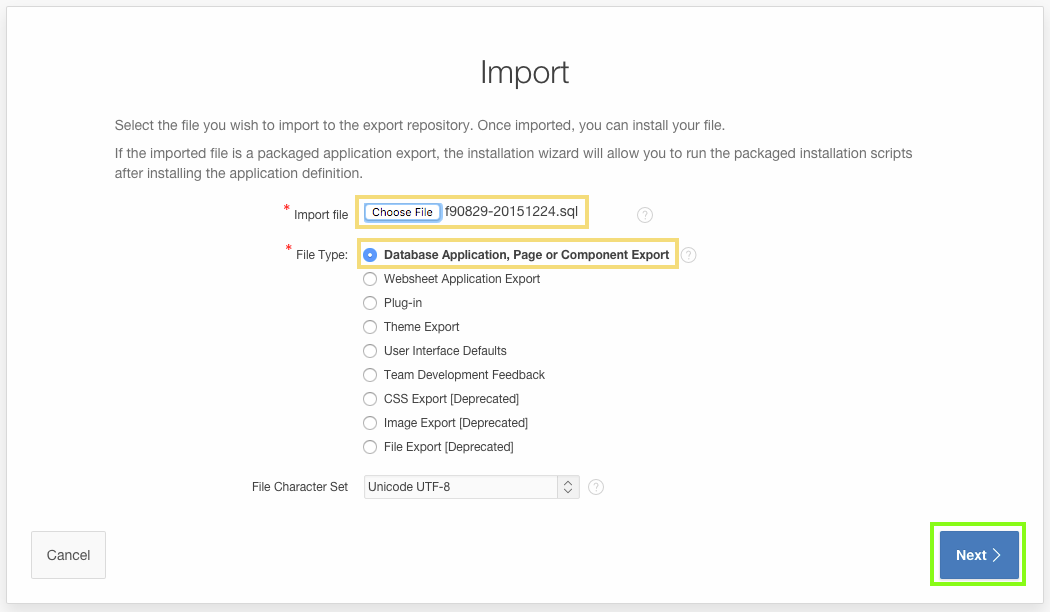
For the File Import Confirmation step, click Next.
For ease of reference it is preferable to keep the same Application Id in the target development environment. However, this may not be viable, in which case assigning a new application Id will need to be used.
For the Install step, verify the Parsing Schema is correct, and verify the Build Status is Run and Build Application,
For Install As Applications, select Reuse Application ID xxxxx From Export File.
Click Install Application.Note: The majority of Application Express workspaces are only associated with a single schema. As such the Parsing Schema will not need to be updated as it will default to the only associated schema.
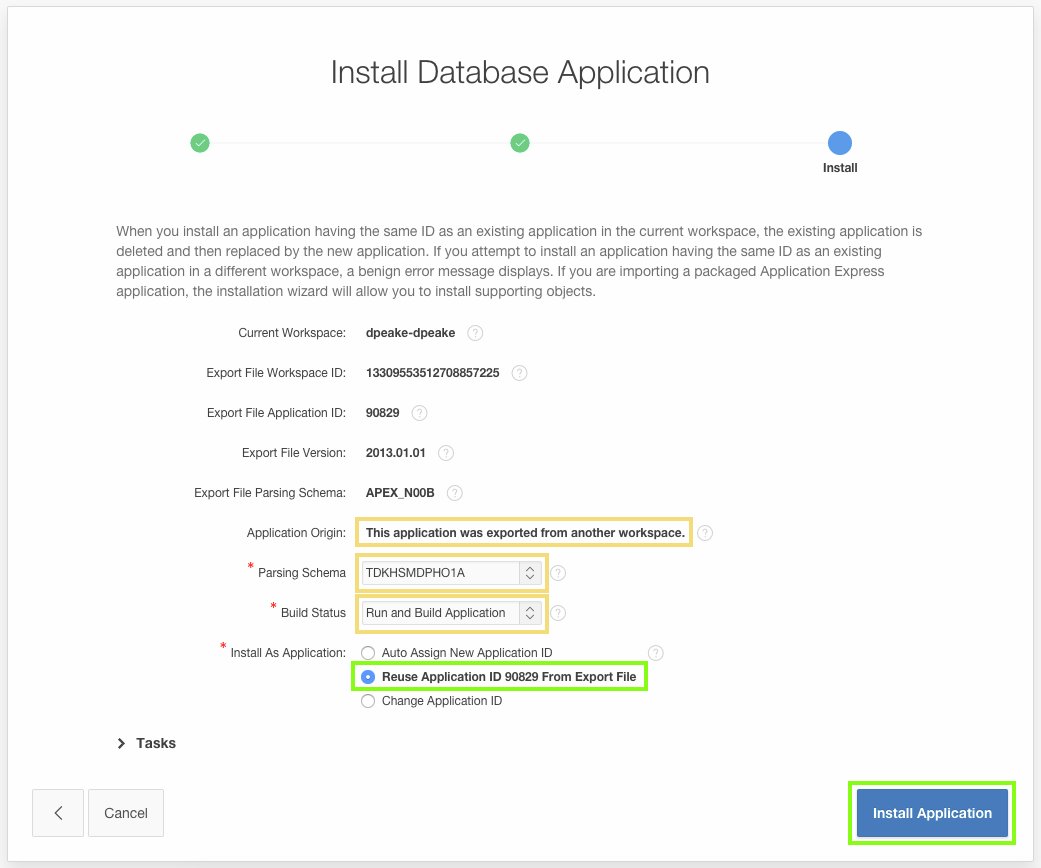
-
If you are installing into the Orcle Database Cloud - Schema Service then there are restrictions on the ranges for Application Ids.
Return to the previous step and for Install As Application, select Auto Assign New Application ID.
-
The existing Application Id from your current development environment may already be used by another application in the target environment. This Application Id may exist in your workspace or another workspace in the same environment.
Return to the previous step and for Install As Application, select Auto Assign New Application ID.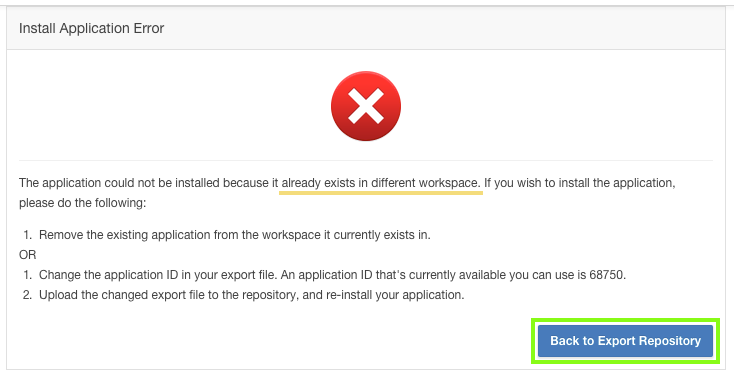
A box with Installing Application ... will be displayed for a short period (< 1 minute).
Once the application has been successfully installed, click Edit Application.

-
You have installed the application in your target environment. However, until you have imported the database objects (tables) and data, you will get errors when you try and run the application.
-
-
Migrating Database Objects and Data
The two primary ways to move the database objects and data from one environment to another, for a single application, is using either Oracle SQL Developer, or Application Express > SQL Workshop.
Oracle SQL Developer is a free integrated development environment that simplifies the development and management of Oracle Database in both traditional and Cloud deployments. SQL Developer is familiar to most professional Oracle developers and DBAs, but perhaps not to business developers.
Oracle Application Express includes SQL Workshop which also provides capabilities for managing database objects. SQL Workshop is designed for application developers who do not have direct access to the underlying Oracle Database, such as in hosted environments such as http://apex.oracle.com.Note: Other techniques are available if moving complete development environments, or whole workspaces. For example, if using Oracle Database 12c Multitenant Option, you may be able to simply move the Pluggable Database (PDB) from one environment to another using Oracle Enterprise Manager 12c. In addition, there are a number of techniques available to move tables with large data volumes between environments.
In order to use SQL Developer you must be able to connect to the Oracle Database schemas for both the development environment and the target environment. You need to connect to the data schema associated with your workspace.
Once connected to both schemas, it is simply a matter of dropping the required database objects from the current schema into the Cart, where you can also include the table data, and then moving it to the target schema.To determine your Oracle Database schema name associated with your Application Express workspace, log into Application Express.
Click SQL Workshop, and review the schema name listed.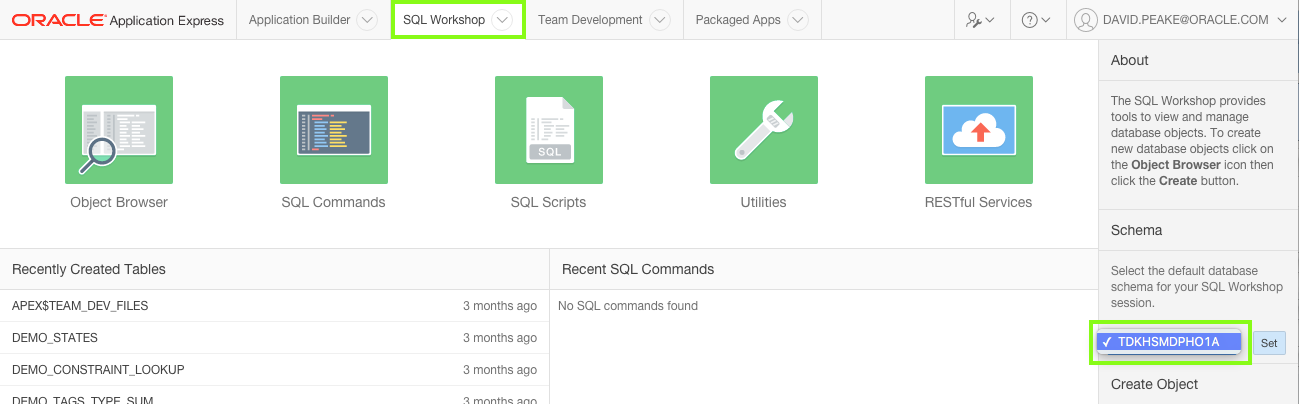
Determine if you can use SQL Developer, by answering the following questions:
- Can you connect to the Oracle Database schema in the current environment?
- On-Premise - MAYBE: If you have, or can obtain, database credentials for the current schema from your Oracle Database Administrator
- apex.oracle.com - NO: SQL access is not provided for this public facing service
- Oracle Database Cloud Service - Database as a Service (DBaaS) / Exadata Service - YES: The required credentials are provided
- Oracle Database Cloud Service - Database Schema Service - NO: Although you can connect to this services using SQL Developer, you can not use the Cart feature to move objects out of the cloud environment
- Local Install - YES: If you have installed the Oracle Database directly on to your laptop or desktop, you should be able to determine, or reset the
- Oracle Database Cloud Service - Databas as a Service (DBaaS) / Exadata Service - YES: Although you can connect to these services using SQL Developer, you can not use the Cart feature to move objects out of the cloud environment
- Public Hosting Service - MAYBE: If you have, or can obtain, database credentials for the current schema from your Hosting Provider
- Can you connect to the Oracle Database schema in the target environment?
- On-Premise - MAYBE: If you have, or can obtain, database credentials for the target schema from your Oracle Database Administrator
- apex.oracle.com - NO: SQL access is not provided for this public facing service
- Oracle Database Cloud Service - YES: SQL Developer can be connected and used to move data into these cloud environments
- Local Install - YES: If you have installed the Oracle Database directly on to your laptop or desktop, you should be able to determine, or reset the password for the data schema associated with your workspace.
- Public Hosting Service - MAYBE: If you have, or can obtain, database credentials for the target schema from your Hosting Provider
Note:Oracle Database Cloud Service currently includes three distinct services - Database Schema Service, Database as a Service (DBaaS), and Exadata Service.If you answered "YES" to both questions above, then follow the steps outlined in B-1 : Migrating using SQL Developer.
If you could not answer both questions "YES", then follow the steps outlined in B-2 : Migrating using Application Express Only.B-1 : Migrating using SQL Developer
-
Connecting to SQL Developer
If SQL Developer is not currently installed on your computer, download the latest version from Oracle Technology Network (OTN) here.
You will need to define two connections - one to the current and one to the target Oracle Database schemas, associated with your Application Express workspaces.
If you are connecting SQL Developer to an On-Premise, local install, or Public Hosting Service, then start SQL Developer.
Click Add (New Connection) and enter the following:- Connection Name - enter a meaningful name for the schema
- Username - enter the schema name associated with the Application Express workspace
- Password - enter the password for the schema
- Check Save Password
- Hostname - enter the appropraite Hostname for your environment
- Port - enter the appropriate port for your environment (normally 1521)
- SID / Service Name - enter either the SID or Service Name for your environment
Click Test to ensure your connection details are correct.
Click Save.
If you are connecting SQL Developer to the Oracle Database Cloud - Database Schema Service then following this documentation:
Using Oracle Database Cloud - Database Schema Service > ... > Configuring Oracle SQL Developer Cloud Connection
and Using Oracle Database Cloud - Database Schema Service > ... > Setting Up Secure FTP Account.
Warning: You must be using SQL Developer 4.0 or above. The instructions in the lab are based on SQL Developer 4.1.
Note: With Database Schema Service you get a slice (schema) of a fully managed Oracle Database running on Exadata. However, you do not have access to the operating system or direct access to the underlying Oracle Database. For this reason, connection to this service is via RESTful Web services over HTTPS.
You will create a connection using the Service SFTP User Name details.If you are connecting SQL Developer to the Oracle Database Cloud - Database as a Service (DBaaS) / Exadata Service then following this lab:
Oracle Database Cloud Service - Advanced Hands On Labs: Lab 2.
Warning: You must be using SQL Developer 4.0 or above. The instructions in the lab are based on SQL Developer 4.1.
Note: With DBaaS and Exadata Service you have access to the entire database, with root, and DBA level access. However, as this service is available over the Internet, not all ports are open, including port 1521. Port 1521 is the default port the database listener services connection request with. For this reason, connection to these services is via SSH Tunneling, using port 22 which is open.
You will create a connection on port 22 of the DBaaS / Exadata Service virtual machine running your database. The SSH Tunneling then forwards the traffic from SQL Developer to port 1521 on the same virtual machine. -
Moving Database Objects and Data
If your target Oracle Database Schema is On-Premise, a local install, or a Public Hosting Service, then follow this documentation:
SQL Developer User's Guide > 1. SQL Developer Concepts and Usage > 1.15 Using the Cart.If your target Oracle Database Schema is Oracle Database Cloud - Database Schema Service, then follow this documentation:
Using Oracle Database Cloud - Database Schema Service > ... > Creating and Deploying a Cart of Objects.If your target Oracle Database Schema is Oracle Database Cloud - Database as a Service (DBaaS) / Exadata Service, then follow this documentation:
SQL Developer User's Guide > 1. SQL Developer Concepts and Usage > 1.15 Using the Cart.
Note: Becuase you have a standard connection to your cloud service, via SSH Tunneling, then you follow the SQL Developer documentation. The documentation for the Database Schema Service is specific to that service, as it utilizes the Secure FTP server to transfer the files.You need to load the following database objects into the SQL Developer Cart:
- Table DEMO_MILESTONES - Including data
- Table DEMO_PROJECTS - Including data
- Table DEMO_TASKS - Including data
- Table DEMO_TEAM_MEMBERS - Including data
- Trigger BIU_DEMO_MILESTONES
- Trigger BIU_DEMO_PROJECTS
- Trigger BIU_DEMO_TASKS
- Trigger BIU_DEMO_TEAM_MEMBERS
Note: You do not need to include the package DEMO_PROJECTS_DATA_PKG as the data will be included in the SQL Developer cart.
B-2 : Migrating using Application Express Only
The SQL Workshop within Application Express provides all of the tools required for migrating database objects and data. However, you will need to perform more steps to accomplish this task than simply using the SQL Developer Cart, and dragging and dropping database objects.
-
Preparing the Database Objects and Data Files
-
Log into your current Application Express development environment.
-
Use SQL Workshop to create a script file, for creating the table definitions.
Click SQL Workshop.
Click Utilities.
-
Locate Generate DDL. Click Generate DDL.

-
Click Create Script.

Verify the Schema name is correct, and click Next.
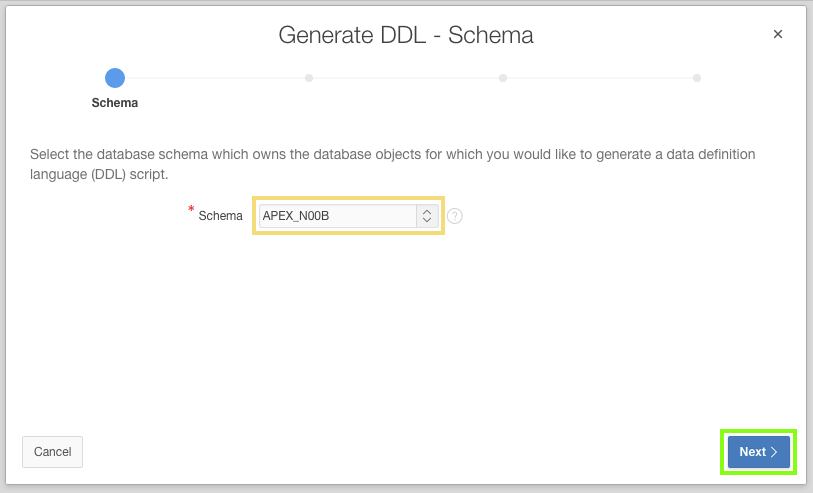
For Output select Save As Script File, and for Object Type check Table.
Click Next.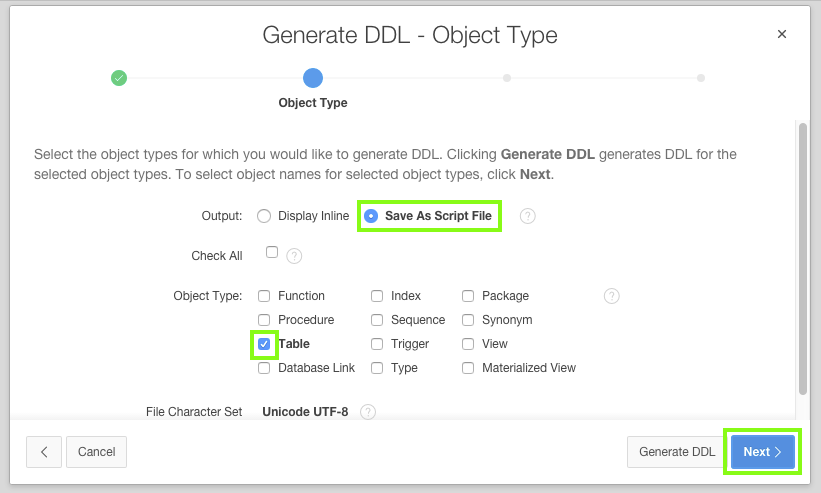
Select the following tables:
- DEMO_MILESTONES
- DEMO_PROJECTS
- DEMO_TASKS
- DEMO_TEAM_MEMBERS
Click Generate DDL.

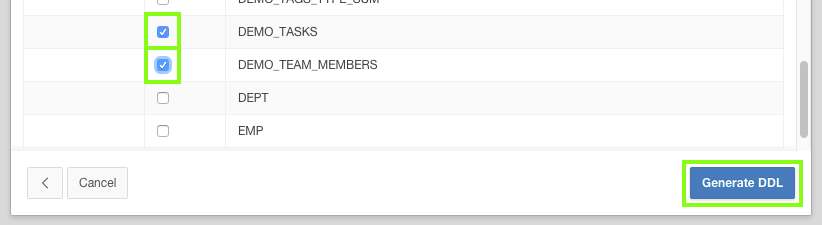
For Script Name, enter a meaningful name. Optionally enter a description.
Click Create Script.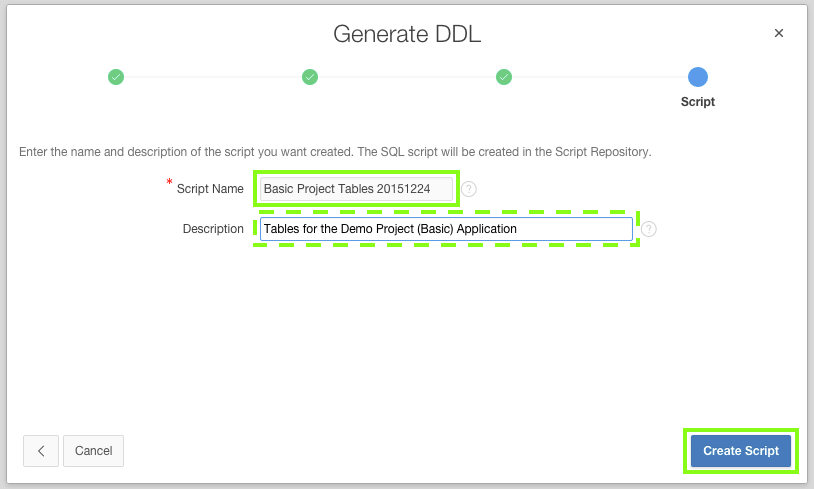
After a short wait, generally less than a minute, you will be returned to SQL Scripts. You will see the scripts that were uploaded earlier, then the page will refresh and will show the new script just created.
Click the Edit icon (pencil) on the recently created script.
Click Download.
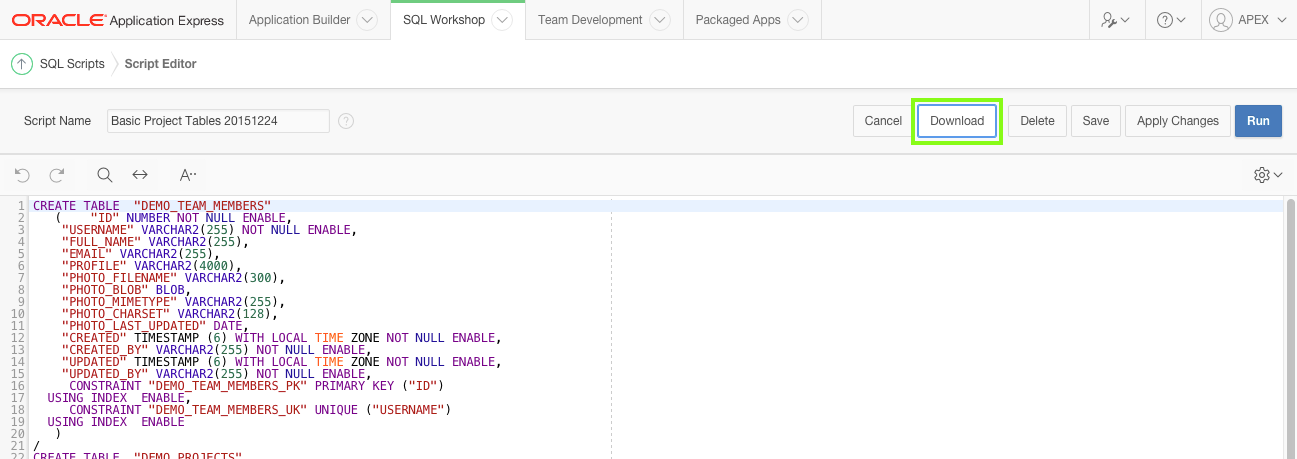
Click Save.
-
Use SQL Workshop to create a script file, for creating the trigger definitions.
Click SQL Workshop.
Click Utilities.Locate Generate DDL. Click Generate DDL.
Click Create Script.
Verify the Schema name is correct, and click Next.
For Output select Save As Script File, and for Object Type check Trigger.
Click Next.
Select the following triggers:
- BIU_DEMO_MILESTONES
- BIU_DEMO_PROJECTS
- BIU_DEMO_TASKS
- BIU_DEMO_TEAM_MEMBERS
Click Generate DDL.
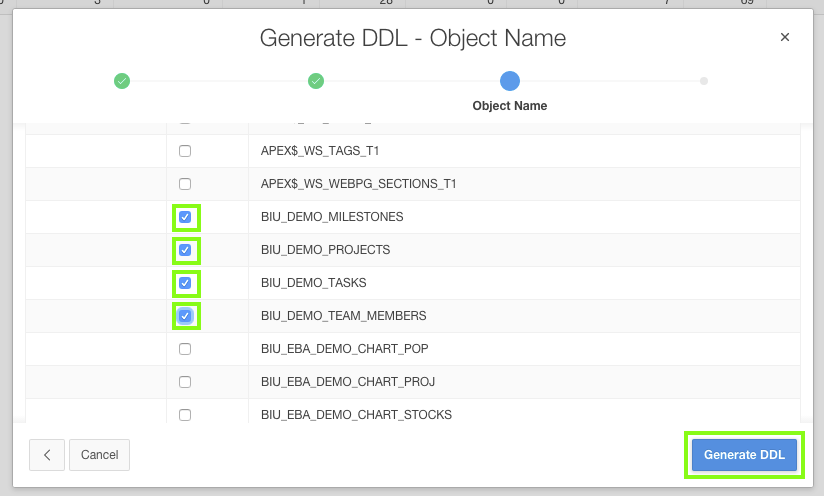
For Script Name, enter a meaningful name. Optionally enter a description.
Click Create Script.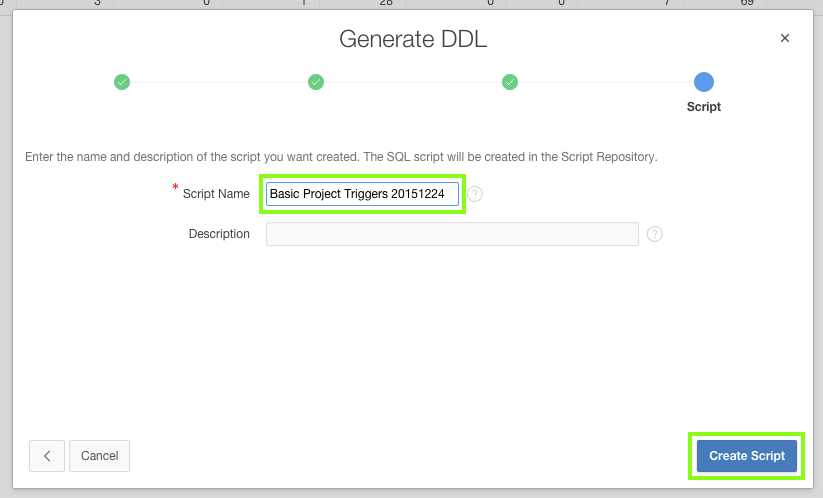
After a short wait, generally less than a minute, you will be returned to SQL Scripts. You will see the scripts that were uploaded earlier, then the page will refresh and will show the new script just created.
Click the Edit icon (pencil) on the recently created script.
Click Download.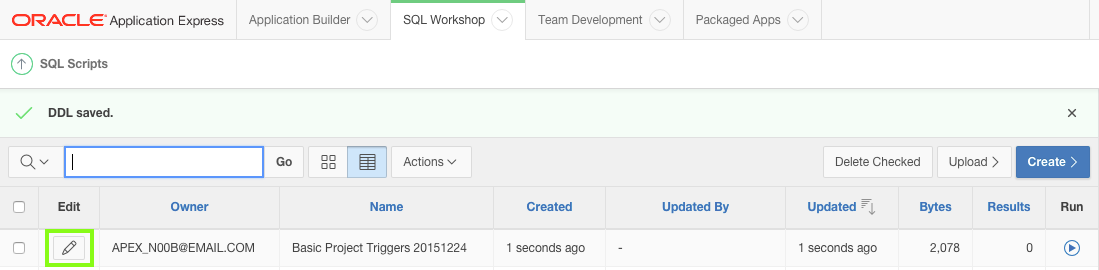

Click Save.
-
Use SQL Workshop to create XML files for your data.
In the Application Express main toolbar, click the SQL Workshop down arrow ( ↓ ), select Utilities and then select Data Workshop.
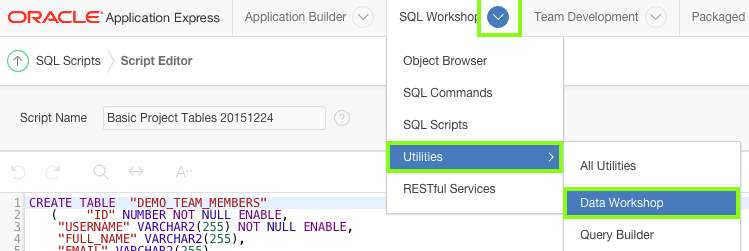
-
Under Data Unload locate to XML. Click to XML.

Verify the value for Table Owner is the correct schema.
For Table select DEMO_MILESTONES.
For Columns click on ID, hold down the Ctrl key, and then click on UPDATED_BY, such that all of the columns are selected.
Click Unload Data.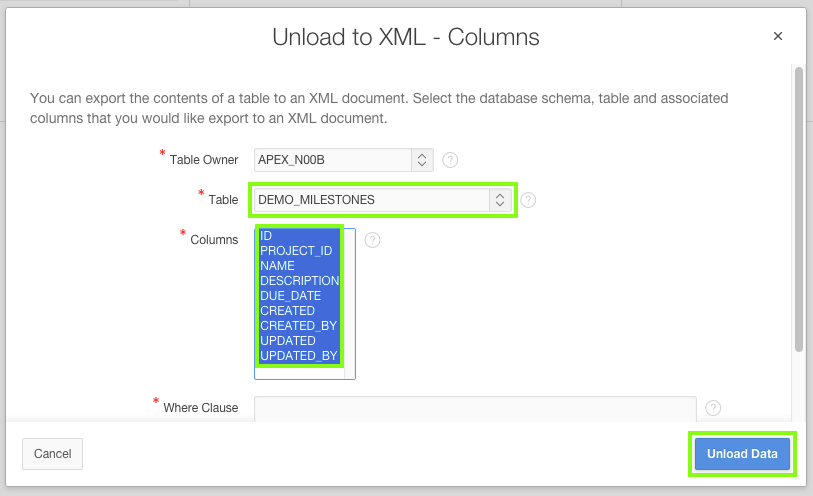
For Save As enter a meaningful name.
Click Save.
After saving the file you will be returned to the Unload to XML - Columns dialog.
For Table select DEMO_PROJECTS.
For Columns click on ID, hold down the Ctrl key, and then click on UPDATED_BY, such that all of the columns are selected.
Click Unload Data.For Table select DEMO_TASKS.
For Columns click on ID, hold down the Ctrl key, and then click on UPDATED_BY, such that all of the columns are selected.
Click Unload Data.
Note: You will need to scroll down in the list of columns to see the UPDATED_BY column.For Table select DEMO_TEAM_MEMBERS.
For Columns click on ID, hold down the Ctrl key, and then click on UPDATED_BY, such that all of the columns are selected.
Click Unload Data.
Note: You will need to scroll down in the list of columns to see the UPDATED_BY column.Click Cancel, to exit the dialog.
-
-
Recreating the Database Objects and Migrating the Data
-
Log into your target Application Express development environment.
-
Use SQL Workshop to load and run the script file, for creating the table and trigger definitions.
Click SQL Workshop.
Click SQL Scripts.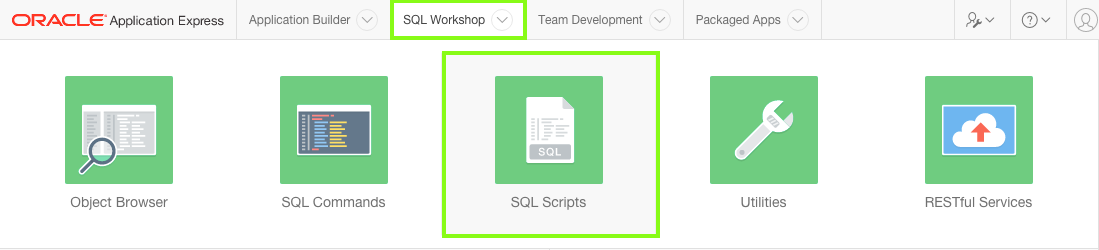
-
Upload the script to create the tabes first.
Click Upload.
For File, click Choose File. In the operating system File Browser, navigate to the subdirectory where you saved the table script file.
Locate the table script file, and double-click the file or click the file and then click Open.
Click Upload.

-
Click the Run icon to the right of the script you uploaded.

Click Run Now.
-
Click the View Results icon for the script you just ran.

At the bottom of the results page you should see "9" Statements Processed, "9" Successful, and "0" With Errors.
-
Upload the script to create the triggers.
Click Upload.
For File, click Choose File. In the operating system File Browser, navigate to the subdirectory where you saved the table script file.
Locate the table script file, and double-click the file or click the file and then click Open.
Click Upload.
-
Click the Run icon to the right of the script you uploaded.
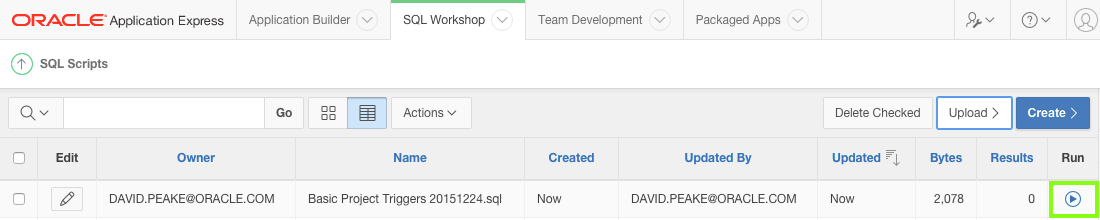
Click Run Now.
-
Click the View Results icon for the script you just ran.

At the bottom of the results page you should see "8" Statements Processed, "8" Successful, and "0" With Errors.
-
Currently the tables you created do not have any data. Use the XML files you created to populate the tables.
Note: The order in which the tables are populated is crucial, to ensure referential integrity does not prevent records loading.
For example, loading any records into DEMO_PROJECTS before loading the records into DEMO_TEAM_MEMBERS will fail, as the ASSIGNEE column in DEMO_PROJECTS must correspond to an existing record in DEMO_TEAM_MEMBERS.In the Application Express main toolbar, click the SQL Workshop Down Arrow ( ↓ ), select Utilities and then select Data Workshop.
Under Data Load, locate XML Data. Click XML Data.

Verify the value for Schema is correct.
For Table, select DEMO_TEAM_MEMBERS. For File, click Choose File, locate the file for DEMO_TEAM_MEMBERS, and double-click the file or click the file and then click Open.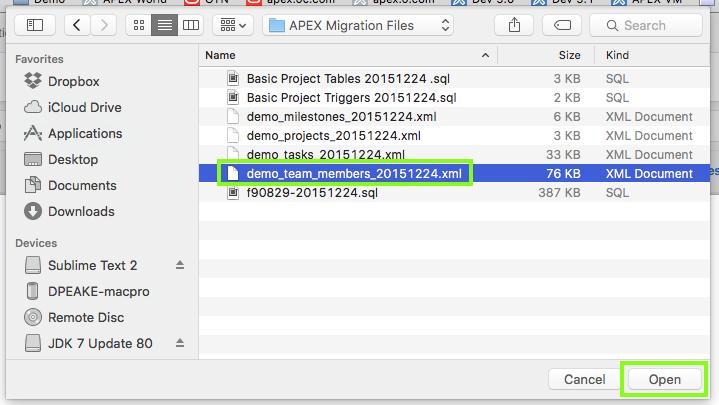
Click Load Data.
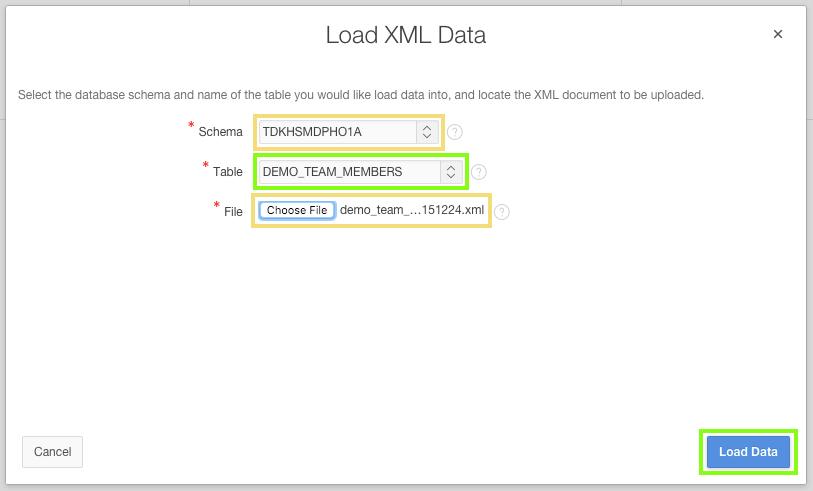
Under Data Load, click XML Data.
For Table, select DEMO_PROJECTS. For File, click Choose File, locate the file for DEMO_PROJECTS, and double-click the file or click the file and then click Open.Under Data Load, click XML Data.
For Table, select DEMO_MILESTONES. For File, click Choose File, locate the file for DEMO_MILESTONES, and double-click the file or click the file and then click Open.Under Data Load, click XML Data.
For Table, select DEMO_TASKS. For File, click Choose File, locate the file for DEMO_TASKS, and double-click the file or click the file and then click Open. -
Review the tables in SQL Workshop > Object Browser to ensure the data has loaded successfully in all four tables.
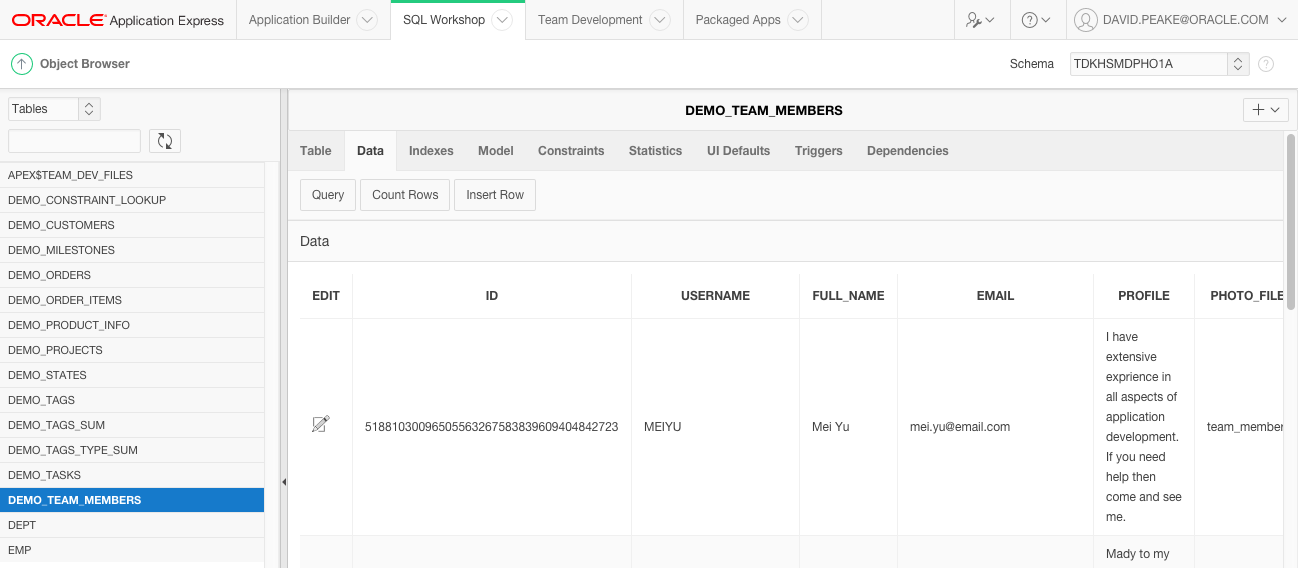
-
- Can you connect to the Oracle Database schema in the current environment?
-
Test the Migrated Application
The target development environment should now have everything you need to continue developing the application.
Note: Before running the application, especially if you are using an Oracle Database Cloud Service, you may need to create a runtime user.
In the main Application Express Toolbar, click Administration (on the right), and select Manage Users and Groups.
Click Create User, enter the same username you use in the current development environment.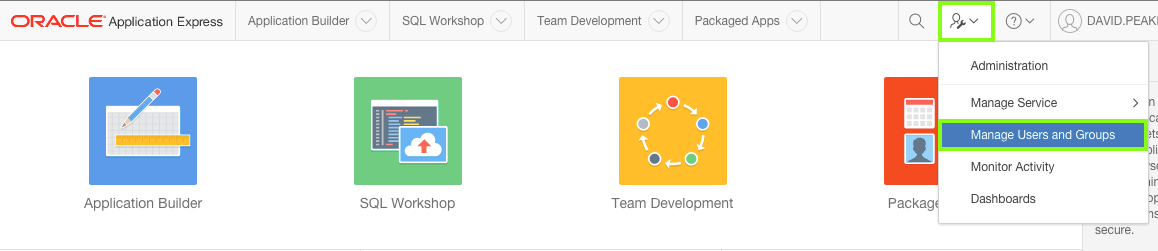
In the Application Builder Home Page, click the Run icon for the Demo Projects application.
Note: If the My Outstanding Tasks report has no data in your target environment, this is caused by logging into the runtime application with a different username to the one used in your current development environment. Go to Administration and create a new user.

To navigate this Oracle by Example tutorial, note the following:
- Topic List:
- Click a topic to navigate to that section.
- Expand All Topics:
- Click the button to show or hide the details for the sections. By default, all topics are collapsed.
- Hide All Images:
- Click the button to show or hide the screenshots. By default, all images are displayed.
- Print:
- Click the button to print the content. The content that is currently displayed or hidden is printed.
To navigate to a particular section in this tutorial, select the topic from the list.